
Classic side part
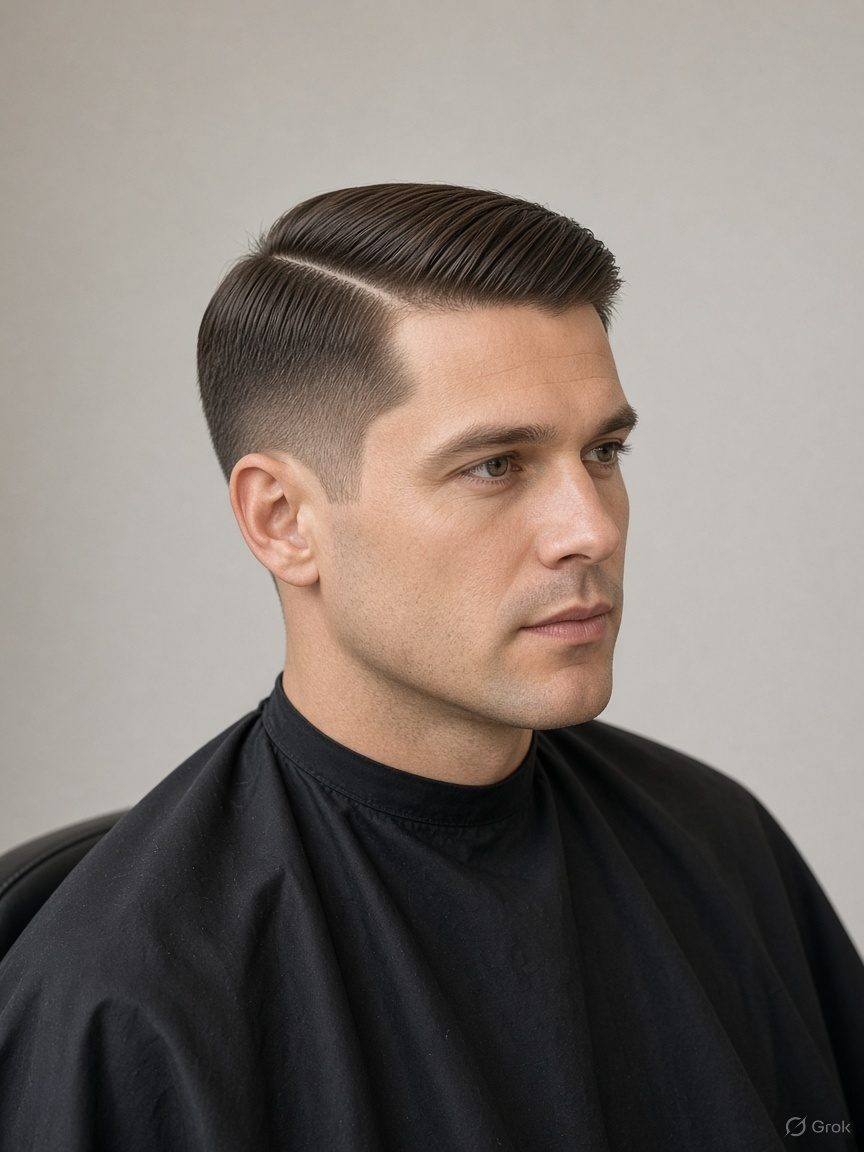
The classic side part is the reference shape for every other cut in this chapter: the top is left at 5 to 8 cm, combed to one side, and the sides are tapered rather than clipped close. Straight and gently wavy hair sit best, and the length must match the texture. Keep 5 to 6 cm on fine hair so the top does not collapse, and 7 to 8 cm on coarse hair so it can be combed flat. A round face gains height from the lift at the front, and a long face needs the part placed further out so the sweep adds width. The cut takes 20 to 40 minutes, and the consultation sits inside that time.
Cut the hair damp and find the part before you cut anything, because the head already has a direction and it will win. Comb the line with a tail comb from the front hairline to the crown, then measure the top from the front hairline back to 5 to 8 cm, as agreed. Set a taper guideline at the sideburn and above the ear, and blend up from it with the clipper or the shears. Blow-dry with the comb following the part. Heat stays at 120 to 140 C on fine hair, 150 to 170 C on medium hair and 175 to 190 C on coarse hair, never above 200 C. Oil is not a heat protectant.
- 1. Consult on dry hair, ask where he has worn the part before, and check the crown whorl before the cape goes on.
- 2. Show the part with a comb, combing the wet line from the front hairline to the crown and letting him hold the hand mirror.
- 3. Set the taper guideline at the sideburn and above the ear, and keep it visible for the whole cut.
- 4. Agree the top length in centimetres, 5 to 6 on fine hair and 7 to 8 on coarse hair, and measure it at the front.
- 5. Check both sides in the mirror at eye level before blending the second side, so the two sides match.
- 6. Keep the neckline natural and follow the head shape rather than cutting a straight bar across it.
- 7. Dry check the part, the top and both tapers, and look at the crown under direct overhead light.
- 8. Rebook in 3 to 4 weeks, because the taper and the neckline show regrowth first.
Salon example: Suresh's trained part
Suresh, a bank clerk in his thirties, came in with straight medium hair and a photo of a classic side part at about 7 cm. I checked the dry fall first and found his hair already trained to his left, with a small whorl at the crown that opened toward the front. We agreed the part 3 cm from the centre on his left, the top at 7 cm, and a taper that started at the sideburn and finished just above the ear. I cut the top damp, blended the taper with the clipper and the shears, and dried it with the comb following the part. The line sat flat without paste, and he rebooked in four weeks. I wrote 7 cm and the part position on his card.
Caution: Do not cut the top shorter than 5 cm on fine hair unless he agrees to a different finish, because a short fine top will not stay combed to one side.
Left side part taper
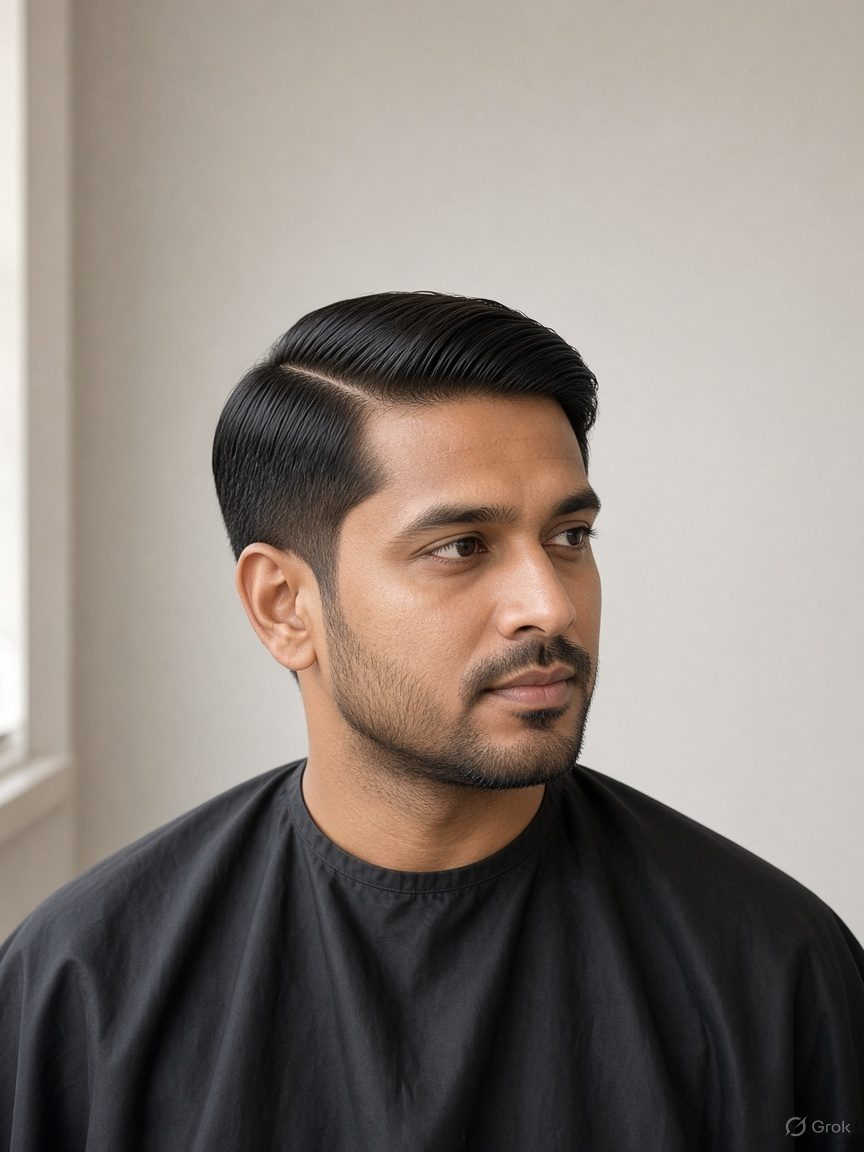
A left side part taper puts the part on the client's left side and keeps the top at about 6 cm, so the longer hair falls to his right and the sides sit close. The part normally sits 3 to 4 cm from the centre, not on the centre line, because a centre part changes the whole shape of the face. Check the dry fall before the cape: most men already have a side their hair wants to take, and fighting it costs him five minutes every morning. Straight and wavy hair both work here, and fine hair needs the 6 cm respected so the sweep does not fall flat. The cut takes 20 to 40 minutes.
Work from behind the chair, where his left is your left, and comb the part line from the front hairline to the crown with a tail comb. Leave the top at 6 cm, measured at the front hairline, and keep the heavier side no more than 1 cm longer than the short side, or the head looks tilted. Set the taper guideline at the sideburn and above the ear, then blend upward in small steps. Blow-dry from the part toward his right. Heat is 120 to 140 C on fine hair, 150 to 170 C on medium hair and 175 to 190 C on coarse hair, never above 200 C, and oil is not a heat protectant.
- 1. Consult on dry hair, ask which side he parts on and what his hair does when he wakes up.
- 2. Show the part with a comb, placing the wet line 3 to 4 cm from the centre on his left and showing it in the hand mirror.
- 3. Set the taper guideline at the sideburn and above the ear, and check both heights before blending.
- 4. Agree the top at about 6 cm and measure it at the front hairline, not at the crown.
- 5. Check both sides in the mirror at eye level, remembering that the mirror reverses his left and right.
- 6. Keep the neckline natural and clean, following the head shape instead of cutting a bar.
- 7. Dry check the part line, the long sweep and both tapers, and look at the front from his eye level.
- 8. Rebook in 3 to 4 weeks, because a taper loses its edge before the top looks long.
Salon example: Ravi's left part
Ravi, a school teacher in his forties, wanted a left side part with the top at about 6 cm and a clean taper. I checked the dry fall and found a strong whorl at the back crown that pushed the hair forward on his right, so a part further out on his left would have fought it. We agreed the part 4 cm from the centre, the top at 6 cm, and a taper that started at the sideburn and finished at the top of the ear. I cut the top damp at 6 cm, blended the taper in small steps, and dried the sweep toward his right. The front lifted without paste, and he rebooked in three weeks. I wrote the 6 cm and the 4 cm part position on his card.
Caution: Do not place the part closer than 3 cm to the centre on a long face, because the sweep will lose the width that balances the face.
Right side part taper
A right side part taper is the mirror of the left version, with the part on his right and the top at about 6 cm, so the longer hair falls to his left. It suits a man who combs with his right hand and pushes the hair across as he styles, because the finished shape then follows his own habit instead of working against it. Check the front right hairline before you comb the line: a cowlick there can lift the part within an hour. If the hair fights, move the part 1 cm further out rather than cutting the cowlick short. The service takes 20 to 40 minutes.
Comb the part line from the front hairline to the crown and keep it straight, with no curve at the back. Keep the top at 6 cm and the heavier side only slightly longer than the short side. Set the taper guideline at the sideburn and above the ear, blend it upward, and check the fade height above each ear from the front. Blow-dry the hair across to his left, lifting the root only at the front. Heat is 120 to 140 C on fine hair, 150 to 170 C on medium hair and 175 to 190 C on coarse hair, never above 200 C. A light paste is enough to hold the sweep.
- 1. Consult on dry hair, watch which hand he uses to push the hair back, and check the front right hairline for a cowlick.
- 2. Show the part with a comb, placing the wet line on his right about 3 to 4 cm from the centre.
- 3. Set the taper guideline at the sideburn and above the ear, and keep the two sides at the same height.
- 4. Agree the top at about 6 cm and measure it at the front, not by eye at the crown.
- 5. Check both sides in the mirror at eye level, and compare the taper height above each ear.
- 6. Keep the neckline natural and follow the head shape, with no straight bar at the back.
- 7. Dry check the part, the sweep and the neckline, then look at the crown under direct light.
- 8. Rebook in 3 to 4 weeks, because the right side usually shows regrowth first on a right-handed client.
Salon example: Imran's right part
Imran, a sales manager in his thirties, asked for a right side part with the top at 6 cm. I checked the dry fall and found a cowlick at the front right that pushed a small tuft up whenever the part was combed close to it. He wanted the part exactly where the photo showed it, 2 cm from the centre. I refused that position, because the tuft would have stood up every morning and he would have blamed the cut. We agreed the part 4 cm from the centre, the top at 6 cm with the cowlick section left 1 cm longer, and a taper finishing at the top of the ear. I dried the section with the growth, and the tuft lay down. He rebooked in four weeks, and I wrote the 4 cm part position and the longer cowlick section on his card.
Caution: Do not cut a front cowlick short to force the part, because the hair will stand up again within a day and the line will look broken.
Hard part
A hard part is a clean comb line, not a shaved line. The name comes from the sharp change of direction at the parting, not from a clipper groove cut into the scalp. Men often arrive with a photo of a shaved line and ask for the same, so explain what a shaved line does: it grows back in 4 to 6 days as dark stubble, it can look like a scar on a bare temple, and it commits him to a clipper every week. The comb line is cut and trained instead, with the top kept at 6 to 8 cm and enough length on both sides for the hair to lie down. The service takes 20 to 40 minutes.
Comb the line with a tail comb from the front hairline to the crown, and follow the direction the hair already takes. Keep at least 6 cm at the part line, because a short top cannot hold a comb line and will lift within an hour. Do not run the clipper along the part and do not notch it with the corner of the blade. Taper the sides, blend at the temple, and dry the top with the comb laid along the line, first one side and then the other. Heat stays at 120 to 140 C on fine hair, 150 to 170 C on medium hair and 175 to 190 C on coarse hair, never above 200 C. A light pomade holds the line.
- 1. Consult on dry hair, ask what he means by a hard part, and show him the difference between a comb line and a shaved line.
- 2. Show the part with a comb, drawing the wet line with a tail comb and letting him see the direction change in the mirror.
- 3. Set the taper guideline at the sideburn and above the ear, and blend it without touching the part line.
- 4. Agree the top at 6 to 8 cm and keep at least 6 cm along the part, because the line needs length to lie flat.
- 5. Check both sides in the mirror at eye level, and confirm that the line runs straight from front to crown.
- 6. Keep the neckline natural and clean, with no bar and no clipper line at the nape.
- 7. Dry check the comb line under direct light, then look at the top from the front and both sides.
- 8. Rebook in 3 to 4 weeks, and explain that the line is trained with a comb, not cut into the scalp.
Salon example: Deepak's comb line
Deepak, an engineer in his twenties, came in with a photo of a shaved hard part and asked for the clipper line. He had straight, medium-coarse hair and a top of about 7 cm. I explained that a shaved line would grow back as stubble in 4 to 6 days and could look like a scar at his temple, and that it would need a clipper every week. He agreed to a comb line instead. I kept 7 cm on the top, blended the taper at the sideburn, and dried the line with the comb first on one side and then the other. The part sat sharp without any hair removed, and he rebooked in four weeks. I wrote 7 cm and comb line only on his card.
Caution: Never shave the part line into the scalp, because the stubble grows back dark within a week and can look like a scar.
Comb over
A comb over keeps the hair longer on one side and combs it across the top, and the whole shape depends on the weight left at the thin temple. The temple corner is usually the first place a man loses density, so that corner carries the cover and must not be thinned, layered short or clipped close. The top runs 7 to 9 cm on the heavy side and slightly shorter on the receiving side, so the hair crosses without a step. Coarse hair covers with less length, while fine hair needs the extra centimetre and a gentler taper. Check the crown under direct light before agreeing, because a comb over cannot cover a bare crown. Allow 20 to 40 minutes.
Cut the top damp, parting where he wears it, and keep the front on the heavy side long enough to reach the far temple. Leave 1 to 2 cm more at the temple corner than the rest of that side, and blend the taper below it with the shears rather than the clipper. Do not thin the corner with thinning shears. Blow-dry the hair across the head from the part, lifting the root only at the front. Heat is 120 to 140 C on fine hair, 150 to 170 C on medium hair and 175 to 190 C on coarse hair, never above 200 C. Oil is not a heat protectant, so apply a protectant before the brush.
- 1. Consult on dry hair, check the temple density and the crown under direct light, and say plainly what the comb over can and cannot cover.
- 2. Show the part with a comb, drawing the line where he wears it and combing the heavy side across in the mirror.
- 3. Set the taper guideline below the temple corner, and blend with the shears so the corner keeps its weight.
- 4. Agree the top at 7 to 9 cm on the heavy side and keep the temple corner 1 to 2 cm longer than the rest.
- 5. Check both sides in the mirror at eye level, and look at the crossing point where the hair meets the far temple.
- 6. Keep the neckline natural and clean, and follow the head shape at the nape.
- 7. Dry check the cover, the temple corner and the crossing point, and look at the crown under direct light.
- 8. Rebook in 3 to 4 weeks, because the corner weight that makes the cover work grows out first.
Salon example: Manoj's temple cover
Manoj, a government clerk in his fifties, asked for a comb over with the top at 8 cm. I checked the dry fall and found his left temple corner noticeably thinner than the right, and the crown still had good density. He wanted the sides clipped to a number 1, the same as a photo he had saved. I refused the number 1 at the left temple, because clipping that corner would have removed the only weight covering the recession and left a pale patch. We agreed the top at 8 cm on the heavy side, the corner 2 cm longer, and a taper that started low and blended with the shears. I dried the hair across from the part. The cover sat flat with no gap, and he rebooked in three weeks. I wrote 8 cm, the 2 cm corner and shears only at the temple on his card.
Caution: Do not thin or clip the thin temple corner, because that corner is what carries the cover and it will not grow back in time for the next visit.
Comb over with a taper
A comb over with a taper uses the same top as the plain comb over and takes the sides down short, so the head looks tidy without losing the cover. The taper is the risk in this shape. A short side leaves little room to blend, and if the transition from short side to long top happens in one step, a shelf appears above the ear. Blend the taper over 3 to 4 cm and keep the temple corner longer than the side below it. Straight and wavy hair both work, and coarse hair takes a short taper well because it still looks dark at 3 mm. The cut takes 20 to 40 minutes.
Set the taper guideline at the sideburn and a second guideline above the ear, then blend the two with the clipper lever and finish with the shears. Keep the top at 7 to 9 cm, with the corner 1 to 2 cm longer than the side. Comb the top across from the part and dry it in that direction, lifting the root only at the front. Heat is 120 to 140 C on fine hair, 150 to 170 C on medium hair and 175 to 190 C on coarse hair, never above 200 C. On fine hair choose one guard longer than you think, because fine hair shows the scalp at a short length. Light pomade holds the cross.
- 1. Consult on dry hair, check the temple corner and the crown, and agree how short the sides will go.
- 2. Show the part with a comb, combing the heavy side across and showing the taper height on both sides in the mirror.
- 3. Set the taper guideline at the sideburn and a second above the ear, then blend over 3 to 4 cm.
- 4. Agree the top at 7 to 9 cm and keep the temple corner 1 to 2 cm longer than the side.
- 5. Check both sides in the mirror at eye level, and compare the taper height above each ear.
- 6. Keep the neckline natural, and follow the head shape rather than cutting a straight bar.
- 7. Dry check the taper, the corner and the crossing point, and look at the blend from the front.
- 8. Rebook in 3 to 4 weeks, because the short taper loses its shape first.
Salon example: Arvind's short taper
Arvind, a hardware shop owner in his forties, wanted a comb over with the sides taken short for the summer. He had coarse, dark hair and a receding left temple, and the top measured 8 cm. He asked for a number 1 at the sideburn blending straight into the top. I refused that, because the jump from 3 mm to 8 cm would have left a visible shelf above the ear and exposed the temple corner. We agreed a number 2 at the sideburn, a number 3 above the ear, a shear blend over 3 cm, and the corner left 2 cm longer. I dried the top across from the part. The shelf was gone, the corner still covered, and he rebooked in three weeks. I wrote the guard numbers and the 2 cm corner on his card.
Caution: Do not blend a short taper into the top in one step, because the shelf above the ear will show on every visit.
Side sweep
A side sweep carries the top across the forehead at about 6 cm, so the fringe crosses the brow on a diagonal instead of falling straight down. The part sits shallow, 1 to 2 cm from the natural line, and the hair moves as one piece from the part to the far temple. It suits straight and gently wavy hair, and it softens a square forehead because the diagonal breaks the hard line. Fine hair needs the full 6 cm to cross without separating, and coarse hair can carry 7 cm. Check the front hairline for a cowlick before you cut, because a sweep will expose it. The service takes 20 to 40 minutes.
Set the part first, then comb the top across the forehead and look at where the sweep ends at the far temple. Cut the front so the sweep reaches the far temple but not past the outer corner of the eye. Keep the inside corner soft with point cutting so the sweep does not look like a block. Taper the sides, and keep the receiving side slightly shorter than the heavy side. Blow-dry across the forehead with a brush, not straight down. Heat is 120 to 140 C on fine hair, 150 to 170 C on medium hair and 175 to 190 C on coarse hair, never above 200 C. Oil is not a heat protectant.
- 1. Consult on dry hair, check the front hairline and the cowlick direction, and ask how he wears the front now.
- 2. Show the part with a comb, drawing the shallow part and combing the sweep across the forehead in the mirror.
- 3. Set the taper guideline at the sideburn and above the ear, and keep the receiving side slightly shorter.
- 4. Agree the top at about 6 cm and cut the front so the sweep ends at the far temple.
- 5. Check both sides in the mirror at eye level, and look at the sweep from the front and the side.
- 6. Keep the neckline natural and clean, with no bar and no clipper line at the nape.
- 7. Dry check the sweep with his eyes open and closed, and confirm it does not reach the eye.
- 8. Rebook in 3 to 4 weeks, because the front of a sweep grows into the eye first.
Salon example: Kabir's forehead sweep
Kabir, a photographer in his thirties, asked for a side sweep at 6 cm with the fringe crossing his brow. He had straight hair and a cowlick at the front left that pushed the hair up when it was combed forward. He wanted the sweep to start at the centre so it covered more of the forehead. I refused the centre start, because the cowlick would have lifted the sweep at the part and left a gap. We agreed the part 2 cm from the centre, the top at 6 cm, and the front cut to end at the far temple without crossing the outer eye corner. I point-cut the inside corner, dried the sweep across, and checked it with his eyes open. The fringe sat diagonally with no lift, and he rebooked in three weeks. I wrote the 2 cm part and the 6 cm top on his card.
Caution: Do not cut the sweep to reach past the outer eye corner, because it will touch the eye within two weeks and he will comb it aside.
Short slick back
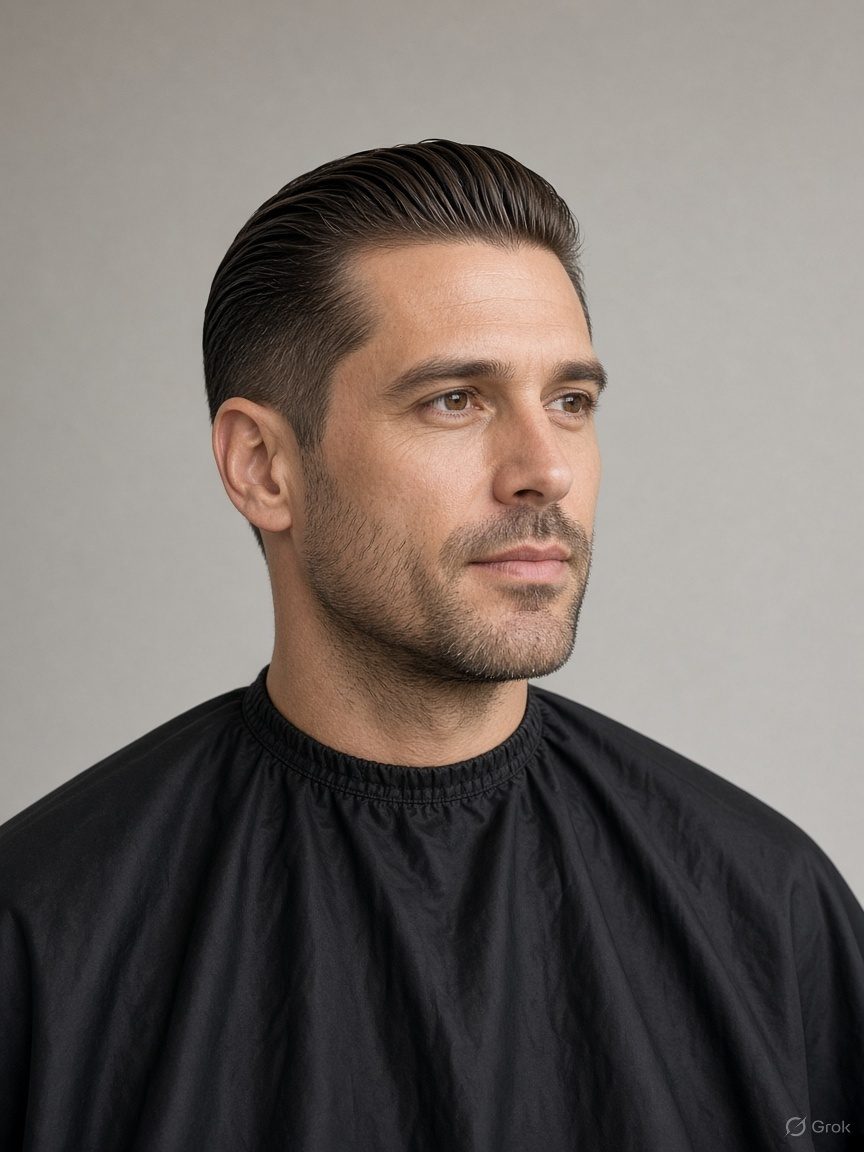
A short slick back keeps the top at 5 to 7 cm and dries it straight back from the hairline, with the sides tapered and the neckline clean. It is the shortest version of the slick family and the easiest to maintain, because the top needs only a comb and a small amount of product. The front is cut about 1 cm longer than the crown so the hair can be pushed back without standing up. A receding hairline shows more when the hair is slicked back, so check the hairline and tell him before you start rather than after. Straight and medium hair work best, and coarse hair needs a stronger hold. The cut takes 20 to 40 minutes.
Cut the top damp at 5 to 7 cm, keep the front 1 cm longer than the crown, and taper the sides from the sideburn to the top of the ear. Dry the hair back from the hairline with a brush, lifting the root at the front, then lay the top flat with the comb. If he arrives with oil applied overnight, two shampoos are needed before the blow-dry, because oil keeps the top from holding and oil is not a heat protectant. Heat is 120 to 140 C on fine hair, 150 to 170 C on medium hair and 175 to 190 C on coarse hair, never above 200 C. Finish with a small amount of pomade.
- 1. Consult on dry hair, check the hairline and the crown, and say how much of the hairline the slick back will show.
- 2. Show the part with a comb, or show the no-part line, and comb the top straight back in the mirror.
- 3. Set the taper guideline at the sideburn and above the ear, and blend it upward in small steps.
- 4. Agree the top at 5 to 7 cm, with the front 1 cm longer than the crown.
- 5. Check both sides in the mirror at eye level, and look at the taper height above each ear.
- 6. Keep the neckline natural and clean, following the head shape with no straight bar.
- 7. Dry check the top from the front and both sides, and confirm the front lifts instead of standing.
- 8. Rebook in 3 to 4 weeks, and explain that the top stays flat only while it is short at the sides.
Salon example: Sanjay's short slick
Sanjay, a gym owner in his thirties, asked for a short slick back at 5 cm. He had thick straight hair, a strong front hairline and a small cowlick at the crown. He came in with coconut oil in his hair and said he wanted the slick finish today. I shampooed twice, because oil on the scalp keeps the top from holding and oil is not a heat protectant. We agreed the top at 6 cm, the front 1 cm longer, and a taper from the sideburn to just above the ear. I dried the hair back with a brush, laid it flat with the comb, and used a small amount of pomade. The front lifted cleanly, and he rebooked in four weeks. I wrote 6 cm and the two-shampoo rule on his card.
Caution: Do not blow-dry over oil, because the heat will not set the hair and the oil is not a heat protectant.
Medium slick back
A medium slick back leaves the top at 8 to 12 cm and keeps the collar short, so the hair reads as a deliberate style rather than long hair. The extra length gives weight and a smooth surface, but it also takes longer to dry and needs more product. The nape stays 1 to 2 cm above the collar, which keeps the shape sharp from behind and stops the back from curling over the shirt. Medium to thick straight hair carries it best, and fine hair can wear 8 cm with a light taper. Wavy hair will not sit flat without a brush and heat. The cut takes 20 to 40 minutes.
Cut the top damp at 8 to 12 cm, with the front 1 cm longer than the crown, and take the nape to 1 to 2 cm above the collar. Taper the sides and blend the temple so the top does not sit on a short wall. Dry in two stages: lift the root first until the hair is about 80 percent dry, then brush the top back and lay it with the comb. Shampoo twice if he arrives with oil from overnight, because a slick finish will not hold over oil. Heat is 120 to 140 C on fine hair, 150 to 170 C on medium hair and 175 to 190 C on coarse hair, never above 200 C.
- 1. Consult on dry hair, check the length at the nape against the collar, and agree the top length in centimetres.
- 2. Show the part with a comb, or the no-part line, and comb the top back so he sees how the length falls.
- 3. Set the taper guideline at the sideburn and above the ear, and blend the temple without a step.
- 4. Agree the top at 8 to 12 cm, with the front 1 cm longer than the crown.
- 5. Check both sides in the mirror at eye level, and compare the taper height and the temple blend.
- 6. Keep the nape 1 to 2 cm above the collar and follow the head shape at the neckline.
- 7. Dry check the top and the nape, and confirm the back does not curl over the collar.
- 8. Rebook in 3 to 4 weeks, because the nape and the taper grow out before the top looks long.
Salon example: Nitin's collar length
Nitin, a lawyer in his forties, asked for a medium slick back with the top at 10 cm. He had straight, medium-thick hair and a nape that curled outward when it reached his collar. He wanted the back left long, the same as the top, because he liked the look from the side. I refused the long nape, because the curl would have pushed over the collar within two weeks and made the shape look untidy. We agreed the top at 10 cm, the front 1 cm longer, and the nape 2 cm above the collar. I dried the top in two stages and laid it back with the comb, and the nape sat clean. He rebooked in four weeks. I wrote the 10 cm top and the 2 cm nape clearance on his card.
Caution: Do not leave the nape longer than 2 cm above the collar, because it will curl over the shirt and spoil the flat back.
Wet-look slick
A wet-look slick uses the same cut as a slick back, and the wet appearance is a finish, not a haircut. This is where clients get confused: they ask for a wet cut and expect the shape itself to look wet. The cut stays at 5 to 12 cm on top, tapered at the sides, and the shine comes from gel or pomade worked through damp hair. Do not cut the top shorter or add steps to imitate the look, because the cut will then be wrong on the days he wears it dry. The shape has to work both wet and dry. The cut takes 20 to 40 minutes, and the finish sits inside that time.
Cut the top as a slick back, dry it back, and then finish it. Shampoo twice if he arrives with oil from overnight, because the gel will not hold over oil and the surface will separate. Towel the hair to damp, not dry, and comb the product through from the front to the back in one direction. Do not over-apply at the crown, because a heavy patch reads as greasy rather than wet. If he wants volume, blow-dry the root first at 120 to 140 C on fine hair, 150 to 170 C on medium hair and 175 to 190 C on coarse hair, never above 200 C. Oil is not a heat protectant.
- 1. Consult on dry hair, explain that the wet look is a finish and not a different cut, and agree the top length in centimetres.
- 2. Show the part with a comb, combing the top back wet and letting him see the line the cut will hold.
- 3. Set the taper guideline at the sideburn and above the ear, and blend it before the finish goes on.
- 4. Agree the top at 5 to 12 cm, matching the slick back he wants, and keep the front 1 cm longer.
- 5. Check both sides in the mirror at eye level, and look at the surface from the front and the side.
- 6. Keep the neckline natural and clean, and dry it fully so the finish does not run down the neck.
- 7. Dry check the cut without product first, then apply the finish and check that the shape still reads.
- 8. Rebook in 3 to 4 weeks, and tell him the cut is the same whether he wears it wet or dry.
Salon example: Farhan's wet finish
Farhan, a restaurant manager in his twenties, brought a photo of a wet-look slick and asked for the cut to look wet every day. He had coarse, dark hair and a top of about 6 cm. He asked me to cut the top to 4 cm so the gel would sit closer and look wetter. I refused that, because the shorter top would have looked flat and spiky on the days he wore it dry, and the wet look is a finish, not a cut. We agreed the top at 6 cm, the front 1 cm longer, and a taper at the sides. I cut and dried it, then worked gel through damp hair from front to back. The surface looked wet without a heavy patch, and he rebooked in four weeks. I wrote 6 cm and finish only on his card.
Caution: Do not cut the top shorter to fake a wet look, because the shape must still work on the days he wears it dry.
Gentleman's cut

A gentleman's cut is a neat side part with a scissor taper and a natural neckline, cut for a conservative, formal look. The sides are taken down with the shears over the comb rather than the clipper, so there are no clipper marks and the edge stays soft. The neckline follows the head shape, with no bar and no squared corners, because a natural line looks correct at a wedding, an interview and a board meeting. The top stays at 6 to 8 cm, enough to comb flat and hold the part. Fine and medium hair suit it best, and coarse hair needs the sides blended gently. The service takes 20 to 40 minutes.
Comb the part from the front hairline to the crown and keep it straight. Cut the top to 6 to 8 cm, with the front slightly longer, then scissor-taper the sides over the comb, working upward from the sideburn in small zones. Keep the neckline natural, following the shape of the head, and finish the sideburns at the middle of the ear. Dry the top with the comb following the part and the sides flat against the head. Heat is 120 to 140 C on fine hair, 150 to 170 C on medium hair and 175 to 190 C on coarse hair, never above 200 C. Use light pomade only, because a heavy product makes a formal cut look greasy.
- 1. Consult on dry hair, ask about the occasion and his workplace, and agree how conservative the sides should be.
- 2. Show the part with a comb, drawing the wet line and combing the top flat so he sees the finished direction.
- 3. Set the taper guideline with the shears over the comb at the sideburn, and keep the cut soft rather than tight.
- 4. Agree the top at 6 to 8 cm, with the front slightly longer than the crown.
- 5. Check both sides in the mirror at eye level, and compare the scissor taper above each ear.
- 6. Keep the neckline natural with no bar and no squared corners, and finish the sideburns at the middle of the ear.
- 7. Dry check the part, the top and the neckline, with the collar up and then down.
- 8. Rebook in 3 to 4 weeks, because a scissor taper softens before it looks untidy.
Salon example: Anil's interview cut
Anil, an accountant in his fifties, came in for a gentleman's cut before a job interview. He had straight, medium hair, a neat hairline and a top of 7 cm, and he wanted the sides clipped short like his usual barber did. I explained that a clipper would leave a harder edge and visible lines, and that a scissor taper would look softer and still neat. He agreed. We kept the top at 7 cm, cut the sides over the comb from the sideburn upward, kept the neckline natural and finished the sideburns at the middle of the ear. I dried the part flat and used a small amount of pomade. The cut looked formal without looking tight, and he rebooked in three weeks. I wrote 7 cm, scissor taper and natural neckline on his card.
Caution: Do not square the neckline or cut a bar on this shape, because a natural line is what makes a formal cut look correct.
Business crop
A business crop keeps the top at about 4 cm and the shape tidy, with no tall quiff and no long front. It is the practical choice for a man who wants a short cut that looks the same after a wash, and it works in an office where a longer style would draw attention. The fringe sits slightly forward and flat, the sides are tapered low, and the neckline stays natural. Straight, wavy and coarse hair all work, and coarse hair looks especially good because the texture reads at 4 cm. Fine hair needs the 4 cm respected, or the scalp will show at the front. The cut takes 20 to 40 minutes.
Cut the top to about 4 cm with the clipper comb or the shears, keeping the fringe slightly longer than the crown and flat rather than lifted. Taper the sides low, starting at the sideburn, and blend to just above the ear. Do not build a quiff at the front, because the crop is meant to sit flat. Dry the top forward and flat with the comb. Heat is 120 to 140 C on fine hair, 150 to 170 C on medium hair and 175 to 190 C on coarse hair, never above 200 C. A small amount of matte paste keeps the fringe in place without shine, and a heavy product will make it look wet.
- 1. Consult on dry hair, agree the top at about 4 cm, and check that he wants no height at the front.
- 2. Show the part with a comb, or show the no-part line, and comb the fringe forward in the mirror.
- 3. Set the taper guideline at the sideburn and above the ear, and blend low so the crop stays tidy.
- 4. Agree the top at about 4 cm, with the fringe slightly longer than the crown and flat.
- 5. Check both sides in the mirror at eye level, and compare the taper height above each ear.
- 6. Keep the neckline natural and clean, with no bar and no squared corners.
- 7. Dry check the fringe, the top and both tapers, and confirm the front sits flat after drying.
- 8. Rebook in 3 to 4 weeks, because a 4 cm top loses its shape quickly.
Salon example: Rohit's flat crop
Rohit, a bank officer in his thirties, asked for a business crop at 4 cm with the front flat. He had coarse, dark hair and a cowlick at the front that lifted the fringe when it was cut short. He wanted a small quiff at the front to use the cowlick. I refused the quiff, because the crop is meant to sit flat and the height would have made it a different shape. We agreed the top at 4 cm, the fringe 1 cm longer than the crown and combed forward, and a low taper from the sideburn to just above the ear. I dried the fringe forward with the comb, and the cowlick lay into the fringe instead of lifting. He rebooked in three weeks. I wrote 4 cm, flat fringe and low taper on his card.
Caution: Do not build height at the front of a business crop, because a quiff turns the cut into a different shape and needs daily styling.
Professional taper
A professional taper keeps office length on top at about 5 cm and a low taper at the sides, so the cut reads as neat without looking like a short crop. The low taper starts at the sideburn and the nape and blends only to just above the ear, which leaves weight through the temple and keeps the head from looking narrow. It suits straight and wavy hair, and it is a good choice for a man whose temples are thinning, because the taper does not climb into the corner. The top stays long enough to comb to one side or straight back. The cut takes 20 to 40 minutes and grows out cleanly for 3 to 4 weeks.
Cut the top damp to about 5 cm, keeping the front slightly longer so it can be combed. Set the taper guideline at the sideburn and the nape, then blend upward only to just above the ear, with the clipper lever or the shears. Keep weight at the temple corner and do not carry the taper higher on one side. Dry the top to one side or straight back, as he wears it, and keep the sides flat. Heat is 120 to 140 C on fine hair, 150 to 170 C on medium hair and 175 to 190 C on coarse hair, never above 200 C. Use a light pomade and comb the taper line clean.
- 1. Consult on dry hair, ask how he wears the top and check the temple corners before agreeing the taper height.
- 2. Show the part with a comb, combing the top in his usual direction and showing the low taper on both sides.
- 3. Set the taper guideline at the sideburn and the nape, and blend only to just above the ear.
- 4. Agree the top at about 5 cm, with the front slightly longer than the crown.
- 5. Check both sides in the mirror at eye level, and compare the taper height above each ear.
- 6. Keep the neckline natural and clean, following the head shape with no bar.
- 7. Dry check the top, the taper and the neckline, and confirm the temple corner still has weight.
- 8. Rebook in 3 to 4 weeks, because the low taper holds its line longer than a short fade.
Salon example: Prakash's office taper
Prakash, a civil servant in his forties, asked for a professional taper with the top at 5 cm. He had straight, medium hair and a receding left temple that he wanted covered. He asked for the taper to go high above the ear, because he thought it would look sharper. I refused the high taper, because it would have climbed into the thin corner and left the recession open. We agreed the top at 5 cm, the front slightly longer, and a low taper that stopped just above the ear with the lever, plus shears at the corner. I dried the top to his right and kept the sides flat. The temple still had weight and the taper looked clean. He rebooked in four weeks. I wrote 5 cm, low taper and corner weight on his card.
Caution: Do not carry a taper above the top of the ear on a thinning temple, because it will expose the recession the top length is covering.
Scissor-over-comb taper
A scissor-over-comb taper takes the sides down with the shears and the comb only, with no clipper at all. The comb lifts the hair and the shears cut across the top of the teeth, so the length changes in small steps and the edge stays soft. It suits a man who dislikes the clipper sound or the hard edge a blade leaves, and it is the better choice on fine hair, on a sensitive scalp and on a client who has had a clipper rash. The result grows out with a softer line than a fade and looks tidy for 3 to 4 weeks. The cut takes 20 to 40 minutes, usually at the longer end, because the technique is slower than a clipper.
Start at the sideburn with the comb flat against the head and cut across the top of the teeth, then work upward in zones, keeping the comb angle the same on both sides. Use sharp shears and close them fully, because a half-close crushes the hair instead of cutting it. Check the blend by looking across the head at eye level, not by looking straight at one side. Keep the neckline natural and finish the sideburns at the middle of the ear. Dry the top in the direction he wears it. Heat is 120 to 140 C on fine hair, 150 to 170 C on medium hair and 175 to 190 C on coarse hair, never above 200 C, and oil is not a heat protectant.
- 1. Consult on dry hair, ask whether he has had clipper rash or dislikes the clipper, and agree the taper height.
- 2. Show the part with a comb, combing the top in his direction and showing the soft taper line on both sides.
- 3. Set the taper guideline with the comb at the sideburn, and keep the comb angle the same on both sides.
- 4. Agree the top in centimetres, usually 5 to 7 cm, and keep the front slightly longer.
- 5. Check both sides in the mirror at eye level, and compare the soft edge above each ear.
- 6. Keep the neckline natural with the shears, and finish the sideburns at the middle of the ear.
- 7. Dry check the taper and the top, and look along the side of the head for steps.
- 8. Rebook in 3 to 4 weeks, because a soft scissor edge grows out faster than a clipped fade.
Salon example: Vinod's softer edge
Vinod, a retired teacher in his sixties, asked for a scissor-over-comb taper because the clipper gave him a rash on his neck. He had fine, straight hair and a top of 6 cm, and his scalp was clear apart from two small marks at the nape from an old cut. I used the comb and shears only, starting at the sideburn and working upward in small zones, and kept the comb angle the same on both sides. He asked for a number 1 edge at the neckline, and I explained that a clipper would bring back the rash. We kept the neckline natural with the shears, left the top at 6 cm and dried it to his right. The line looked soft and even, and he rebooked in four weeks. I wrote shears only and natural neckline on his card.
Caution: Do not use a clipper on a client with a history of clipper rash, because the blade will irritate the same skin again.
Side part for a receding temple
A side part for a receding temple keeps weight at the temple corner and avoids combing the hair tight back. The recession usually starts at the two corners, and the corner is also where the remaining hair is softest, so it can cover the hollow if it is left long enough and combed forward or across. Cutting that corner short, tapering into it or pulling the top straight back exposes the recession and makes the forehead look wider. Place the part behind the recession, not through it, so the line does not draw the eye to the thinnest point. Top length runs 6 to 7 cm, with the corner 1 to 2 cm longer. The cut takes 20 to 40 minutes.
Cut the top damp to 6 to 7 cm, and leave the temple corner 1 to 2 cm longer than the rest of the top. Taper the sides low and keep the clipper off the corner. Comb the corner forward and across, following the direction of the growth, and dry it that way with a brush, using the lowest heat that works: 120 to 140 C on fine hair, 150 to 170 C on medium hair and 175 to 190 C on coarse hair, never above 200 C. Use a matte product rather than a wet one, because shine draws attention to a thin area. Oil is not a heat protectant.
- 1. Consult on dry hair, check both temple corners and the hairline, and agree what the cut can and cannot cover.
- 2. Show the part with a comb, placing the line behind the recession and combing the corner forward in the mirror.
- 3. Set the taper guideline low at the sideburn, and keep the clipper off the temple corner.
- 4. Agree the top at 6 to 7 cm and leave the corner 1 to 2 cm longer than the rest.
- 5. Check both sides in the mirror at eye level, and compare how each corner falls.
- 6. Keep the neckline natural and clean, following the head shape with no bar.
- 7. Dry check the corner under direct light, and confirm it is combed forward rather than back.
- 8. Rebook in 3 to 4 weeks, because the corner loses its cover first.
Salon example: Ashok's corner cover
Ashok, a shopkeeper in his forties, asked for a side part and told me he was worried about his left temple. I checked the dry fall and found the corner soft but not bare, with the recession about 2 cm deep. He wanted the top combed straight back, the way he had worn it for years. I explained that combing it back would have opened the corner and made the recession look deeper, and he agreed to comb it forward instead. We kept the top at 7 cm, left the corner 2 cm longer, placed the part behind the recession and tapered the sides low with the shears at the corner. I dried the corner forward. It covered the hollow without looking heavy, and he rebooked in three weeks. I wrote 7 cm, 2 cm corner and part behind the recession on his card.
Caution: Do not comb a receding temple tight back, because it pulls the corner flat and shows the recession at its widest.
Side part for a thin crown
A side part for a thin crown keeps the top solid and avoids short layers over the crown. Short layers lift the hair away from the scalp and expose the thin area, and the same happens with a clipper taken over the crown or with heavy thinning. Keep the crown at 7 to 8 cm, cut it with the shears, and let the length lie flat so it covers the scalp instead of standing up. The part stays where he wears it, and the sides taper low so the shape keeps weight through the middle. Straight and wavy hair work best, and a matte finish looks fuller than a wet one. The cut takes 20 to 40 minutes.
Cut the top damp to 7 to 8 cm, leave the crown solid and do not run the clipper over it. Taper the sides low, keep the temple corners with weight and blend without a step. Dry the hair flat over the crown with the comb, using low heat: 120 to 140 C on fine hair, 150 to 170 C on medium hair and 175 to 190 C on coarse hair, never above 200 C. Do not lift the root at the crown, because lift separates the hair and shows the scalp. Use a small amount of matte paste on the surface only. Check the crown under direct overhead light before you finish.
- 1. Consult on dry hair, check the crown under direct overhead light, and agree that the crown will stay long.
- 2. Show the part with a comb, drawing the line where he wears it and combing the crown flat in the mirror.
- 3. Set the taper guideline low at the sideburn, and keep the clipper off the crown entirely.
- 4. Agree the top at 7 to 8 cm, with the crown solid and no short layers.
- 5. Check both sides in the mirror at eye level, and look at the crown from the front and from above.
- 6. Keep the neckline natural and clean, following the head shape with no bar.
- 7. Dry check the crown under direct light, and confirm the hair lies flat instead of lifting.
- 8. Rebook in 3 to 4 weeks, because the sides grow out while the crown length must be preserved.
Salon example: Mahesh's solid crown
Mahesh, a factory supervisor in his fifties, asked for a side part with the top at 7 cm. He had medium hair and a thin patch at the crown that he covered by combing the hair flat. He asked for the crown layered short so it would look thicker. I explained that short layers lift, and lift exposes the scalp, so the opposite would happen. We agreed the top at 8 cm with the crown solid, the sides tapered low, and no clipper on the crown. I cut the crown with the shears and dried it flat with the comb, without lifting the root, and used a small amount of matte paste. The patch looked covered, and he rebooked in four weeks. I wrote 8 cm, solid crown and no clipper on the crown on his card.
Caution: Do not layer or thin a thin crown, because short layers lift the hair and expose the scalp you are trying to cover.
Side part with a widow's peak
A side part with a widow's peak places the part off the peak, so the pointed hairline falls into the heavier side instead of being split down the middle. The hair at a peak grows forward and down, and a centre part cuts it into two horns that stand apart. Move the part 1 to 2 cm to one side of the point, comb the peak into the longer side and let it lie with the growth. The top stays at 5 to 7 cm, with a little extra at the front so the peak can be directed. Straight, wavy and coarse hair all work, and fine hair needs the front respected. The cut takes 20 to 40 minutes.
Comb the wet part line 1 to 2 cm to one side of the peak, then comb the peak hair down and across into the heavy side. Keep the front 1 cm longer than the crown so the peak can be directed, and taper the sides low. Do not cut the peak hair short to flatten it, and do not force a centre part through the point. Dry the front with the comb following the growth, using low heat: 120 to 140 C on fine hair, 150 to 170 C on medium hair and 175 to 190 C on coarse hair, never above 200 C. Finish with a light pomade so the peak stays in the sweep.
- 1. Consult on dry hair, find the peak, and check which way the peak hair falls before the cape goes on.
- 2. Show the part with a comb, placing the wet line 1 to 2 cm to one side of the peak and showing it in the mirror.
- 3. Set the taper guideline at the sideburn and above the ear, and blend without touching the peak.
- 4. Agree the top at 5 to 7 cm, with the front 1 cm longer so the peak can be directed.
- 5. Check both sides in the mirror at eye level, and confirm the peak falls into the heavy side.
- 6. Keep the neckline natural and clean, following the head shape with no bar.
- 7. Dry check the peak and the part, and look at the front from his eye level.
- 8. Rebook in 3 to 4 weeks, because the peak shows a centre split first when the top grows.
Salon example: Devendra's peak
Devendra, a railway clerk in his thirties, came in with a strong widow's peak and asked for a centre part, because a photo he liked showed one. I checked the dry fall and saw that the peak hair grew forward and down on both sides, so a centre part would have split it into two points. I explained this and he agreed to a side part instead. We placed the part 2 cm to his right of the peak, kept the top at 6 cm with the front 1 cm longer, and tapered the sides low. I combed the peak down and across into the heavy side and dried it with the growth. The peak lay flat inside the sweep instead of standing apart. He rebooked in four weeks, and I wrote the 2 cm offset and the 6 cm top on his card.
Caution: Do not cut a centre part through a widow's peak, because the point will split into two horns and stand away from the head.
Side part around a cowlick
A side part around a cowlick puts the part away from the spot where the hair insists on standing, so the cowlick falls into the longer side instead of lifting at the line. Find the cowlick on dry hair, because it hides when the hair is wet and combed flat. Look for a small swirl or a tuft that rises against the comb. Put the part on the opposite side of it, leave the cowlick section 1 to 2 cm longer than the hair around it, and comb it with the direction it wants to take. Cutting it short to force it flat only makes it stand up sooner. The top runs 6 to 7 cm. The cut takes 20 to 40 minutes.
Comb the part line on the far side of the cowlick, then comb the cowlick section with its natural direction and check that it does not lift at the part. Keep the section 1 to 2 cm longer than the surrounding hair and blend the length into the top rather than cutting it to match. Taper the sides low and keep the clipper away from the cowlick. Dry that section last, with the comb following the growth, at 120 to 140 C on fine hair, 150 to 170 C on medium hair and 175 to 190 C on coarse hair, never above 200 C. A small amount of paste holds the direction without weighing it down.
- 1. Consult on dry hair, find the cowlick and note which way the tuft falls, then agree the part position.
- 2. Show the part with a comb, placing the line on the far side of the cowlick and showing the tuft in the mirror.
- 3. Set the taper guideline at the sideburn and above the ear, and keep the clipper away from the cowlick.
- 4. Agree the top at 6 to 7 cm and leave the cowlick section 1 to 2 cm longer than the hair around it.
- 5. Check both sides in the mirror at eye level, and confirm the cowlick does not lift at the part line.
- 6. Keep the neckline natural and clean, following the head shape with no bar.
- 7. Dry check the cowlick last, and look at it from the front and from above.
- 8. Rebook in 3 to 4 weeks, and explain that the cowlick will lift again as the section grows.
Salon example: Harish's cowlick
Harish, a software tester in his twenties, asked for a side part with the line exactly on the left, as in a photo. On dry hair I found a cowlick at the front left that stood up whenever the part was combed beside it. He wanted the section cut short so it would stop lifting. I refused that, because cutting a cowlick short makes it stand up sooner, not later. We moved the part 2 cm to his right of the cowlick, kept the top at 7 cm, left the cowlick section 2 cm longer and tapered the sides low. I combed the tuft with its growth and dried it last. It lay into the sweep without paste, and he rebooked in four weeks. I wrote the cowlick position, the 2 cm offset and the 7 cm top on his card.
Caution: Do not cut a cowlick short to flatten it, because the shorter it is, the sooner it stands up again.
Side part with two crowns
A side part with two crowns needs a longer top and no skin fade, because two whorls push the hair in two directions and a short top splits between them. The whorls usually sit on either side of the back crown, and each sends hair away from its centre, so the middle of the crown can open. Keep the top at 7 to 8 cm, leave the crown solid and taper the sides low. A skin fade removes the weight at the sides and makes the two whorls look sharper, so keep at least a number 1 at the shortest point. Straight and wavy hair work best. The cut takes 20 to 40 minutes.
Cut the top damp to 7 to 8 cm, keep the crown solid and do not run the clipper over either whorl. Taper the sides low, starting at the sideburn, and stop at just above the ear, or a little lower on the second side if the whorls sit unevenly. Comb the top from the crown forward and across, following each whorl rather than against it, and dry it in that direction. Heat is 120 to 140 C on fine hair, 150 to 170 C on medium hair and 175 to 190 C on coarse hair, never above 200 C. Use a light product, because heavy product separates the hair at the whorls and shows the scalp.
- 1. Consult on dry hair, find both whorls, and check how the hair opens between them before the cape goes on.
- 2. Show the part with a comb, placing the line where he wears it and combing the crown forward in the mirror.
- 3. Set the taper guideline low at the sideburn, and keep the clipper off both whorls and off the crown.
- 4. Agree the top at 7 to 8 cm, solid at the crown, with no skin fade at the sides.
- 5. Check both sides in the mirror at eye level, and look at the crown from above under direct light.
- 6. Keep the neckline natural and clean, following the head shape with no bar.
- 7. Dry check both whorls from the front and from above, and confirm the middle does not open.
- 8. Rebook in 3 to 4 weeks, because the crown must stay long while the sides are kept neat.
Salon example: Ajay's two whorls
Ajay, a delivery manager in his thirties, came in with thick wavy hair and two crowns that opened in the middle. He asked for a skin fade at the sides and a top of 5 cm, because he wanted a sharper shape. I refused both, because the skin fade would have taken the weight that supports the crown, and a 5 cm top would have split between the two whorls. We agreed the top at 8 cm, a solid crown, and a taper that stopped at a number 1 above the ear. I combed the crown forward and across, following each whorl, and dried it in that direction. The middle stayed closed and the sides looked clean. He rebooked in three weeks. I wrote 8 cm, solid crown, no skin fade and number 1 taper on his card.
Caution: Do not skin fade the sides on a double crown, because the missing weight makes both whorls open and the scalp show.
Side part that needs no product
A side part that needs no product is a promise about his morning, not about the photo. If the picture in his hand needs paste every day to look that way, the honest answer is a shorter crew, because a side part at 6 to 8 cm will fall flat without something to hold it. Test it in the chair: wash the hair, comb it into the part, dry it with no product and let him look. If the top falls or the part closes, offer a crew at 3 to 4 cm with a taper, which holds its shape after a towel dry. The cut takes 20 to 40 minutes.
Decide from density, texture and the cowlick, not from what he says he will do. Fine hair with a strong cowlick will not hold a product-free side part at 7 cm. Medium hair with a weak cowlick can hold 5 cm if the front is cut to sit with the growth and the sides are tapered. Cut the top to the length the hair can hold without product, dry it with a comb and no product, and let him see the result before you finish. Heat is 120 to 140 C on fine hair, 150 to 170 C on medium hair and 175 to 190 C on coarse hair, never above 200 C. State the choice plainly and write it on his card.
- 1. Consult on dry hair, ask how many minutes he gives his hair each morning, and test what the top does without product.
- 2. Show the part with a comb, combing the line and demonstrating how it closes when the hair is not held.
- 3. Set the taper guideline at the sideburn and above the ear, whether the finish is a part or a crew.
- 4. Agree a length the hair can hold, 5 cm for a soft part or 3 to 4 cm for a crew, and say why.
- 5. Check both sides in the mirror at eye level after drying with no product.
- 6. Keep the neckline natural and clean, following the head shape with no bar.
- 7. Dry check the whole shape without product, then ask him to comb it himself in the mirror.
- 8. Rebook in 3 to 4 weeks, because a product-free shape depends on the cut staying short.
Salon example: Rakesh's honest crew
Rakesh, a site supervisor in his forties, brought a photo of a side part with a high, smooth front and said he wanted it without any product. He had fine hair, a cowlick at the front right and about four minutes each morning. I washed the hair, combed the part and dried it with no product: the top fell within a minute and the part closed. I showed him in the mirror and offered two choices, a 5 cm part that would need paste or a crew at 4 cm that would hold after a towel dry. He chose the crew. We cut the top to 4 cm, tapered the sides low and kept the fringe flat. It held without product, and he rebooked in three weeks. I wrote 4 cm crew and no product needed on his card.
Caution: Do not promise a product-free side part at 7 cm, because the hair will fall and he will blame the cut, not the missing paste.
This is a Nandu Nai textbook. It is a private brand book, not a government licence, and it does not give the right to give medical treatment.