
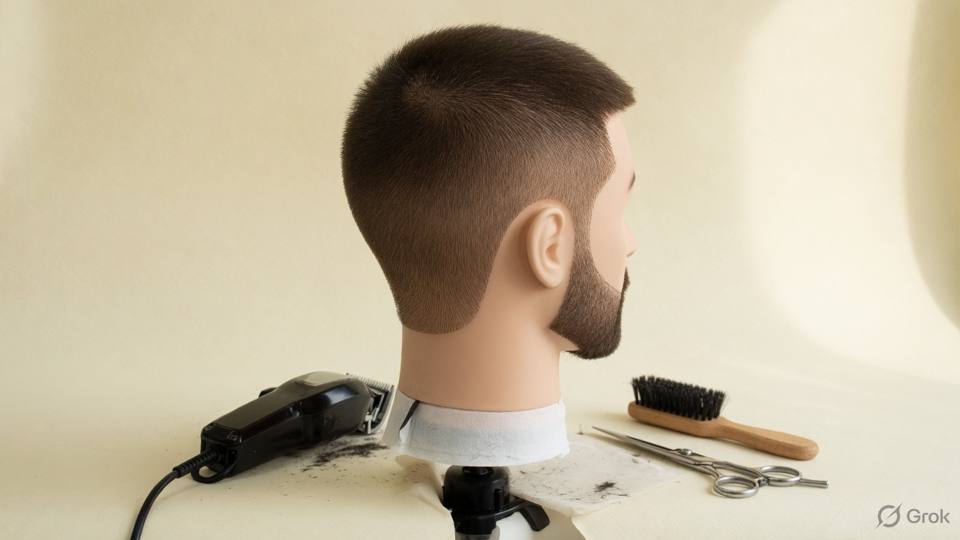
Guards as a guide
A guard is a plastic or metal attachment that sets a nominal cutting length on clippers. The common numbers are 0.5 guard at about 1.5 millimetres, 1 guard at about 3 millimetres, 2 guard at about 6 millimetres, 3 guard at about 10 millimetres and 4 guard at about 13 millimetres. These numbers describe the guard, not the result. The same guard on fine hair looks shorter because the scalp shows through, and on coarse hair looks longer because each strand stands up. Density changes the read as much as length. Treat the number as a starting point and check the result on the head.
Guards change the cut because they set the base for the blend. A number one on the sides with a number three on top gives a clear contrast; a number two with a number three gives a soft, close shape. On a client with a receding hairline, a very short guard at the temple exposes the recession, so keep more length at the corner or leave the hairline soft. On a client with a double crown, a short guard at the crown shows the whorl as a gap, so leave weight there. On a client with coarse hair, the guard may leave a bristly surface that needs scissor-over-comb to soften. The guard is the foundation; the blend is the finish.
The procedure starts with the consultation and the guard chart. Ask for the last photo or the date of the last cut. Repeat the client's usual cut, then change one thing, not three. Set the guideline at the nape or the sideburn with the longest guard you plan to use on the sides, then work up. Check both sides in the mirror before you blend the top. Keep the clipper flat against the head and move it in overlapping strokes, against the direction of growth first if the hair is long, then with the growth for the finish. Do not push the corner of the blade into the head; the corner is what cuts a line where you did not want one.
A men's cut takes twenty to forty minutes, and the guard work is only part of it. Leave time for the blend, the neckline, the beard line and the top. If the client wants a skin fade, the work starts at the nape and moves up in stages, and the difference between the stages is what makes the fade look gradual. If the client wants a longer top, cut the top first or last, but keep enough length for the client's own styling. A top that needs product every morning will fail for a client who washes and leaves. Ask how the client styles the top before you decide the length. The guard number is the easy part; the shape is the judgement.
- Ask for the last photo or the last cut date before you choose a guard.
- Use 0.5 guard at about 1.5 mm, 1 at 3 mm, 2 at 6 mm, 3 at 10 mm and 4 at 13 mm.
- Check the guard on fine and coarse hair, because the same number reads differently.
- Set the guideline at the nape or the sideburn with the longest side guard.
- Work up in overlapping strokes and keep the clipper flat against the head.
- Check both sides in the mirror before you blend the top.
- Keep weight at a receding temple and at a double crown.
- Leave enough top length for the client's own styling routine.
Salon example: Sameer's first skin fade
Sameer, a sales executive, wants a skin fade for a wedding. He has thick, coarse hair that grows straight out at the sides and a small double crown. I ask for the last photo and see that he usually wears a number two on the sides and a number four on top. A skin fade would expose the double crown at the back if I took the top too short. I start at the nape with the clipper and work up in stages, keeping the crown at about ten millimetres. On the sides, I use a number one at the bottom and blend to a number three at the temple, leaving the temple corner longer because his hairline is receding slightly. I check both sides in the mirror before I touch the top. The top is cut with scissors to about four centimetres, enough for him to push back with a little cream. The fade takes thirty-five minutes and looks sharp without showing the crown. He also asks how often to come back, and I say every three to four weeks to keep the fade clean.
Caution: Do not use a short guard on a receding temple or a double crown without showing the client the result in the mirror first. Leave weight at the corner and at the crown, or the scalp will show.
Scissor-over-comb and blending
Scissor-over-comb is cutting only the hair that stands through the teeth of a comb. The comb lifts the hair away from the head at a consistent angle, and the shears cut the hair above the comb. It is the softest way to blend short sides, necklines and the transition into a fade. The comb angle is the key: hold it at the same angle through the section, and move it in small steps. If the angle changes, the blend line changes. Scissor-over-comb removes small amounts, so it is slower than a clipper, but it leaves a softer surface and it is easier to correct. On coarse hair, it is the difference between a cut that looks barbered and a cut that looks clipped.
Clipper-over-comb does the heavier removal. The comb lifts the hair and the clipper takes the length above it. Use it when the hair is long enough to comb up and you need to remove bulk quickly, then finish with scissors for softness. Do not gouge the blend line by pushing the clipper into the comb; let the comb control the length. Keep the comb clean, because hair caught in the teeth changes the angle. On the neckline, work from the centre out and check both sides. On the sides, work from the bottom up, following the shape of the head, and keep the blade flat as you reach the curve above the ear.
Blending is the art of making two lengths look like one. The blend line is the place where the short side meets the longer top, and it should be invisible from a normal distance. Start with the shorter length, then bring the longer length down to it in small steps. Check the blend with the head tilted, because the mirror hides the flat spot at the back. Use a hand mirror to look at the back of the head, and ask the client to tilt the chin down and then up. If you can see a step, take a small amount from the longer side, not the shorter side. A blend that is cut too low cannot be repaired without removing more length from the top.
The procedure is the same for a classic short back and sides and for a fade. Set the guideline, remove the bulk with the clipper, then blend with scissor-over-comb or clipper-over-comb, then check the neckline and the sides. Keep the comb angle consistent and the sections small. Do not cross the blend line with a guard that is too short. Finish with a light trim of the neckline and the ears, and check the shape from the front, the side and the back. If the client has a cowlick at the nape, leave a little more length there so the hair does not kick out. A men's cut is finished when the blend disappears, not when the clipper stops.
- Set the guideline first and remove the bulk with the clipper.
- Hold the comb at a consistent angle and cut only the hair above the teeth.
- Move the comb in small steps and keep the teeth clean.
- Use scissor-over-comb for softness and clipper-over-comb for heavier removal.
- Work the neckline from the centre out and the sides from the bottom up.
- Check the blend with the head tilted and a hand mirror at the back.
- Take more from the longer side if a step shows, never from the shorter side.
- Leave a little length at a nape cowlick so the hair does not kick out.
Salon example: Vikram's hard blend line
Vikram comes in with a short back and sides that has a visible line where the clipper stopped. The sides are a number one and the top is about five centimetres, and the line sits two centimetres above the ear. He says the previous cut looked fine for three days and then the line appeared. I set a new guideline lower and blend upward with scissor-over-comb, using a cutting comb at a consistent angle. I take small amounts and check with the hand mirror after every few passes. The line softens but does not disappear, because the top is not long enough to reach the short side without removing more length. I explain that the next cut should start the blend lower and keep the top slightly longer. I finish the neckline and the ears, and the shape looks even from the front and the side. He books four weeks ahead, and I write 'blend from the ear up, keep top 5 cm' on his card. He also asks whether he can stretch the cut to six weeks, and I say yes if he keeps the neckline tidy at home.
Caution: Do not cross the blend line with a shorter guard to hide a step. It removes the length you need to blend and leaves a hard line lower down; take small amounts from the longer side instead.
Beard line and the final shape
The beard line follows the jaw, not a ruler. A natural line runs along the jaw and softens toward the ear; a cleaned line is sharper but still follows the bone. Do not draw a straight line across the cheek, because the jaw is a curve and a straight line looks pasted on. On a round face, a slightly higher line at the side can lengthen the face; on a long face, a lower line adds width. The neckline should sit just above the Adam's apple, following the natural curve, not a deep squared scoop unless the client asks for one. Ask the client to tilt the head back and swallow to find the natural line before you cut.
The beard changes the haircut because it frames the same face. A short beard with a sharp line makes a short haircut look sharper; a full beard with a soft line balances a longer top. If the client has a patchy beard, do not cut a hard line through the patch; leave the length and blend the edge. If the client has a strong jaw, a lower neckline softens it; if the jaw is narrow, a slightly fuller beard adds width. The sideburn connects the beard to the haircut, so decide its length with the haircut, not after it. Sideburns end at the middle of the ear unless the client asks for another length.
The top is the last decision. Cut it with enough length for the client's own styling, and show the client how to put the product in. If the client does not style, do not leave a top that needs product every morning. A short textured top can be worn with a matte cream; a longer top needs a brush or a dryer. On fine hair, a short top exposes the scalp; on coarse hair, a short top stands up. Check the top against the sides from the front and the side, and make sure the silhouette is balanced. A good men's cut looks intentional without looking styled.
Finish with the details: the neckline, the ears, the sideburns and the beard line. Use a small trimmer or a razor for the edges, and keep the line clean without taking it too high. Wipe the neck and the ears, brush off the loose hair, and show the client the back with a hand mirror. Tell the client the rebook interval: three to four weeks for a short back and sides, because men's hair grows about one and a quarter centimetres a month. Write the guard numbers, the top length and the beard line on the card. The next visit should start from those notes, not from a guess.
- Ask the client to tilt the head back and swallow to find the natural neckline.
- Follow the jaw curve for the beard line and avoid a straight line across the cheek.
- Keep the neckline just above the Adam's apple, following the natural curve.
- End the sideburns at the middle of the ear unless the client asks otherwise.
- Decide the sideburn length together with the haircut, not after it.
- Leave enough top length for the client's own styling routine.
- Check the top against the sides from the front and the side.
- Book a short back and sides in 3 to 4 weeks and write the guard numbers on the card.
Salon example: Arif's beard and narrow jaw
Arif, a restaurant manager, has a patchy beard on the cheeks and a narrow jaw. He wants a short haircut and a sharp beard line for a family photograph. A high, hard cheek line would expose the patch and make the jaw look narrower. I trim the beard to about eight millimetres, follow the jaw curve with the trimmer, and leave the cheeks softer, blending the patch instead of cutting through it. The neckline sits just above the Adam's apple, and the sideburns end at the middle of the ear. For the haircut, I use a number two on the sides and leave four centimetres on top, enough for him to push back with a matte cream. I check the silhouette from the front and the side, and the beard adds width at the jaw instead of narrowing it. He sees the photograph on his phone and asks for the same next time. I write the lengths and the soft cheek line on his card. He also asks for a softer cheek line next time, and I note that beside the photograph.
Caution: Do not cut a hard cheek line through a patchy beard or take the neckline above the jaw curve. Leave length over the patch, follow the bone, and show the client the line before you finish.
This is a Nandu Nai textbook. It is a private brand book, not a government licence, and it does not give the right to give medical treatment.