
Skin fade crew
A skin fade crew keeps a short, flat top of 2 to 4 cm and takes the sides down to skin only at the lowest edge. It suits straight or slightly wavy hair with good density at the crown, because a short top exposes the scalp when the hair thins. The shape is tidy for work, quick to wash and easy to style with a towel dry and a small amount of product. A round face carries it well when the top keeps a little height, while a long face looks better with the top nearer 2 cm. Density, growth pattern and cowlicks decide how flat the top will sit, so the photo is a reference and not a promise.
Consult with dry hair and check the whole scalp under strong light before the cape goes on. Set the bottom guideline with a 0 or 0.5 blade along the nape and above the ears only, and keep that skin edge low instead of lifting it toward the parietal ridge. Work upward through 1, 2 and 3, opening the lever in small steps, and blend each step until no line shows. Cut the top at 2 to 4 cm with clipper comb or scissors, follow the natural growth, and check both sides at eye level. Trim the neckline and around the ears, then show the back in a hand mirror.
- 1. Consult with dry hair, agree the top at 2 to 4 centimetres, and confirm the client wants skin only at the lowest edge.
- 2. Check the scalp under strong light and stop if you see sores, lice, rings, pus or a sudden bald patch.
- 3. Set the bottom guideline at the nape and above both ears with a 0 or 0.5 blade, and keep that edge low.
- 4. Blend upward through 1, 2 and 3 in small lever steps until the sides look even.
- 5. Remove hard lines with a corner blade in short, light strokes, and never dig into the scalp.
- 6. Cut the top at 2 to 4 centimetres, follow the growth pattern and soften the front hairline.
- 7. Check both sides at eye level with the head straight, then repeat with the head tipped down.
- 8. Rebook in 2 to 3 weeks, because a skin edge grows out fast and loses its clean line.
Salon example: Arjun's skin fade crew
Arjun, a twenty-eight-year-old warehouse supervisor, asked for a crew cut with skin at the sides. His hair was straight and dense at the crown but thin at the temples, and the scalp showed no sores or patches under the lamp. I agreed a top of 3 cm and explained that the skin edge would stay at the nape and above the ears. I set the guideline with a 0.5 blade, then blended through 1, 2 and 3 with the lever opening slowly. The top was cut with the clipper comb, the front softened, and both sides matched at eye level. He rebooked for three weeks and said the shape held through two washes a day.
Caution: Never take the 0 blade above the lowest edge of the nape or the ear, because skin that high leaves a bald band under the parietal ridge.
Skin fade crop
A skin fade crop leaves 3 to 5 cm on top, cut with enough texture that it falls forward and sits slightly uneven on purpose. It suits straight and wavy hair with medium density and works well when the front hairline is strong but the crown is a little flat, because the forward fall hides thin spots. The skin edge stays at the bottom only, so the contrast is sharp but the scalp is not exposed high on the sides. A square jaw gains softness from the textured fringe, while a narrow face looks fuller when the top keeps width. The finish is casual, so the client must accept a slightly broken surface rather than a neat line.
Begin with dry hair and a scalp check, then mark the top length at 3 to 5 cm before any clipper touches the sides. Set the bottom guideline with a 0 or 0.5 blade at the nape and above the ears, and keep it at the lowest edge. Blend through 1, 2 and 3 with small lever movements and cross-check the two sides by looking from the front and the back. Cut the top with point-cutting or a texturising shear so the ends stay soft, direct the hair forward, and leave the fringe slightly irregular. Remove any hard line at the transition, then dry the hair and check the balance with the client standing.
- 1. Consult with dry hair, agree the top at 3 to 5 centimetres, and show where the fringe will sit on the forehead.
- 2. Check the scalp under strong light and stop if you see sores, lice, rings, pus or a sudden bald patch.
- 3. Set the bottom guideline at the nape and above both ears with a 0 or 0.5 blade, and keep that edge low.
- 4. Blend upward through 1, 2 and 3 in small lever steps, then compare the two sides from the front and the back.
- 5. Remove the hard line at the top of the fade with a corner blade in short, light strokes.
- 6. Cut the top at 3 to 5 centimetres with point-cutting, direct the hair forward and keep the fringe slightly uneven.
- 7. Check both sides at eye level with the head straight, then check the fringe from the front and the side.
- 8. Rebook in 2 to 3 weeks, because the skin edge and the fringe both lose their shape quickly.
Salon example: Karan's textured crop
Karan, a thirty-two-year-old software engineer, wanted a textured crop with skin at the sides. His hair was straight, the front hairline was strong, and the density on top was good, but the crown was a little flat. The scalp was clean under the lamp, with no sores and no sudden bald patch. We agreed a top of 4 cm and I explained that the skin edge would stay low. I set the guideline with a 0.5 blade, blended through 1, 2 and 3, then point-cut the top and directed it forward. Both sides matched at eye level and the fringe was left slightly uneven. He rebooked in two and a half weeks because the skin edge grows out quickly.
Caution: Do not point-cut a crop shorter than 3 centimetres, because the texture turns into holes and the scalp shows through the top.
Skin fade quiff
A skin fade quiff keeps 6 to 9 cm on top, styled up and slightly back, with the sides taken to skin at the lowest edge. It suits straight to wavy hair with good density at the front, because the quiff needs length and body to stand. The shape lengthens the face, so it flatters a round or square face and needs care on a long face, where the height should stay modest. The contrast between a soft, lifted top and a tight fade is the whole point, and the skin edge must stay low so the sides do not look shaved. The client must be willing to blow-dry the front for a minute or two, or the quiff will fall flat.
Check the scalp first and confirm the front hairline is not receding too far, because a quiff draws the eye forward. Set the bottom guideline with a 0 or 0.5 blade at the nape and above the ears and keep it low. Fade upward through 1, 2 and 3, blending each step until the sides read as one smooth gradient. Cut the top to 6 to 9 cm with scissors, keeping the front longest and the crown slightly shorter, then point-cut the ends so they lift. Remove the weight line with a light corner pass, dry the front with a brush, and check both sides at eye level before the mirror.
- 1. Consult with dry hair, agree 6 to 9 centimetres at the front, and check that the client will style the quiff at home.
- 2. Check the scalp and the front hairline under strong light, and stop on sores, lice, rings, pus or a sudden bald patch.
- 3. Set the bottom guideline at the nape and above both ears with a 0 or 0.5 blade, and keep that edge low.
- 4. Blend upward through 1, 2 and 3 in slow lever steps until the sides read as one gradient.
- 5. Remove the weight line above the fade with a light corner pass, without thinning the top of the sides.
- 6. Cut the top at 6 to 9 centimetres, keep the front longest, and point-cut the ends so the quiff lifts.
- 7. Check both sides at eye level with the head straight, then check the height from the front.
- 8. Rebook in 2 to 3 weeks for the fade, and tell the client the top can wait longer.
Salon example: Rohit's quiff fade
Rohit, a twenty-five-year-old sales executive, wanted a quiff for a wedding. His hair was straight and dense at the front, the hairline was strong, and the scalp had no marks. We agreed 8 cm at the front and 7 cm at the crown, because his face is long and extra height would stretch it further. I set the guideline at the nape and above the ears with a 0.5 blade, then blended through 1, 2 and 3. The top was cut with scissors, the front was lifted with a brush and a blow-dryer, and the ends were point-cut. Both sides matched at eye level and the shape held through the evening. He rebooked in three weeks for the fade.
Caution: Never leave a heavy, solid front on a quiff longer than 9 centimetres, because it will collapse forward and cover the forehead.
Skin fade pompadour
A skin fade pompadour keeps 8 to 12 cm on top, swept up and back with volume at the front, while the sides are faded to skin at the bottom edge. It needs thick, straight or wavy hair with a strong front hairline, because the style lifts the whole front away from the head. The height balances a round or square face and can make a narrow face look longer, so discuss the amount of lift before cutting. The look is formal enough for a wedding and still sharp for work, but it needs daily styling with a brush and a blow-dryer. Fine hair will not hold the shape for long, and the client should know that before the first cut.
Start dry, check the scalp and the front hairline, then agree the top length between 8 and 12 cm at the front and slightly shorter at the crown. Set the bottom guideline with a 0 or 0.5 blade only at the nape and above the ears, keeping the skin edge low. Work up through 1, 2 and 3 with slow lever steps, and blend until the sides show no banding. Cut the top with scissors, keep the front longest, and remove bulk from the crown so the hair can rise. Check the two sides at eye level, dry the top up and back, and confirm the shape holds without too much product.
- 1. Consult with dry hair, agree 8 to 12 centimetres at the front, and explain the daily blow-dry the style needs.
- 2. Check the scalp and the front hairline under strong light, and stop on sores, lice, rings, pus or a sudden bald patch.
- 3. Set the bottom guideline at the nape and above both ears with a 0 or 0.5 blade, and keep that edge low.
- 4. Blend upward through 1, 2 and 3 in slow lever steps until the sides show no banding.
- 5. Remove hard lines with a corner blade and take bulk out of the crown so the top can rise.
- 6. Cut the top at 8 to 12 centimetres with scissors and keep the front longest for the sweep.
- 7. Check both sides at eye level, then check the volume from the front and the profile.
- 8. Rebook in 2 to 3 weeks for the fade, and suggest a top trim every 4 to 6 weeks.
Salon example: Vishal's pompadour
Vishal, a thirty-four-year-old bank manager, wanted a pompadour for his sister's wedding. His hair was thick, straight and dense at the front, the hairline was strong, and the scalp showed no sores, rings or patches. We agreed 10 cm at the front and 9 cm at the crown. I set the guideline at the nape and above the ears with a 0.5 blade, then blended through 1, 2 and 3 with slow lever steps. The top was cut with scissors, bulk was taken out of the crown, and the front was dried up and back with a brush. Both sides matched at eye level and the shape stood without much product. He rebooked in three weeks for a trim.
Caution: Do not build a pompadour on hair shorter than 8 centimetres at the front, because it will not stand and the client will style it flat by the second day.
Skin fade French crop

A skin fade French crop keeps a short, blunt fringe of 3 to 5 cm across the forehead and fades the sides to skin at the bottom edge. It suits straight hair best, because the fringe needs a clean edge, and medium density keeps the top from looking sparse. The blunt fringe covers a high hairline and a slightly uneven forehead, which makes it a useful choice for clients who dislike showing their forehead. A round face looks sharper with the fringe kept short and the sides tight, while a long face can carry a slightly longer fringe. The whole shape depends on a straight fringe line, so the client must accept regular trims.
Consult with dry hair and check the scalp, then agree the fringe at 3 to 5 cm, measured from the front hairline down to the brow. Set the bottom guideline with a 0 or 0.5 blade at the nape and above the ears and keep it low. Fade through 1, 2 and 3, blending with small steps until the sides are even. Cut the top to the agreed fringe length, keep the line across the forehead straight, and soften the corners so the fringe does not look like a ruler. Remove any hard line at the top of the fade, dry the hair forward, and compare both sides in the mirror.
- 1. Consult with dry hair, agree a fringe of 3 to 5 centimetres, and show the client where it will end above the brow.
- 2. Check the scalp under strong light and stop if you see sores, lice, rings, pus or a sudden bald patch.
- 3. Set the bottom guideline at the nape and above both ears with a 0 or 0.5 blade, and keep that edge low.
- 4. Blend upward through 1, 2 and 3 in small lever steps until both sides are even.
- 5. Remove the hard line at the top of the fade with a corner blade and soften the corners of the fringe.
- 6. Cut the top to the agreed fringe length, keep the line across the forehead straight and the surface soft.
- 7. Check both sides at eye level, then check the fringe line from the front with the client looking down.
- 8. Rebook in 2 to 3 weeks, because the fringe line and the skin edge both grow out fast.
Salon example: Sameer's French crop
Sameer, a twenty-nine-year-old teacher, wanted a French crop with a straight fringe because his hairline is high. His hair was straight and medium in density, with a small cowlick at the crown, and the scalp was clean. We agreed a fringe of 4 cm, measured from the front hairline to the brow. I set the guideline at the nape and above the ears with a 0.5 blade, blended through 1, 2 and 3, and cut the top to the agreed length. The forehead line was kept straight and the corners were softened, so the fringe did not look like a ruler. When dry, the fringe fell forward and both sides matched. He rebooked in two and a half weeks to keep the line sharp.
Caution: Never cut the fringe above the natural growth whorl at the front, because the hair will spring up and the straight line will break within days.
Skin fade curly top
A skin fade on curly hair keeps the curls on top, cut dry so the true shape is visible, and fades the sides to skin at the lowest edge. It suits tight to loose curls with medium to high density, because the top needs enough curl to form a soft mass above the fade. Cutting dry matters: wet curls pull up as they dry and a wet cut hides the real length. A round face softens under a curly top, while a narrow face gains width from the curl volume. The contrast is strong, so the skin edge stays low and the fade must be blended carefully on textured sides, where bands show easily.
Check the scalp first, parting the curls to the skin, because sores and patches hide under dense texture. Set the bottom guideline with a 0 or 0.5 blade at the nape and above the ears only, keeping it low. Fade upward through 1, 2 and 3, but work more slowly than on straight hair, because curls lie unevenly and expose the scalp at different lengths. Cut the top dry, curl by curl, lifting the ends and taking small amounts, and leave the shape rounded. Remove any hard line at the fade with a light corner pass, then mist the curls, check both sides, and show the back in the hand mirror.
- 1. Consult with dry hair, agree to keep the curls on top, and explain that the cut will be done dry so the length is honest.
- 2. Part the curls to the skin and check for sores, lice, rings, pus or a sudden bald patch before the clipper starts.
- 3. Set the bottom guideline at the nape and above both ears with a 0 or 0.5 blade, and keep that edge low.
- 4. Fade upward through 1, 2 and 3 slowly, because curls lie unevenly and expose the scalp at different lengths.
- 5. Remove hard lines at the fade with a corner blade in light strokes and do not over-blend the texture.
- 6. Cut the top dry, curl by curl, lifting the ends and keeping the shape rounded and even.
- 7. Check both sides at eye level with the head straight, then mist the curls and check the fall again.
- 8. Rebook in 2 to 3 weeks, because the fade grows out faster than the curls lose shape.
Salon example: Imran's curly top
Imran, a twenty-six-year-old chef, has tight curls and wanted a skin fade with the curls kept on top. I parted the curls to the skin and checked the scalp under the lamp; it was clean, with no sores or patches. Because wet curls shrink, I cut the top dry, curl by curl, lifting the ends and keeping the shape rounded. I set the guideline at the nape and above the ears with a 0.5 blade and faded slowly through 1, 2 and 3, because the curls exposed the scalp unevenly. The fade line was cleaned with a corner blade, both sides were matched at eye level, and the curls were misted to check the fall. He rebooked in three weeks.
Caution: Do not cut wet curls to the final length, because they will shrink by 2 to 3 centimetres as they dry and leave the top too short.
Skin fade with loose waves
A skin fade with loose waves keeps 8 to 14 cm on top and fades the sides to skin at the bottom edge, with the wave created as a finish rather than cut into the hair. It suits hair with a natural loose wave or enough length to hold one, and medium to thick density keeps the top from falling flat. The style softens a square jaw and gives movement that a straight crew cut cannot, while the tight sides keep it tidy. The skin edge stays low, so the contrast is sharp but the scalp is never exposed high on the head. The client must accept that the wave needs a little product or a sea-salt mist to show.
Consult dry, check the scalp, and feel the natural wave before agreeing the top at 8 to 14 cm. Set the bottom guideline with a 0 or 0.5 blade at the nape and above the ears, keeping the skin edge low. Blend through 1, 2 and 3 in small lever steps until the sides are even, then cross-check from both sides. Cut the top with scissors at the agreed length, remove weight from the ends with point-cutting, and leave the mid-lengths alone so the wave has something to travel through. Remove any hard line, then dry the top with a diffuser or a light mist, and check the fall on both sides in the mirror.
- 1. Consult with dry hair, agree the top at 8 to 14 centimetres, and feel the natural wave before you cut.
- 2. Check the scalp under strong light and stop if you see sores, lice, rings, pus or a sudden bald patch.
- 3. Set the bottom guideline at the nape and above both ears with a 0 or 0.5 blade, and keep that edge low.
- 4. Blend upward through 1, 2 and 3 in small lever steps, then cross-check both sides from the front and the back.
- 5. Remove hard lines with a light corner pass and leave the mid-lengths alone so the wave can travel.
- 6. Cut the top at 8 to 14 centimetres with scissors and point-cut the ends without thinning the middle.
- 7. Check both sides at eye level, then dry the top with a diffuser and check the wave from the front.
- 8. Rebook in 2 to 3 weeks for the fade, and tell the client the top only needs a trim every 6 to 8 weeks.
Salon example: Dev's loose waves
Dev, a thirty-year-old architect, had loose waves and wanted to keep the length on top with a skin fade. We agreed 12 cm on top and confirmed the wave was natural, not styled in. I set the guideline at the nape and above the ears with a 0.5 blade, faded through 1, 2 and 3, and removed the hard line with a light corner pass. The top was cut at 12 cm, the ends were point-cut, and the mid-lengths were left alone so the wave could travel. After drying with a diffuser the wave showed without much product, and both sides matched at eye level. He rebooked in three weeks for the fade.
Caution: Never thin the mid-lengths of wavy hair, because the wave will collapse into straight, flat ends that no product can lift.
Bald fade

A bald fade takes the sides down to skin at the nape and around the ears and blends that skin edge into the top with no visible line, so the whole side reads as a smooth gradient. It suits most hair types with enough density on top, and it is a practical choice for a client who wants a very clean finish and does not mind a two-week trim cycle. The shape is close on the sides and keeps 1 to 3 cm above, so the head looks balanced. This is still a barbering service and not a medical shave: it is not done with a razor on irritated skin, and it never covers sores, lice, rings, pus or sudden bald patches.
Check the scalp under strong light before anything else, and refuse the skin pass if the skin is broken or inflamed. Set the bottom guideline with a 0 or 0.5 blade at the nape and around the ears, and keep that line at the lowest edge rather than pushing up. Work upward through 1, 2 and 3 with slow lever steps, blending until the skin edge disappears into the short hair. Cut the top with clipper comb or scissors, following the growth, and keep the crown slightly shorter than the front. Remove the last lines with a corner blade in light strokes, then check both sides and the back with a hand mirror.
- 1. Consult with dry hair, agree the top at 1 to 3 centimetres, and explain that this is a barbering service, not a medical shave.
- 2. Check the scalp under strong light and refuse the skin pass on sores, lice, rings, pus or a sudden bald patch.
- 3. Set the bottom guideline at the nape and around both ears with a 0 or 0.5 blade, and keep that line at the lowest edge.
- 4. Blend upward through 1, 2 and 3 with slow lever steps until the skin edge disappears into the short hair.
- 5. Remove the last lines with a corner blade in light strokes, and stop at the first sign of redness.
- 6. Cut the top at 1 to 3 centimetres with clipper comb or scissors and keep the crown slightly shorter than the front.
- 7. Check both sides and the back at eye level, then show the nape in the hand mirror.
- 8. Rebook in 2 to 3 weeks, because a bald fade shows regrowth sooner than any other fade.
Salon example: Farhan's bald fade
Farhan, a thirty-five-year-old driver, wanted a bald fade with a very clean finish. His scalp was healthy under the lamp, with no sores, rings or patches, and the skin was not irritated. I explained that this was a barbering skin pass and not a medical shave. I set the lowest guideline at the nape and around the ears with a 0.5 blade, then worked upward through 1, 2 and 3 with slow lever steps until the skin edge disappeared. The top was kept at 2 cm, slightly shorter at the crown. I stopped the corner work when a small red patch appeared near the ear and told him to keep it dry that day. He rebooked in two weeks.
Caution: Stop the skin pass at the first sign of redness or broken skin, because a bald fade on irritated scalp can turn into a rash or infection.
Burst fade

A burst fade fades low around the ear and leaves the back longer, so the short area bursts outward from the ear instead of running straight up the side. It suits straight to curly hair with medium density and works well with a crop, quiff or small curly top. The shape keeps length at the nape, which softens the back of the head and gives a modern finish without a full skin side. A round face gains a slimmer look when the burst stays tight around the ear, while a long face keeps balance from the longer back. The skin edge is at the ear and the lowest nape only, never high on the parietal ridge.
Consult with dry hair, check the scalp, and mark the burst area around the ear before you start. Set the bottom guideline with a 0 or 0.5 blade around the ear and at the lowest nape, keeping it low. Fade upward through 1, 2 and 3 inside the burst zone, then blend the top of the burst into the longer back with a soft transition, leaving the back length alone. Remove the hard line at the top of the burst with a light corner pass. Cut the top to the agreed style, then check the ear area from the front, the side and the back before you show the hand mirror.
- 1. Consult with dry hair, agree the burst area around the ear and the style on top, and confirm the back stays long.
- 2. Check the scalp under strong light and stop if you see sores, lice, rings, pus or a sudden bald patch.
- 3. Set the bottom guideline around the ear and at the lowest nape with a 0 or 0.5 blade, and keep it low.
- 4. Fade upward through 1, 2 and 3 inside the burst zone, then blend its top softly into the longer back.
- 5. Remove the hard line at the top of the burst with a light corner pass, leaving the back length alone.
- 6. Cut the top to the agreed style, and keep the length at the nape that makes the burst read.
- 7. Check the ear area from the front, the side and the back, then show the hand mirror.
- 8. Rebook in 2 to 3 weeks for the fade, and trim the long back only when the client asks.
Salon example: Nikhil's burst fade
Nikhil, a twenty-three-year-old student, wanted a burst fade with a small crop on top. We agreed that the fade would burst around the ear and the back would stay longer. I checked the scalp, set the guideline around the ear and at the lowest nape with a 0.5 blade, and faded through 1, 2 and 3 inside the burst. The top of the burst was blended softly into the longer back, so the nape kept its length. The crop was cut with point-cutting and the fringe left slightly uneven. I checked the ear area from the front, the side and the back, and the two sides matched. He rebooked in three weeks.
Caution: Do not fade the back of the head on a burst fade, because the longer back is the shape and cutting it short turns the style into a plain fade.
Drop fade
A drop fade takes the shortest point down behind the ear, so the fade curves down at the back instead of sitting level, and the front and top keep their weight. It suits most hair types and adds shape to a head that looks flat at the back, because the dropped line wraps the curve of the skull. It pairs with a crop, a small quiff or a curly top and looks sharp without being extreme. A round face benefits from the tighter back, while a long face keeps balance because the top is not shortened. The skin edge stays at the lowest point behind the ear and is never pushed up toward the parietal ridge.
Check the scalp first, then mark the point behind the ear where the fade should drop lowest, because that point decides the whole shape. Set the bottom guideline with a 0 or 0.5 blade at that point and carry it down around the ear, keeping the skin edge low. Blend upward through 1, 2 and 3 with small lever steps, following the curve so the fade drops evenly on both sides. Remove the hard lines at the top of the drop with a light corner pass, then cut the top to the agreed length. Check both sides at eye level with the head straight, and check the back curve in the hand mirror.
- 1. Consult with dry hair, agree the style on top, and mark the point behind the ear where the fade should drop lowest.
- 2. Check the scalp under strong light and stop if you see sores, lice, rings, pus or a sudden bald patch.
- 3. Set the bottom guideline at the lowest point behind the ear with a 0 or 0.5 blade and carry it down around the ear.
- 4. Blend upward through 1, 2 and 3 in small lever steps, following the curve so the drop matches on both sides.
- 5. Remove hard lines at the top of the drop with a light corner pass and keep the line smooth.
- 6. Cut the top to the agreed length, keeping the front and crown balanced against the lower back.
- 7. Check both sides at eye level with the head straight, then check the back curve in the hand mirror.
- 8. Rebook in 2 to 3 weeks, because the dropped point loses its shape first as the neck grows.
Salon example: Ayaan's drop fade
Ayaan, a twenty-seven-year-old trainer, wanted a drop fade with a short top. I marked the point behind his right ear where the fade would drop lowest, then matched it on the left, because the whole shape sits on that point. I checked the scalp, set the guideline with a 0.5 blade, and carried it down around the ear. The fade was blended through 1, 2 and 3 following the curve, and the hard line at the top of the drop was removed with a light corner pass. The top was cut at 4 cm. Both sides matched at eye level and the back curve looked level. He rebooked in three weeks.
Caution: Never drop the fade lower on one side than the other, because the back curve will look tilted and no amount of blending will hide it.
Fade mullet
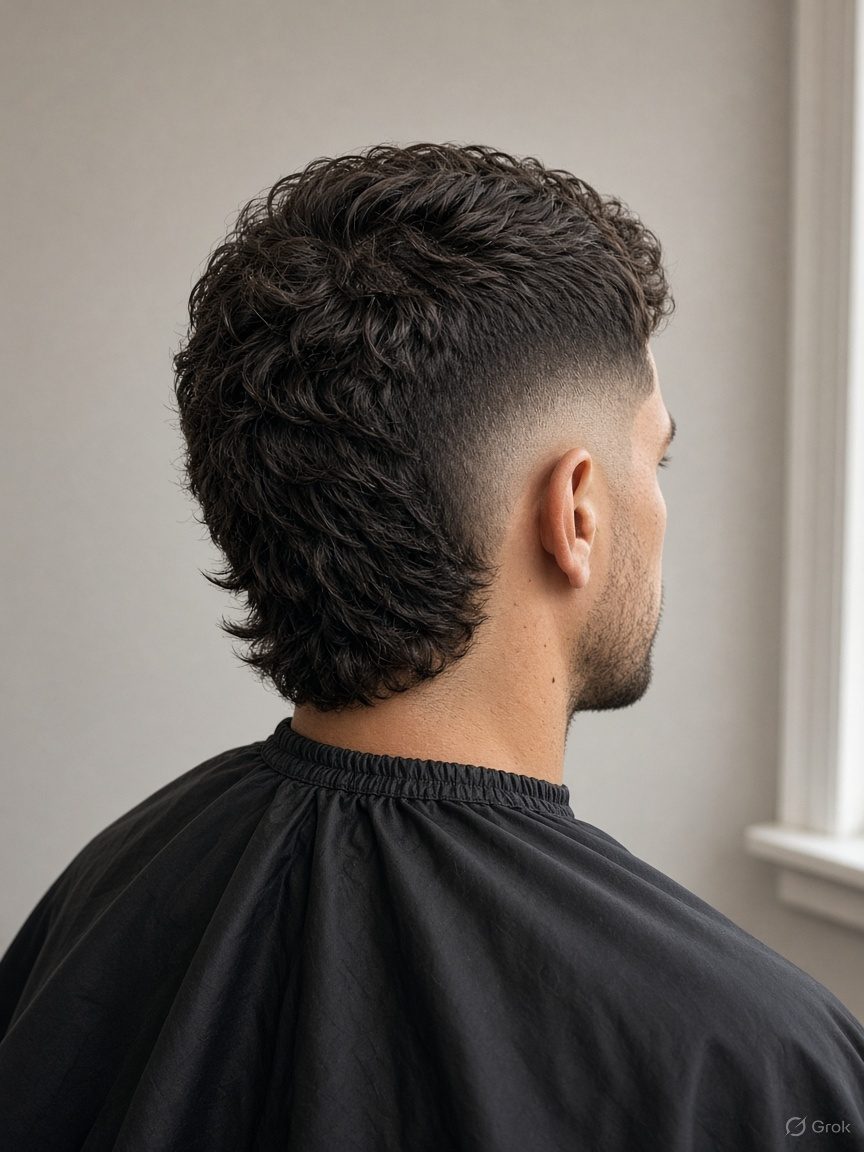
A fade mullet keeps the sides and front faded short and leaves the back long, so the length at the nape becomes the feature of the cut. It suits straight to wavy hair with good density, because a long back on thin hair looks stringy. The shape is deliberately uneven in length but clean at the sides, and the skin edge sits at the lowest nape and around the ears only. A client with a strong jaw can carry the contrast, while a narrow face gains width from the back mass. The style needs regular side trims to stay sharp, even when the back is growing out on purpose.
Consult dry, check the scalp, and agree the back length in centimetres before anything is cut, because the client often has a photo with a much longer back. Set the bottom guideline with a 0 or 0.5 blade at the lowest nape and around the ears, keeping the skin edge low. Fade through 1, 2 and 3 on the sides and blend into the longer back with a soft transition, so there is no shelf. Cut the top to match the front length, then trim the back to the agreed length and soften the ends so they do not look cut off. Check both sides, the back fall and the transition in the mirror.
- 1. Consult with dry hair, agree the top, the side fade and the back length in centimetres before any clipper starts.
- 2. Check the scalp under strong light and stop if you see sores, lice, rings, pus or a sudden bald patch.
- 3. Set the bottom guideline at the lowest nape and around both ears with a 0 or 0.5 blade, and keep it low.
- 4. Fade the sides through 1, 2 and 3, then blend the faded sides into the longer back with a soft transition.
- 5. Remove hard lines with a light corner pass and check the transition so the back does not sit as a shelf.
- 6. Cut the top to match the front, trim the back to the agreed length and soften the ends.
- 7. Check both sides and the back fall at eye level, then check the transition profile in the hand mirror.
- 8. Rebook in 2 to 3 weeks for the sides, and let the back grow until the client wants it shaped.
Salon example: Yash's fade mullet
Yash, a twenty-four-year-old music student, wanted a fade mullet with a short front and a long back. He showed a photo with the back reaching his collar, but his hair was fine at the nape, so we agreed 6 cm instead of the length in the picture. I checked the scalp, set the guide at the lowest nape and around the ears with a 0.5 blade, and faded the sides through 1, 2 and 3. The faded sides were blended softly into the longer back, so there was no shelf. The top was cut to the front length, and the back was point-cut at 6 cm. Both sides matched and the transition looked smooth. He rebooked in three weeks for the sides.
Caution: Do not blend the faded sides straight into the long back with a hard shelf, because the weight line will look like a mistake rather than a style.
Disconnected undercut
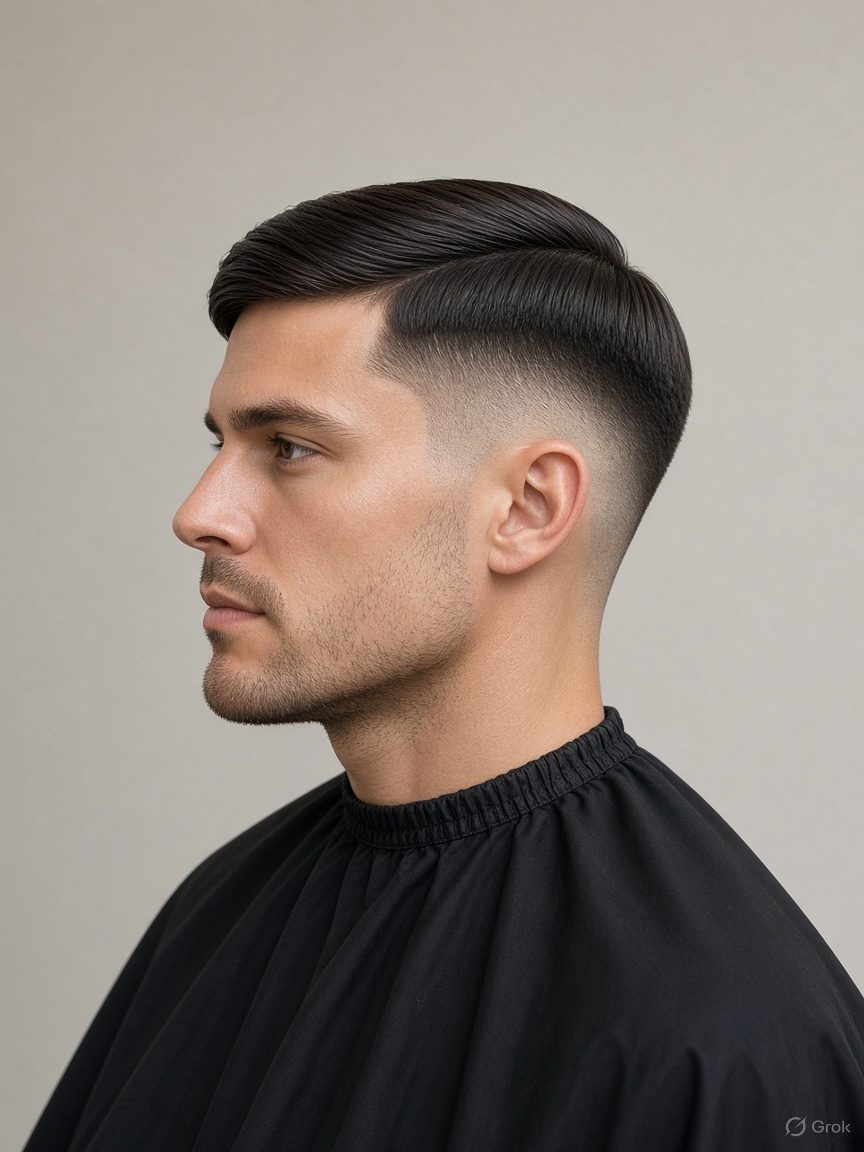
A disconnected undercut removes the sides and back length below a clear weight line, while the top is left long and hangs over that line, so the two lengths never blend. It suits thick, straight or wavy hair with strong density, because the top must cover the shaved area when it falls. The shape is bold and needs confidence, and it works well for a client who wants a visible change without a shaved pattern. A round face gains length from the top mass, while a long face looks better with a shorter top. The line is deliberate and stays visible, so the client must accept a sharp edge rather than a soft fade.
Check the scalp and agree where the weight line will sit, usually level with the top of the ear or slightly above, before you cut. Clip the sides and back below that line with a 0.5 or 1 blade, keeping the skin edge at the lowest nape and around the ear only. Do not fade the line: leave it clean and slightly rounded at the corner so it reads as a decision. Cut the top to length, let it fall over the line, and remove bulk from the ends so it hangs straight. Check the line on both sides at eye level and confirm it is level before the mirror.
- 1. Consult with dry hair, agree where the weight line sits, and confirm the top is long enough to cover it.
- 2. Check the scalp under strong light and stop if you see sores, lice, rings, pus or a sudden bald patch.
- 3. Set the bottom guideline at the lowest nape and around both ears with a 0 or 0.5 blade, and keep it low.
- 4. Clip below the weight line with a 0.5 or 1 blade, blend the bottom into the skin edge, and leave the line clean.
- 5. Remove any stray lines below the weight line with a corner blade and keep the line level, not faded.
- 6. Cut the top to length so it falls over the line, and remove bulk from the ends so it hangs straight.
- 7. Check the line on both sides at eye level with the head straight, then check the corners in the hand mirror.
- 8. Rebook in 2 to 3 weeks to keep the sides sharp, and trim the top every 6 to 8 weeks.
Salon example: Aditya's disconnected undercut
Aditya, a twenty-nine-year-old designer, wanted a disconnected undercut with a long top. We agreed the weight line just above the top of the ear and a top that would fall over it. I checked the scalp, clipped the sides and back below the line with a 1 blade, and kept the line clean rather than fading it. The skin edge stayed at the lowest nape and around the ear. I cut the top to length, removed bulk from the ends so it hung straight, and checked the line on both sides at eye level. The line was level and the top covered the corners. He rebooked in three weeks to keep the sides sharp.
Caution: Do not place the weight line above the parietal ridge, because the top will not cover it and the scalp will show at the corners.
Disconnected undercut, slick back
A disconnected undercut with a slick back keeps the sides and back clipped below a clear weight line and combs the long top back over it, so the hair reads as one smooth, swept shape from the front. It suits straight, thick hair with a strong front hairline, because the style exposes the forehead and needs the hair to lie flat. The look is formal and works for a wedding or an office, and it is easy to maintain with a comb and a light pomade. A round face gains length from the swept top, while a long face should keep the top shorter. The weight line stays visible at the sides, and the skin edge is low.
Consult dry, check the scalp, and agree the weight line and the top length before the clipper starts. Clip below the line with a 0.5 or 1 blade, keep the skin edge at the lowest nape and around the ear, and leave the line clean rather than faded. Cut the top long enough to reach the back of the crown when combed back, then remove bulk so it lies flat. Dry the top with a comb and a blow-dryer, working from the front hairline to the crown, and add a small amount of pomade. Check the line on both sides and the fall at the back, then show the client the finish in the mirror.
- 1. Consult with dry hair, agree the weight line and the top length, and confirm the client will comb the top back at home.
- 2. Check the scalp under strong light and stop if you see sores, lice, rings, pus or a sudden bald patch.
- 3. Set the bottom guideline at the nape and around both ears with a 0 or 0.5 blade, and keep that edge low.
- 4. Clip below the weight line with a 0.5 or 1 blade, blend the bottom into the skin edge, and leave the line clean.
- 5. Remove stray lines below the weight line with a corner blade, and keep the line itself sharp and level.
- 6. Cut the top long enough to reach the crown when combed back, and remove bulk so it lies flat.
- 7. Check the line on both sides at eye level, then check the back fall and the comb direction in the mirror.
- 8. Rebook in 2 to 3 weeks to keep the sides sharp, and let the top grow until the client wants it trimmed.
Salon example: Siddharth's slick undercut
Siddharth, a thirty-one-year-old lawyer, wanted a slick-back undercut for a formal event. We agreed the weight line at the top of the ear and a top long enough to reach the back of the crown when combed back. I checked the scalp, clipped below the line with a 1 blade, and left the line clean. The top was cut with scissors and the bulk was removed so it would lie flat. After a blow-dry with a comb from the front hairline to the crown, the hair sat smooth over the line. Both sides matched and the back fall was even. He rebooked in three weeks for the sides.
Caution: Do not slick back hair that is too short to reach the crown, because it will stand up at the front and the style will look unfinished.
Disconnected undercut, curly top
A disconnected undercut with a curly top pairs tight, clipped sides with a mass of dry-cut curls above a clear weight line. It suits curly hair with high density, because the top must be full enough to sit as a rounded shape over the shaved sides. The cut is done dry so the curl pattern stays honest, and the line is left deliberate rather than blended. A round face softens under the curl volume, while a narrow face gains width from the top. The style needs the client to accept a strong contrast and a regular side trim to keep the line sharp.
Check the scalp by parting the curls, then agree the weight line, usually just above the ear, before clipping. Clip below the line with a 0.5 or 1 blade, keep the skin edge at the lowest nape and around the ear, and leave the line clean. Cut the top dry, curl by curl, lifting the ends and taking small amounts so the shape stays rounded and even. Remove any heavy corners at the line without softening it into a fade. Mist the curls lightly, check both sides and the back, and confirm the top covers the line when the hair settles.
- 1. Consult with dry hair, agree the weight line and the curled top, and explain that the top will be cut dry.
- 2. Part the curls to the skin and check for sores, lice, rings, pus or a sudden bald patch before clipping.
- 3. Set the bottom guideline at the nape and around both ears with a 0 or 0.5 blade, and keep that edge low.
- 4. Clip below the weight line with a 0.5 or 1 blade and blend the bottom into the skin edge.
- 5. Remove stray lines below the weight line and keep the line itself clean, not faded.
- 6. Cut the top dry, curl by curl, keeping it long enough to cover the weight line when the curls settle.
- 7. Check the line on both sides at eye level, then mist the curls and check the coverage.
- 8. Rebook in 2 to 3 weeks for the sides, because the line shows regrowth quickly.
Salon example: Kabir's curly undercut
Kabir, a twenty-six-year-old musician, has tight curls and wanted a disconnected undercut with the curls left on top. I parted the curls and checked the scalp, then agreed the weight line just above the ear. I clipped below the line with a 1 blade and kept the line clean. The top was cut dry, curl by curl, so the curls stayed rounded and the weight line was covered when they settled. I did not cut the top wet, because the curls would have shrunk and left the line exposed. Both sides were checked, the line was level, and the top covered it. He rebooked in three weeks for the sides.
Caution: Do not cut a curly undercut wet, because the curls shrink as they dry and the top will end up too short to cover the weight line.
Two-block cut
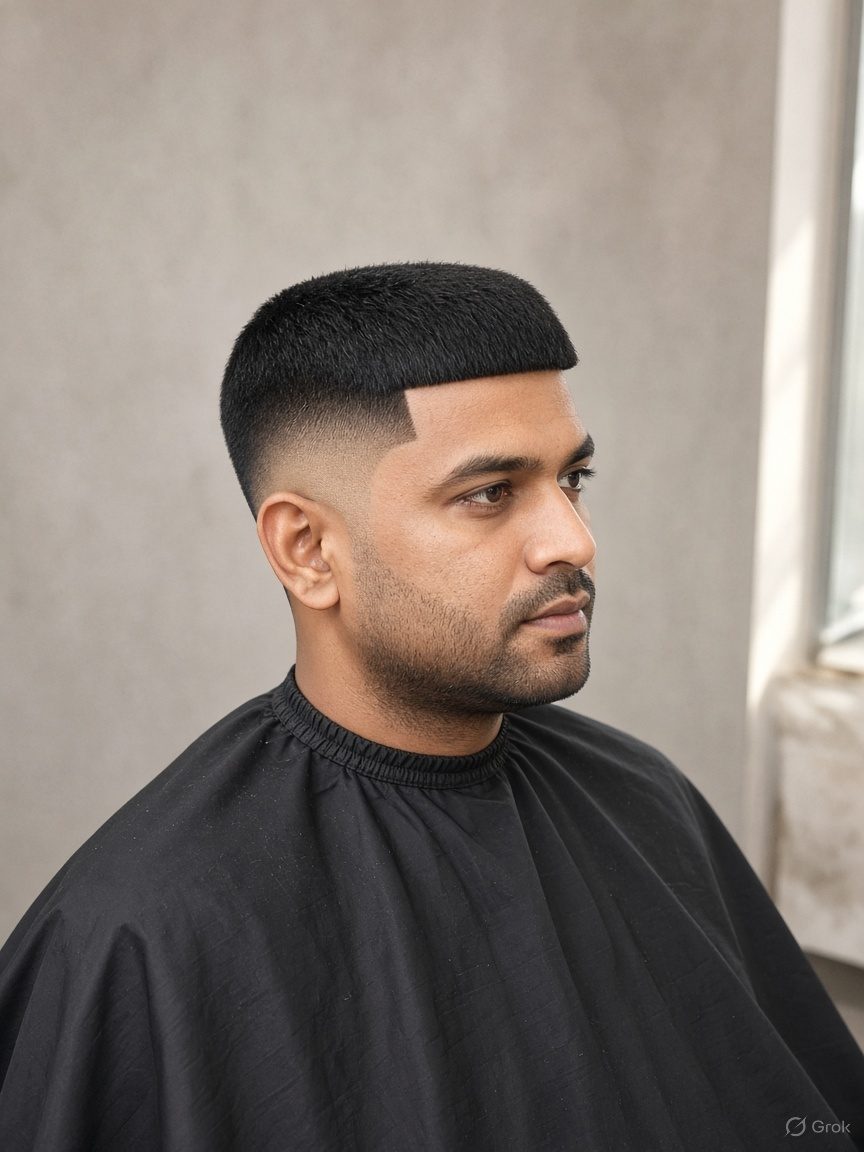
A two-block cut keeps a heavy top and short sides with one clear weight line between them, so the hair looks like two blocks stacked rather than a blended fade. It suits straight and wavy hair with thick density, because the top needs weight to hang over the line. The shape is popular with younger clients and works well when the top is long enough to move but not so long that it covers the eyes. A round face gains length from the top block, while a long face should keep the top closer to the line. The skin edge is at the lowest nape and around the ears only, not high on the sides.
Consult dry, check the scalp, and agree the top length and the weight line before cutting. Clip the sides and back below the line with a 0.5 or 1 blade, keeping the skin edge low at the nape and around the ears. Leave the line clean and slightly rounded at the corners, so it reads as a step and not a fade. Cut the top to the agreed length, direct it forward or back as the client wears it, and remove bulk from the ends so it falls softly over the line. Check the line on both sides at eye level and confirm it is even, then dry and mirror check.
- 1. Consult with dry hair, agree the top length and the weight line, and show where the line will sit above the ear.
- 2. Check the scalp under strong light and stop if you see sores, lice, rings, pus or a sudden bald patch.
- 3. Set the bottom guideline at the nape and around both ears with a 0 or 0.5 blade, and keep that edge low.
- 4. Clip below the weight line with a 0.5 or 1 blade and blend the bottom into the skin edge.
- 5. Leave the weight line clean and slightly rounded at the corners, with no fade into the top.
- 6. Cut the top to the agreed length, direct it as the client wears it, and remove bulk from the ends.
- 7. Check the line on both sides at eye level, then check the top fall from the front and the side.
- 8. Rebook in 2 to 3 weeks, because the short sides grow out faster than the top.
Salon example: Aryan's two-block
Aryan, a twenty-two-year-old college student, wanted a two-block cut with a heavy top and short sides. We agreed the top at 7 cm and the weight line just above the ear. I checked the scalp, clipped the sides and back below the line with a 1 blade, and kept the line clean and slightly rounded at the corners. The top was cut to 7 cm, directed forward, and the ends were softened so it fell over the line. Both sides matched at eye level and the line was level. He rebooked in three weeks, because the short sides grow out first even when the top still looks long.
Caution: Do not blend a two-block line into a fade, because the whole style depends on that visible step between the top and the sides.
Textured two-block
A textured two-block keeps the same heavy top and short sides with one weight line, but the top is point-cut and layered so it looks airy and moves instead of sitting as a solid mass. It suits straight to wavy hair with medium to thick density, because the texture needs enough hair to break up. The style is softer than a plain two-block and hides a slightly uneven growth pattern on top. A round face gains length from the lifted texture, while a narrow face gets width from the broken ends. The sides stay short and the skin edge stays at the lowest nape and around the ears.
Check the scalp, agree the top length and the line, then clip the sides below the line with a 0.5 or 1 blade, keeping the skin edge low. Leave the line clean and rounded at the corners. Cut the top to length and point-cut the ends in small sections, lifting the hair away from the head so the cuts fall at different levels. Do not thin the roots, because that flattens the top. Check the line on both sides, dry the top with fingers and a little product, and confirm the texture shows from the front and the back.
- 1. Consult with dry hair, agree the top length and the weight line, and confirm the client wants an airy, textured top.
- 2. Check the scalp under strong light and stop if you see sores, lice, rings, pus or a sudden bald patch.
- 3. Set the bottom guideline at the nape and around both ears with a 0 or 0.5 blade, and keep that edge low.
- 4. Clip below the weight line with a 0.5 or 1 blade and blend the bottom into the skin edge.
- 5. Leave the weight line clean and slightly rounded, and remove any stray line above the ears.
- 6. Cut the top to the agreed length and point-cut the ends in small sections without thinning the roots.
- 7. Check the line on both sides at eye level, then check the texture from the front and the back.
- 8. Rebook in 2 to 3 weeks, because the short sides grow out faster than the textured top.
Salon example: Rehan's textured two-block
Rehan, a twenty-five-year-old graphic designer, wanted a textured two-block with a heavy top and short sides. We agreed the top at 8 cm and the weight line just above the ear. I checked the scalp, clipped the sides below the line with a 1 blade, and kept the line slightly rounded at the corners. The top was cut to length and point-cut in small sections, and the roots were left alone so the top did not flatten. When dry, the texture looked airy and both sides of the line matched at eye level. He rebooked in three weeks for the sides.
Caution: Do not point-cut the top shorter than 2 centimetres, because the texture becomes patchy and the scalp shows through the gaps.
Rounded fringe with a high fade

A rounded fringe with a high fade keeps a short, rounded fringe on top and fades the sides high, so the front sits as a soft curve and the sides look tight. It suits straight hair with dense growth, because the fringe needs to hold a curve without splitting. The high fade starts above the ear and rises toward the parietal ridge, but the skin itself stays at the bottom edge only. A round face gains length because the high sides slim the head, while a long face looks better with the fade slightly lower. If a client asks for an Edgar, this is the request he means, and the fringe shape is the part to agree first.
Consult dry, check the scalp, and agree the fringe height and the fade height before cutting. Set the bottom guideline with a 0 or 0.5 blade at the nape and above the ears, and keep the skin edge low. Fade upward through 1, 2 and 3, taking the blend higher than usual on the sides while keeping the skin at the bottom. Cut the fringe to a rounded shape across the forehead, with the corners curving down toward the temples, and check that it sits level. Remove hard lines with a light corner pass, then dry the fringe forward and compare both sides in the mirror.
- 1. Consult with dry hair, agree the fringe height and the fade height, and confirm that the client means the rounded Edgar shape.
- 2. Check the scalp under strong light and stop if you see sores, lice, rings, pus or a sudden bald patch.
- 3. Set the bottom guideline at the nape and above both ears with a 0 or 0.5 blade, and keep that edge low.
- 4. Fade upward through 1, 2 and 3, taking the blend higher on the sides but keeping skin at the bottom only.
- 5. Remove hard lines with a light corner pass and soften the corners where the fringe meets the temples.
- 6. Cut the fringe to a rounded shape across the forehead, with the corners curving down toward the temples.
- 7. Check both sides at eye level, then check the fringe curve from the front with the client looking down.
- 8. Rebook in 2 to 3 weeks, because a high fade and a short fringe both lose their shape quickly.
Salon example: Manav's rounded fringe
Manav, a twenty-year-old college student, asked for an Edgar, which means a rounded fringe with high faded sides. His hair was straight and dense, the front hairline was strong, and the scalp showed no sores or patches. We agreed a fringe of 3 cm and a fade that starts above the ear, with skin only at the bottom. I set the guideline at the nape and above the ears with a 0.5 blade and blended the sides high through 1, 2 and 3. The fringe was cut rounded across the forehead with the corners curving toward the temples, so it did not look like a bowl. Both sides and the fringe sat level, and he rebooked in three weeks.
Caution: Do not cut the rounded fringe with a straight clipper line, because the corners will sit square and the curve will look like a bowl.
Shape-up with a low fade
A shape-up with a low fade cleans the front hairline with the trimmer and fades the sides low, so the hairline looks sharp while the skin edge stays near the ear and nape. It suits most hair types, especially clients who want a neat edge without a high, exposed fade. The low fade keeps the sides fuller at the top, which balances a face that is wide at the jaw. A square hairline is not for everyone, so the shape-up follows the natural front hairline with only a small correction. No cheek design is part of this service, and the finish is clean rather than decorative.
Check the scalp first, then agree how much of the front hairline to shape, because pushing it back too far changes the forehead. Set the bottom guideline with a 0 or 0.5 blade at the nape and above the ears, keeping the skin edge low. Fade upward through 1, 2 and 3 with small lever steps until the sides are even. Use the trimmer with a light hand along the front hairline, following the natural line, and clean the edges around the ears and neck. Remove hard lines with a corner pass, then check the hairline and both sides in the mirror before the client leaves.
- 1. Consult with dry hair, agree how much hairline to shape, and state clearly that no cheek design is included.
- 2. Check the scalp under strong light and stop if you see sores, lice, rings, pus or a sudden bald patch.
- 3. Set the bottom guideline at the nape and above both ears with a 0 or 0.5 blade, and keep that edge low.
- 4. Blend upward through 1, 2 and 3 in small lever steps until the sides are even.
- 5. Shape the front hairline with the trimmer in a light hand, follow the natural line and clean the ears and neck.
- 6. Remove hard lines with a corner pass and keep the hairline soft, not pushed back.
- 7. Check the hairline from the front and both sides at eye level, then show the client the hand mirror.
- 8. Rebook in 2 to 3 weeks, because the shaped hairline and the low fade both fade quickly.
Salon example: Jatin's shape-up
Jatin, a thirty-year-old accountant, wanted a shape-up with a low fade. His hair was dense and wavy, the hairline was slightly uneven, and the scalp showed no sores, rings or patches. I said clearly that the cheek design was not part of the service and that only a light shape-up would be done. I set the guideline at the nape and above the ears with a 0.5 blade, blended through 1, 2 and 3, and shaped the front hairline with the trimmer along the natural line. The ears and neck were cleaned, the hairline stayed soft, and both sides matched. He rebooked in two and a half weeks.
Caution: Do not push the front hairline back more than a few millimetres, because a shape-up that is too aggressive looks like a receding line.
Burst fade crop
A burst fade crop combines a short textured crop on top with a fade that bursts around the ear, leaving the back longer and softer than the sides. It suits straight and wavy hair with medium density and works well for clients who want a modern shape without a full skin side. The crop stays at 3 to 5 cm with a slightly uneven fringe, while the burst keeps the ear area tight and the nape longer. A round face gains height from the crop and a slimmer side from the burst. The skin edge is at the ear and the lowest nape only, never high on the head.
Consult dry, check the scalp, and mark the burst area around the ear before cutting. Set the bottom guideline with a 0 or 0.5 blade around the ear and at the lowest nape, keeping it low. Fade through 1, 2 and 3 inside the burst and blend the top of the burst into the longer back with a soft transition. Cut the crop at 3 to 5 cm, point-cut the ends, and soften the fringe so it falls forward. Remove hard lines with a light corner pass, then check the ear area and the top from both sides in the mirror.
- 1. Consult with dry hair, agree the burst area and a crop of 3 to 5 centimetres, and confirm the back stays longer.
- 2. Check the scalp under strong light and stop if you see sores, lice, rings, pus or a sudden bald patch.
- 3. Set the bottom guideline around the ear and at the lowest nape with a 0 or 0.5 blade, and keep it low.
- 4. Fade through 1, 2 and 3 inside the burst and blend its top softly into the longer back.
- 5. Remove the hard line at the top of the burst with a light corner pass and leave the back length alone.
- 6. Cut the crop at 3 to 5 centimetres, point-cut the ends and soften the fringe so it falls forward.
- 7. Check the ear area and the top from the front, both sides and the back in the mirror.
- 8. Rebook in 2 to 3 weeks for the fade, and trim the long back only when the client asks.
Salon example: Vivaan's burst fade crop
Vivaan, a twenty-four-year-old delivery agent, wanted a burst fade with a textured crop. His hair was straight and medium in density, the scalp was clean, and there was no sudden bald patch. We agreed a crop of 4 cm and a burst around the ear, with the back left long. I set the guideline around the ear and at the lowest nape with a 0.5 blade and faded through 1, 2 and 3 inside the burst. The top of the burst was blended softly into the longer back, the crop was point-cut, and the fringe was softened. Both sides and the ear area matched, and he rebooked in three weeks.
Caution: Do not carry the burst fade into the back of the head, because the longer nape is what separates this cut from a plain fade.
Skin fade curtain fringe
A skin fade curtain fringe keeps a middle-parted curtain on top and fades the sides to skin at the bottom edge only, so the top falls softly while the sides stay tight. It suits straight to wavy hair with medium to thick density, because the curtain needs length to part and fall. The style softens a square face and frames the eyes, and it is easy to wear for work or a formal event. A round face gains length from the centre part, while a long face looks better with the fringe kept shorter. The skin edge stays low at the nape and above the ears, never pushed up the sides.
Consult dry, check the scalp, and agree the curtain length and the part before cutting. Set the bottom guideline with a 0 or 0.5 blade at the nape and above the ears, keeping the skin edge low. Fade upward through 1, 2 and 3 with small lever steps until the sides are even. Cut the top to the agreed length, part it in the middle, and point-cut the ends so the curtain falls softly without a heavy line. Remove any hard line at the top of the fade, then dry the top with a centre part and check the fall on both sides in the mirror.
- 1. Consult with dry hair, agree the curtain length and the centre part, and show where the fringe will fall at the cheekbone.
- 2. Check the scalp under strong light and stop if you see sores, lice, rings, pus or a sudden bald patch.
- 3. Set the bottom guideline at the nape and above both ears with a 0 or 0.5 blade, and keep that edge low.
- 4. Blend upward through 1, 2 and 3 in small lever steps until both sides are even.
- 5. Remove hard lines with a light corner pass and keep the top of the fade smooth.
- 6. Cut the top to the agreed length, part it in the middle, and point-cut the ends so the curtain falls softly.
- 7. Check both sides at eye level, then dry the top with a centre part and check the curtain fall.
- 8. Rebook in 2 to 3 weeks for the fade, and trim the curtain every 6 to 8 weeks.
Salon example: Ishaan's curtain fringe
Ishaan, a twenty-seven-year-old marketing executive, wanted a curtain fringe with a skin fade. His hair was straight and medium in density, it already parted in the middle, and the scalp was clean. We agreed a curtain of 10 cm and a centre part. I set the guideline at the nape and above the ears with a 0.5 blade, blended through 1, 2 and 3, and cut the top to the agreed length. The curtain was parted in the middle and the ends were point-cut so it fell softly, and the hard line at the top of the fade was removed. Both sides fell evenly, and he rebooked in three weeks for the fade.
Caution: Do not cut the curtain shorter than the cheekbone, because it will spring away from the face and the centre part will not hold.
This is a Nandu Nai textbook. It is a private brand book, not a government licence, and it does not give the right to give medical treatment.