
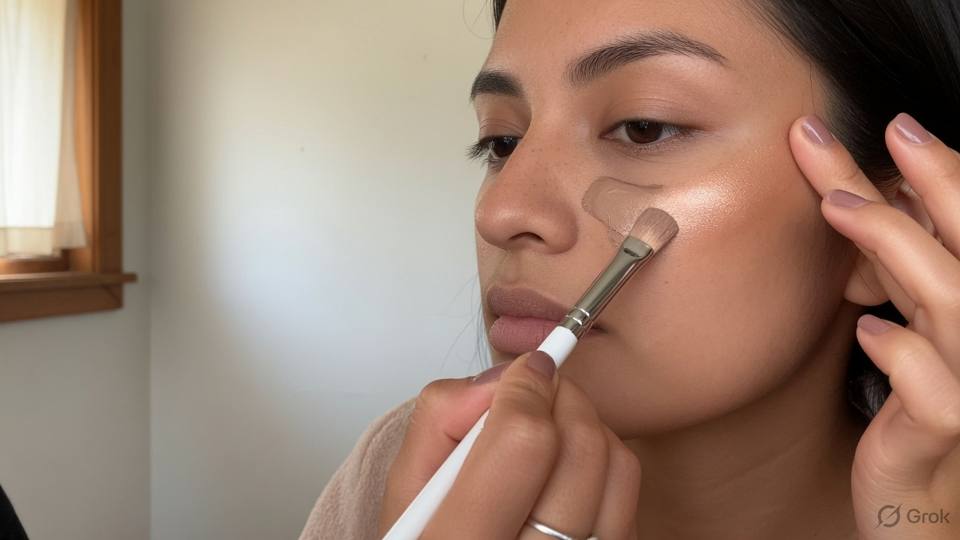
Shadow and light, not a template
Contour and highlight are light direction. They suggest a shadow where the face would naturally cast one and a highlight where it would naturally catch light. They do not change bone, and no product can. A contour can make a cheek look more defined in a photograph and can make a jaw look sharper from across a room, but it cannot create a cheekbone that is not there or narrow a face that is wide. Understanding this keeps the work honest and keeps the makeup looking like a face. The client who is promised a different bone structure will always be disappointed, while the client who is promised a more defined version of her own face will usually be pleased.
Place the contour where a shadow already falls. Under the cheekbone, along the jaw, at the sides of the nose if the client wants it, and around the hairline. Follow the natural hollow rather than a line drawn from a diagram, because the diagram was drawn on a different face. Blend upward and outward, not downward and inward, so the shadow melts into the cheek instead of sitting on it. Use a small amount of product and build slowly; a contour that looks too strong indoors is almost always too strong outdoors. If you can see where the product starts, you have not finished blending.
Bronzer and contour are not the same product, even though they are often sold together. Bronzer warms the high points where the sun would fall: the top of the cheek, the temple, the bridge of the nose. Contour deepens the hollows. A warm bronzer used as a contour looks orange, and a cool contour on warm skin looks dirty. Match the contour to the undertone of the skin, choosing a soft taupe on fair skin and a deeper, warm-neutral brown on medium and deep skin. If the skin is olive, avoid a contour with a pink or grey base, because it will read as a bruise rather than a shadow.
Highlight is the other half of the same idea. Place a little on the top of the cheekbone, the brow bone, the inner corner of the eye, and the cupid's bow. Keep it small: a stripe of highlighter across the cheek reads as shine, not as light, and in humidity it reads as sweat. On deep skin, choose a warm gold or a soft champagne, because a pale silver highlight looks ashy. On fair skin, a soft pearl is enough. If the client has texture on the cheeks, keep the highlight off the textured area and place it on the bone, where the skin is smoother. The aim is a face that looks lit from within, not a face with a line of metal on it.
- 1. Look at the face in daylight and find the natural hollow under the cheekbone.
- 2. Choose a contour shade close to the skin's undertone, not a grey.
- 3. Load a small brush and tap off the excess before touching the face.
- 4. Apply the contour under the cheekbone and along the jaw.
- 5. Blend upward and outward until the edge disappears.
- 6. Add bronzer on the high points where the sun would fall.
- 7. Place a small highlight on the cheekbone, brow bone, and inner corner.
- 8. Step back and check both sides of the face in daylight.
Salon example
Ira, thirty-three, came for a party makeup and asked for cheekbones like a film actor she admired. Her face was round and soft, and she had never worn contour before. I explained that I could not give her a different bone structure, but I could make the cheek she had read more clearly in photographs. We used a cream contour a shade deeper than her base, placed it in the hollow under the cheekbone and blended it upward with a damp sponge. A warm bronzer went across the top of her cheek and her temple, and a small amount of champagne highlight sat on the bone. In the mirror the change was subtle; in the photograph it was clear. She said it looked like her face on a good day, which is the best result contour can offer. Her friend asked for the same, and we used a lighter hand because her skin was fairer and the same product would have looked grey. The friend, who had a longer face, needed the contour lower and the highlight shorter, which is why a diagram would have failed her.
Caution: Do not promise that contour will change the shape of the face; it changes how light falls on the face, and nothing more.
Soft in daylight
Daylight is the most honest light a face will meet. It comes from a wide source, it fills shadows, and it shows every hard edge. A contour that looks subtle under salon bulbs can look like a brown stripe on the cheek at a daytime mehendi. The correction is not to use a darker product but to use less of it and to blend further. Work in thin layers, check the face at a window after each layer, and stop one layer earlier than you think you should. The client can always add a little more at the venue, but she cannot remove a stripe in a bathroom with poor light.
Cream contour is easier to blend into skin and looks more natural in daylight, while powder contour gives more definition and holds better on oily skin. Either can work, but the undertone has to be right. A grey contour on warm skin looks like dirt, and a warm orange contour on cool skin looks like a stain. For a daytime event, choose a product one shade deeper than the base rather than two, and place it only in the hollow, not across the whole cheek. For an evening event, the same placement can be a little stronger, but the edge still has to disappear.
Blend until you cannot see where the product starts, then blend a little more. Use a clean brush or a damp sponge, and work in small circles rather than long sweeps. Check both sides of the face, because most people contour the side they can see more easily and leave the other side lighter. Sit the client in front of a mirror and ask her to turn her head slowly while you look at the transition from the cheek to the jaw. If one side is stronger, remove a little from that side rather than adding to the other, because adding usually makes both sides heavier.
Sometimes the right decision is not to contour at all. A fresh, even base with a little blush and a soft highlight is often the better look for a young face, a very textured face, or a client who has never worn makeup and will feel strange with a carved cheek. On mature skin, heavy contour settles into the hollows and emphasises them, which is the opposite of the intention. On a face with active acne or rosacea, contouring draws attention to the texture. Offer the option, explain the effect, and let the client choose a softer version. Makeup is a service, not a template applied to every face that sits in the chair.
- 1. Ask whether the event is indoors, outdoors, or both.
- 2. Choose a contour one shade deeper than the base for daytime.
- 3. Apply with a small brush and tap off the excess.
- 4. Place the product only in the natural hollow.
- 5. Blend with a clean brush or a damp sponge in small circles.
- 6. Check the face at a window after each thin layer.
- 7. Compare both sides and remove from the stronger side.
- 8. Stop one layer earlier than feels finished.
Salon example
Mira, forty, booked an office event makeup for a lunch award ceremony with daylight coming through a glass wall. She wanted definition and had bought a contour palette from a video she had watched. In the salon, under warm bulbs, the application looked good. When we stepped to the window, the contour sat as two brown bands on her cheeks, and the one on the right was stronger than the left. We removed most of it with a damp sponge, kept a trace in the hollow, and blended the rest into her bronzer. Her blush went slightly higher, and the highlight was reduced to a small touch on the bone. In the daylight photograph her face looked defined but not drawn, and her skin still looked like skin. She told me that she had been using three times too much product and had never seen it in daylight. The palette went home with a note on how to use less. At her next event she sent me a picture taken by the window before she left the house, and the contour was barely visible, which meant it was right.
Caution: Do not use a grey or ashy contour on warm or olive skin; it reads as dirt in daylight and as a bruise in photographs.
Camera versus real life
A camera flattens a face. It turns a three-dimensional head into a two-dimensional image, and it reduces the shadows that give the face its shape. This is why stage and camera makeup uses stronger contour than daylight makeup. The mistake is to carry the stage strength into a close conversation or a daylight reception, where the face is seen at arm's length and the contour is read as a line rather than as a shadow. Ask what the photographs are for: a stage performance, a fashion shoot, a wedding album, or a phone picture taken by a cousin. Each needs a different strength, and the strongest version is rarely the right one for a wedding.
Test the contour with flash before the client leaves. Flash can flatten the contour further, and it can also show the edges more clearly than the eye does. A contour that looks smooth in the mirror can photograph as a grey band if the undertone is wrong, and a highlight that looks subtle can photograph as a white stripe if it is too pale for the skin. Take one picture at arm's length and one from across the room, and compare the face with the neck. If the contour disappears in the far picture, that is usually fine; if it becomes a stripe, reduce it before the client goes to the event.
The lighting at the event will change during the evening. A ceremony in daylight becomes a reception under warm bulbs, and a stage performance moves to a dinner with phone flashes. A contour that works in one may be too strong or too weak in the other. The practical answer is to build for the strongest light the client will be photographed in and to keep the daylight version soft enough for conversation. If the client is performing on stage and then attending a reception, do the stage version for the performance and keep a kit to soften the cheek before the reception. That is a two-minute adjustment and it makes both sets of photographs better.
Honesty about the camera is part of the service. Makeup for a photograph is not the same as makeup for a face, and a client who understands this will make better decisions. Explain that the camera adds contrast, that flash can flatten or exaggerate a contour, and that a phone camera at close range is less forgiving than a professional lens at a distance. Then choose a middle ground that looks good in the room and in the pictures. The best compliment a client can give is not that the contour is visible but that she looks like herself, only more defined, in every photograph from the event.
- 1. Ask what the photographs are for and who will take them.
- 2. Build the contour for the strongest light of the event.
- 3. Keep the daylight version soft enough for close conversation.
- 4. Photograph with flash at arm's length and across the room.
- 5. Compare the contour with the neck and the chest.
- 6. Reduce the contour before the event rather than after.
- 7. Keep a kit to soften stage makeup before a reception.
- 8. Explain the difference between camera makeup and daylight makeup.
Salon example
Tara, twenty-six, was performing a dance at a college function and then attending the dinner afterwards. She asked for strong stage contour because the stage lights would wash her out. We built a defined cheek and jaw for the performance, tested it under a bright lamp and with flash, and photographed it from the back of the hall. It read well at that distance. Before the dinner we removed some of the contour with a damp sponge, softened the highlight, and added a little blush. The same face then looked normal at a table. Without the adjustment she would have walked into the dinner with stage makeup, and the photographs at the table would have shown a brown stripe on each cheek. She kept the sponge and a small powder in her bag, and she now understands why the two versions exist. Her mother, who saw both sets of photographs, said the dinner pictures looked more like her daughter, and Tara agreed. The sponge stayed in her bag for the rest of the season, and she has since taught two friends the same two-minute change.
Caution: Do not carry stage-strength contour into a daylight reception or a close conversation; the line that reads at ten metres reads as dirt at one.
This is a Nandu Nai textbook. It is a private brand book, not a government licence, and it does not give the right to give medical treatment.