
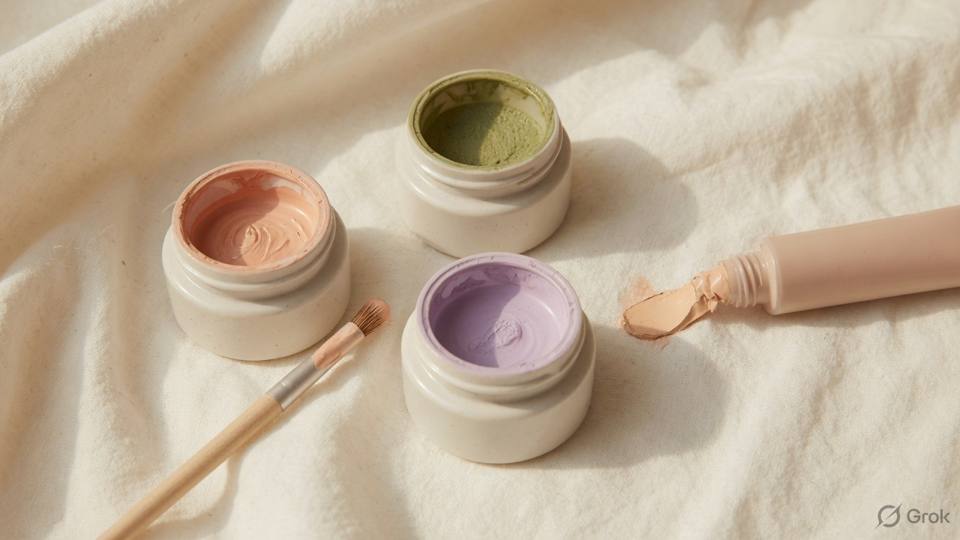
Correction is colour, not coverage
Correction is the practice of neutralising an unwanted colour on the skin before the base goes on. It works on the colour wheel: green cancels red, peach and orange cancel blue and purple, yellow softens brown and grey. The correcting layer is thin and strongly pigmented, and it is applied only to the area that needs it. This is the opposite of covering, where a thick layer of concealer is spread over a large area in the hope that it will hide what is underneath. Covered colour does not disappear; it turns grey under a pale product, and the grey is usually more visible than the original mark.
The most common correction mistake is using a concealer that is lighter than the skin to hide a dark circle. The light product sits on top of the dark colour, the two mix, and the result is a grey or mauve patch that photographs badly. A peach or orange corrector, applied thinly and set lightly, changes the colour underneath so that a concealer matching the skin can finish the job with very little product. The same principle applies to redness and pigmentation: correct the colour first, then match the skin, then cover only what still shows. The order is not a ritual; each step reduces the amount of product the next step needs.
Thin layers are essential. A corrector is concentrated, so a grain of rice is enough for both under-eyes, and a small brush is easier to control than a fingertip. Warm the product on the back of your hand, tap it into the area, and stop before it looks opaque. If the corrected area looks flat and grey, you have used too much. If it looks orange at the edges, you have used too little blending. Set the corrector with a tiny amount of powder before the base, especially under the eye, because a wet corrector will move when the foundation brush passes over it and the correction will be uneven.
Correction also has limits that the client should hear before you start. It can reduce the look of a dark circle, a patch of pigmentation, a beard shadow, or a bruise, but it cannot remove texture, deep scars, or the shadow cast by a hollow under the eye. It cannot hide a raised spot without looking like a raised spot with makeup on it. And it should never be used over broken skin, an active infection, or a cold sore. Saying this at the start is not discouraging; it is the difference between a client who trusts the result and one who expects a filter and blames you for reality.
- 1. Clean the area and let the skin dry completely.
- 2. Identify the colour you need to cancel: blue, red, brown, or grey.
- 3. Pick the corrector that sits opposite that colour on the wheel.
- 4. Take a grain of product and warm it on the back of your hand.
- 5. Tap it on with a small brush, only on the discoloured area.
- 6. Blend the edges until they disappear into the skin.
- 7. Set the corrector with a small amount of powder.
- 8. Apply a base that matches the skin, then conceal only what remains.
Salon example
Fatima, thirty-five, came for a party makeup with two concerns she had carried for years: dark circles under both eyes and a patch of pigmentation on her left cheek. Her previous artist had used a full-coverage concealer three shades too light and had spread it across the whole under-eye and most of the cheek. In the salon mirror it looked almost acceptable; in her cousin's photographs it looked like a pale band across her face. We removed it and started with colour. I used a small amount of peach corrector under the eyes and a slightly warmer peach on the pigmentation, set both with a light powder, and then applied a base that matched her neck. The under-eye looked like skin rather than like a covered bruise, and the cheek patch was quieter without being erased. She needed less than half the concealer she had been using. At the end she said the face in the mirror looked tired in a normal way, not painted, and that was exactly the result we wanted. She now uses the same two correctors at home and has stopped buying the pale concealer.
Caution: Never use a pale pink corrector on deep skin; it turns grey over blue or brown, and no amount of concealer will bring the colour back.
Peach or orange for dark circles
Dark circles are not one colour. Under fair and light-medium skin they are often blue or purple, because the skin is thin enough to show the vessels beneath. Under medium and deep skin they are more often brown, olive-brown, or a mixture of brown and blue, because pigment sits in the same area as the vessels. Peach corrects blue on light and medium skin, while orange corrects deeper blue and purple on deeper skin. A warm apricot sits between the two and works for many Indian clients, especially in the medium range. The right choice depends on what you see in daylight, not on a rule about skin colour.
Placement matters as much as colour. Look at the shape of the shadow rather than at the whole under-eye. Most people have a darker area close to the inner corner and a softer shadow toward the outer edge, and the darkest point is usually just below the lash line at the inner third. Apply the corrector there first, then blend outward, and leave the outer edge almost bare. A corrector spread across the entire under-eye, including the part that is not dark, adds colour where none is needed and creates the flat half-moon that looks artificial in photographs. Correct the shadow, not the area around it.
Creasing is the second enemy. The under-eye is thin, moves constantly, and folds. Use a light hand, press the product into the line with a small brush or a fingertip, and set immediately with a very small amount of finely milled powder. If the client has dry under-eyes, skip the powder in the outer area and use a tiny amount only where the crease forms. If the client has deep lines, use less product and consider a cream corrector that stays flexible. Do not bake the under-eye with a thick layer of powder; on mature or deep skin it settles into every line and photographs as a pale, cracked surface.
The finish should look like rest, not like brightness. After correction and concealer, the under-eye should be within a shade of the cheek, slightly lighter at most. If the client asks for a brighter under-eye, explain that the camera will exaggerate it and offer a soft highlight on the cheekbone instead. For a bride who has not slept before the wedding, the honest aim is to look awake rather than to look eight hours rested, because the latter is not a makeup result. Correction reduces the shadow; it does not remove the cause, and it is worth telling a client with persistent dark circles that a dermatologist may have more to offer than a concealer.
- 1. Look at the under-eye in daylight with the client's face relaxed.
- 2. Decide whether the shadow is blue, purple, brown, or mixed.
- 3. Choose peach for blue, orange for deep purple, apricot for brown.
- 4. Apply a grain of corrector at the inner corner and darkest point.
- 5. Blend outward and stop before the outer edge of the eye.
- 6. Press the product into the crease with a small brush.
- 7. Set with a small amount of finely milled powder.
- 8. Conceal with a shade within one step of the cheek.
Salon example
Ananya, forty-one, booked a bridal trial and told me at the start that her dark circles were the one thing she hated in photographs. She had medium-deep skin with warm undertones and a brown shadow under both eyes that turned mauve whenever she used a light concealer. In daylight the shadow had a purple cast near the inner corners and a brown tone toward the outer edge. I used a warm apricot corrector on the inner third and a slightly deeper peach on the outer brown area, blending the two together. A tiny amount of powder went only into the crease. Her concealer matched her cheek within half a shade. In the trial photographs the under-eye looked rested and the cheekbone still caught the light. Her mother, who had been sceptical, said she looked like she had slept, and Ananya asked me to write the corrector shade on her card so she could buy it for herself. The makeup did not remove the circles; it stopped them from being the first thing anyone saw. At the wedding, three people told her she looked rested, and none of them mentioned her eyes.
Caution: Do not spread corrector across the whole under-eye when only the inner corner is dark; the flat, paler area it creates is visible in every photograph.
Redness, pigmentation and beard shadow
Redness is corrected with green, but the amount matters more than the colour. A green primer spread across the whole face gives a grey, sickly cast under a base, especially on medium and deep skin. Use a tiny amount of green corrector only on the red area: the sides of the nose, a healing spot, the centre of the cheeks, or the chin. Tap it on, blend the edge, and let it dry before the base. For widespread redness from rosacea or a recent peel, do not try to correct the whole face with green. Use a gentle base with the correct undertone and accept that some colour will show through, because a face with a little natural redness looks more human than a face covered in green and then in beige.
Pigmentation is corrected with peach or a warm apricot, then covered with a base that matches the surrounding skin. A patch of melasma or post-acne pigment is usually deeper than the rest of the face, and a concealer that matches the patch will look like a dark spot; a concealer lighter than the patch will look grey. The right approach is to warm the patch slightly with corrector, then even the whole area with base, then add a small amount of concealer only if the patch still shows. Do not promise to erase a large pigmented area. A soft, even tone is a realistic result; a perfectly uniform cheek is not, and pursuing it usually means a thick base that looks worse than the patch.
Beard shadow is a different problem, because it is not pigment on the surface but the dark hair beneath the skin. A peach or orange corrector under the base reduces the blue-grey tone of the shadow, and the base then covers the colour without needing to be thick. Apply the corrector to the beard area only, blend it well at the edges, and set it lightly before the base. On deeper skin, use a deeper orange or a warm terracotta rather than a pale peach. For a groom or a client who has just shaved, the skin may be irritated, so use a gentle product and avoid alcohol-heavy aftershave under makeup. If the skin is broken or razor-burned, do not apply base over it; work around it and refer.
Bruises and tattoos can be corrected in principle by layering the opposite colour, but the result is limited and the promise should be modest. A fresh bruise has several colours at once, including blue, purple, green, and yellow, and each needs a different correction; a tattoo has strong pigment that may need several thin layers before the base. Never promise full coverage, and never apply makeup over a bruise that is still painful, swollen, or broken. For a tattoo on the face or neck, ask whether the skin is fully healed and whether the client has had a reaction to makeup before. If the event is close and the skin is not settled, the honest answer is that makeup will soften it, not hide it.
- 1. Identify the colour to cancel before choosing the product.
- 2. Use green only on small red areas, never across the whole face.
- 3. Tap the green corrector on and blend its edges into the skin.
- 4. Warm a pigmented patch with peach, then even the area with base.
- 5. For beard shadow, use peach or orange on the beard area only.
- 6. Set each correction lightly before applying foundation.
- 7. Conceal only what still shows after the base.
- 8. Stop and refer if the skin is broken, painful, or infected.
Salon example
Sameer, thirty-three, was a groom for a December wedding and had a strong beard shadow that he wanted gone for the photographs. His skin was medium-deep and cool, and the shadow read blue-grey along the jaw and the upper lip. He had shaved that morning and had a little razor burn on the neck. We used a thin layer of orange corrector on the beard area only, blended it at the edges, and set it with a light powder. The base went on with a damp sponge, and the shadow was reduced enough that his jaw looked even without looking painted. I did not apply product to the razor burn, and I told him to use a mild moisturiser on it that night. In the photographs his beard area looks like skin with a faint shadow, which is what a man who shaved that morning looks like. He had asked to look clean-shaven; the honest result was a cleaner, even jaw, not a face without a beard. His bride said he looked like himself in the photographs, which is a better compliment than looking different.
Caution: Never cover a cold sore, an infected spot, or broken skin with corrector or base; refer the client and reschedule the makeup.
This is a Nandu Nai textbook. It is a private brand book, not a government licence, and it does not give the right to give medical treatment.