
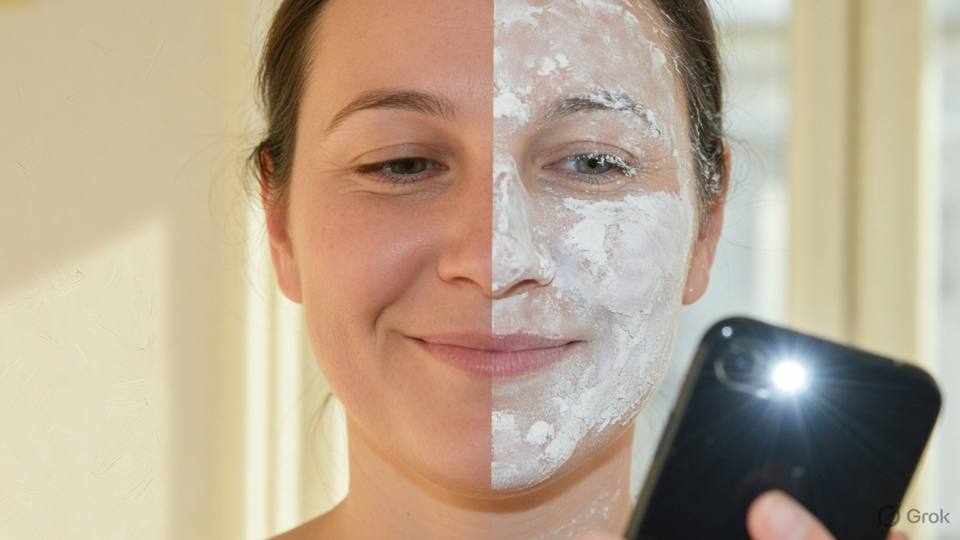
Why some products turn white
Flashback is the pale, chalky, or grey cast that appears on a face in a photograph when the camera flash bounces off particles sitting on the skin. The usual causes are silica powder, mica, and the mineral sunscreen filters titanium dioxide and zinc oxide. These ingredients are not faults in a product; they are useful for blurring texture or blocking ultraviolet light. Under a brief, intense flash, however, they reflect light straight back at the lens instead of letting it pass into the skin. The face then reads lighter than the neck, sometimes by two or three shades, and no amount of blending in the mirror will show it before the photograph is taken.
On deeper skin the effect is more obvious and less forgiving. A white cast that looks like a slight sheen on fair skin reads grey, ashy, or dusty on brown skin, especially on the forehead, the under-eye, and the tops of the cheeks. A high-SPF sunscreen under a full base makes the whole face paler than the chest in flash photographs. A heavy translucent powder pressed over the T-zone can leave a white patch that appears only in pictures taken by a phone at a metre and a half. The client will see the pictures before you do, usually at midnight, and will not know why the face she approved looks wrong.
The reason the mirror hides the problem is that a mirror reflects continuous room light, while a flash releases a very short burst of light from a small point close to the lens. The camera records the burst, not the room, so products that scatter light behave differently in a photograph than they do in a room. Distance changes the effect too: the closer the flash, the stronger the cast. That is why a selfie taken at arm's length can look acceptable while a group photograph taken across a hall looks wrong, or the other way around. A single test at one distance is not enough to judge a product.
It is also a mistake to blame one ingredient in isolation. Flashback usually comes from the combination of layers: a mineral sunscreen, a silicone primer, a powder with silica, and a setting spray applied heavily. Removing one product may reduce the effect without removing it, and adding another powder to fix the first one usually makes it worse. The practical approach is to test the whole stack on the client's jaw, look at the photograph, and change one layer at a time. That is slower than trusting a product name, but it is the only method that gives an answer for this face in this light.
- 1. Ask whether the event will include flash photography and at what distance.
- 2. Build the base exactly as you plan to send the client out.
- 3. Photograph the jaw and the centre of the face with flash.
- 4. Compare the face with the neck in the photograph, not in the mirror.
- 5. Note whether the cast sits on the powder, the base, or the sunscreen.
- 6. Remove or reduce the layer responsible and photograph again.
- 7. Test at two distances: arm's length and across a room.
- 8. Write down the products that passed for this client.
Salon example
Ishita, thirty-two, had a sangeet in a hotel ballroom with a photographer using a strong flash. She had deep skin and a favourite translucent powder that she used at home every day. We finished her base, and in the mirror it looked smooth and even. The first flash photograph showed a pale grey patch across her forehead and the tops of her cheekbones, exactly where I had pressed the powder. Her neck and jaw, which had less powder, looked correct. I removed the powder from those areas with a clean sponge, pressed a finely milled powder closer to her skin tone over the same spots, and photographed again. The grey was gone. We then took a photograph from across the room, where the cast was no longer visible at all. She carried the small coloured powder in her bag for touch-ups, and the photographs from that night show her face and neck as the same colour. The product was not bad; it was simply wrong for that light and that depth of skin. I now keep two powders in the kit for exactly this reason, and I ask about the photographer before I choose between them.
Caution: Do not use a white translucent powder as a large-area setting layer on deep skin before a flash event; test it on the jaw first or choose a powder closer to the skin.
Read the label, then test
Labels are a useful first filter, not a verdict. Look for titanium dioxide, zinc oxide, silica, mica, and any ingredient described as a mineral filter or a soft-focus powder. A product high on the list is more likely to scatter light than one where the same ingredient appears near the end. Sunscreens are a special case: in many countries they are regulated as drugs or as a separate cosmetic category, and the label must state the protection and the filters. The US Food and Drug Administration publishes guidance on cosmetic labelling and sunscreen claims at https://www.fda.gov/cosmetics, which is worth reading once so that you understand what a label can and cannot tell you.
A label cannot tell you how a product will behave on a particular face. Two powders with the same silica content can look different because of particle size, and a primer that flashes on one client may be invisible on another with drier skin. A sunscreen that leaves a white cast on the arm may be fine under a base on the face, or it may be the main cause. The only reliable test is on the skin that will be photographed, in the light that will be used, at the distance the photographer will stand. Anything else is a guess dressed up as expertise, and clients remember guesses that fail.
Test the stack in the order you will apply it, adding one layer at a time and photographing after each. Start with skincare and sunscreen, then primer, then base, then powder, then spray. The photograph after each step tells you exactly which layer introduced the cast, which is far more useful than removing everything and starting over. Keep the test on the jaw so that you can compare it directly with the untreated neck. Write the result on the client card with the product name and the batch if it is visible. Six months later the same client will be glad you did, and so will you.
If a product does flash, you have three choices, in order of preference. Use less of it, which solves more cases than artists expect. Replace it with a version that has less of the offending ingredient. Or change the order so that the flashing layer sits under something that covers it, which works for a sunscreen but rarely for a powder. Do not add a second powder to hide the first, and do not spray a setting mist repeatedly in the hope that it will melt the cast away. A mist can reduce a powdery look, but it cannot make a reflective particle stop reflecting.
- 1. Read the ingredient list for mineral filters, silica, and mica.
- 2. Ask the client which sunscreen she uses and when she applied it.
- 3. Apply the skincare and sunscreen and photograph the jaw.
- 4. Add the primer, photograph again, and note any change.
- 5. Add the base and photograph the neck and jaw together.
- 6. Add the powder, then the spray, photographing after each layer.
- 7. Identify the layer that caused the cast and reduce or replace it.
- 8. Record the passing combination on the client card.
Salon example
Dev, thirty, was a groom for a winter wedding with an outdoor ceremony at four in the afternoon and a reception under flash at nine. He arrived with his own sunscreen, a high-protection cream he used for cricket, and asked us to use it because his skin burned easily. We tested it on his jaw: within a minute the jaw looked pale grey in a flash photograph while his neck stayed warm. The sunscreen was the cause, not the base. I suggested he use it on his neck and ears, where the sun would actually fall during the ceremony, and we used a lighter daytime sunscreen on his face under the base. We photographed again at arm's length and across the room, and the cast was gone in both. He kept the high-protection cream for the cricket season and used the lighter one for the wedding. The client learned something useful, and the photographs do not show a pale line at his jaw. He also stopped applying the heavy cream to his face on the morning of a function, which solved half the problem before we started.
Caution: Do not promise that a product will not flash based on its label alone; a label describes ingredients, not behaviour on this client's skin.
Night photos on deeper skin
Night events combine the worst conditions for a deep-skinned face: strong flash, warm ambient light, heat from a crowd, and photographs taken from every angle. The goal is a base that keeps the depth of the skin while controlling shine, because a face that has been lightened to look bright in a dark room will look grey and flat in the photographs. Start with a shade that matches the neck, then build thin layers and set only where the skin becomes oily. If the client wants more brightness, add a soft highlight on the high points rather than a lighter foundation over the whole face. Light on the skin reads as brightness; a lighter shade reads as a mask.
Powder is the part that needs the most care. Choose a finely milled powder that is close to the client's skin tone, and press it with a small puff on the centre of the face only. Avoid a white translucent powder over large areas, and avoid the technique of baking, where a thick layer of powder is left under the eye for several minutes. Baking can look smooth in a bright salon and then photograph as a pale half-moon under the eye. On deep skin, a little warmth under the eye is natural; a bright, flat under-eye is the detail that makes a face look unlike itself in a photograph.
The under-eye area needs correction rather than brightness. Use a peach or orange corrector on the blue or purple shadow, then a concealer close to the skin tone, then a very small amount of powder. Do not take the concealer two shades lighter than the cheek, even if the client asks, because the flash will turn the difference into a pale patch. If the under-eye is dry, use less powder and press it only where the crease forms. A tiny amount of a cream product on the outer corner can keep the area from looking dusty. The aim is to look rested, not to look illuminated.
Finally, test the way the night will actually happen. Ask the client to stand under a warm bulb, then photograph with flash, then stand near a window or a doorway with cooler light and photograph again. Look at the face as a whole rather than at individual features, and compare it with the neck and the chest. If the face is one colour and the chest another, fix the base rather than the chest. If the forehead is paler than the cheeks, fix the powder. If the under-eye is grey, fix the corrector. Each of these is a five-minute correction now and an unfixable photograph later.
- 1. Match the base to the neck and keep the skin's depth.
- 2. Build two thin layers instead of one heavy layer.
- 3. Correct the under-eye with peach or orange before concealer.
- 4. Choose a finely milled powder close to the skin tone.
- 5. Press powder on the centre of the face only, never bake.
- 6. Add a warm highlight on the high points instead of a lighter base.
- 7. Photograph under a warm bulb, with flash, and in cool light.
- 8. Compare the face with the neck and chest in each photograph.
Salon example
Lakshmi, thirty-four, was attending her cousin's reception and had been told by a relative that she should look fairer for the photographs. She had deep skin with warm undertones, and she had bought a foundation two shades lighter than her neck. We talked about what the camera would do with a pale face above a deep neck, and she agreed to try the match I suggested. I used a base that matched her neck, corrected the under-eye with a peach corrector and a concealer close to her skin, and pressed a finely milled powder only on her forehead, nose, and chin. For brightness I added a warm gold highlight on the tops of her cheekbones and the inner corners of her eyes. The flash photograph showed a face that looked like hers, with depth in the skin and light where the cheekbone caught it. Her aunt asked which product had made her glow, and the answer was the highlight, not a lighter base. Lakshmi sent the picture to the relative who had advised her, and the reply was that she looked like herself, only rested.
Caution: Do not lighten the under-eye to a much lighter shade than the cheek; in flash photography it reads as a pale mask under the eye.
This is a Nandu Nai textbook. It is a private brand book, not a government licence, and it does not give the right to give medical treatment.