
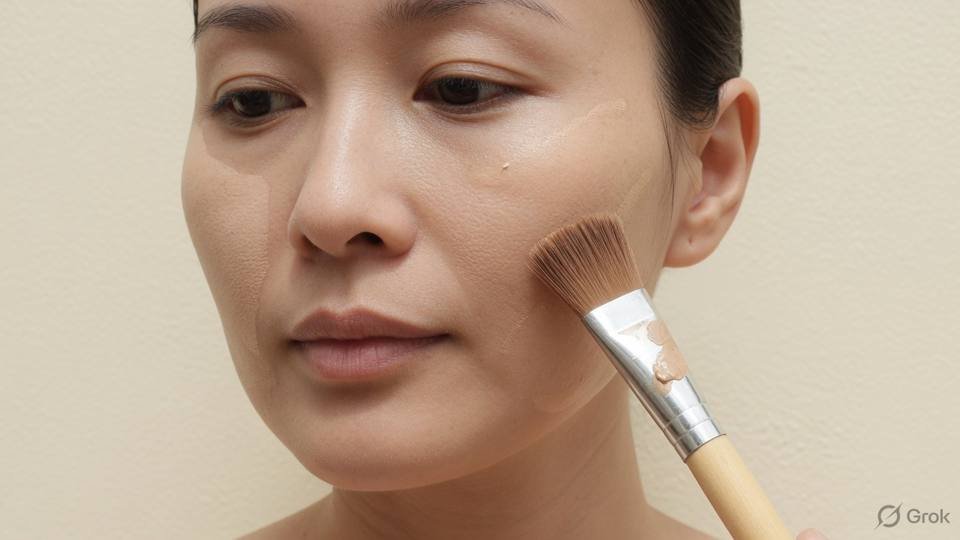
Thin layers, small amounts
A good base is built in thin layers, not in one thick coat. Start with a small amount, about one pump for a full face, on the back of your hand rather than on the client's skin. Pick it up with a brush or a damp sponge and press it into the face in short, tapping motions, working from the centre outward. Most faces need coverage in a few places, not everywhere. One sheer layer over the whole face keeps the skin looking alive, and a second thin layer on the cheeks and chin handles the rest. When the first layer is still wet, stop; wet product moves, and anything piled on top of it streaks.
Thin layers dry faster, sit closer to the skin, and crease less. They also leave room for concealer and powder without turning the face into a mask. If the client asks for full coverage, explain that full coverage is an effect, not a thickness. Build it in three thin passes with drying time between them, and use a small brush to place extra product only on the marks that need it. A thick layer hides texture for ten minutes, then settles into every pore and fine line. Thin layers look better at hour six, which is when the photographs are usually taken and when the client is most tired.
The order of work matters as much as the amount. Do the forehead first, then the nose and the inner cheeks, and finish with the jaw, the ears, and the neck, because those last areas need the least product and the most blending. Keep a clean tissue beside you and wipe the brush handle, not the bristles, when it becomes tacky. If the base starts to drag rather than glide, the skin underneath is either too dry or the layer above is too wet. Stop, press the area with a clean damp sponge, and let it settle before adding anything. Most base problems are solved by waiting and pressing rather than by adding another product.
Judge the result from a step back, not from ten centimetres away. The skin should still look like skin, with the natural shadows of the face visible and the edges of the base invisible at the hairline, the nostrils, and the ears. Ask the client to turn her head slowly while you watch the jaw and the neck. If the base looks heavy, the answer is less product, not more powder. If it looks patchy, the answer is better preparation, not a different foundation. If it looks flat, the answer is a little light on the high points, not a lighter shade all over. Every correction has a cause, and almost none of them is solved by adding more of the thing that failed.
- 1. Shake or stir the foundation and place one pump on the back of your hand.
- 2. Pick up a small amount with a damp sponge or a stippling brush.
- 3. Press from the centre of the face outward, using tapping rather than dragging.
- 4. Stop when the first layer is still slightly wet and let it set.
- 5. Add a second thin layer only where the skin still shows through.
- 6. Use a small brush with concealer on individual marks, not on whole areas.
- 7. Blend the edges into the hairline, the ears, and down the neck.
- 8. Step back and check in daylight before you powder.
Salon example
Ayesha, twenty-eight, came for an engagement makeup with acne marks on both cheeks and a firm belief that only a heavy base would cover them. Her last artist had used a full-coverage foundation in one thick layer, and by the time the photographs were taken it had settled into the marks and made them look deeper. I asked her to trust a different method for one appointment. We used one thin layer over the whole face, then a small brush with a slightly firmer concealer on each mark, and pressed powder only on those spots. The skin still looked like skin, the marks were quieter, and she could hug her cousins without the base moving. At the end she asked me to teach her the method for her own wedding. The explanation took less time than removing a thick base would have, and she practised it twice before the trial. On the wedding day she did her own base in the morning and carried a small brush and concealer for the marks, which is exactly what the method was for.
Caution: A thick base cracks when the face moves and creases under the eyes; more product is not the same as more coverage.
Cream first, then powder
Cream products bond with each other, so cream base, cream blush, cream contour, and cream highlight belong together in one stage. Powder then locks the surface and controls shine. The order matters: powder over wet cream turns patchy, and cream over powder lifts the powder underneath and leaves a small ball of product on the skin. Work through the face in zones, finishing one zone before moving to the next, and give each cream product a minute to settle. If you can still see a wet edge, the powder will find it and the whole area will look uneven in daylight.
Set only where the skin actually becomes oily, usually the centre of the forehead, the sides of the nose, the chin, and the inner cheeks. Leaving the outer cheeks and the jaw unset keeps a little light in the skin, which photographs better than a fully matte face. Press the powder with a puff instead of sweeping it with a fluffy brush. Pressing pushes powder into the base and makes it hold; sweeping moves it across the surface and lifts the product underneath. Tap off the excess before every press, and use a small amount rather than a visible cloud.
Long wear comes from thin layers plus targeted powder, not from a thick mask. At the end of the appointment, finish with a setting spray held an arm away from the face, and let it dry without touching the skin. In humid weather a light dusting of powder over the T-zone just before the client leaves is worth more than a heavy setting layer at the start. If the client will be outdoors, keep the spray light and avoid a dewy finish that turns shiny within an hour. The aim is a base that still looks like skin at the end of the evening, not one that looks like a photograph at the beginning.
Watch for the two common failures of the cream-then-powder rule. The first is pilling, when a water-based product is applied over a silicone-based one before the first has set, or the other way around; the base rolls into small flakes under the brush. The second is separation, when oil or sweat lifts the base from the skin in patches, usually around the nose and the mouth. Pilling is fixed by removing the area and starting again with fewer layers. Separation is fixed by blotting, pressing with a clean sponge, and re-powdering only that spot. Neither is fixed by adding more foundation over the top, which is the most common and least successful repair.
- 1. Finish every cream product before you open the powder.
- 2. Let each cream layer set for about a minute before the next.
- 3. Press powder with a puff on the T-zone and the sides of the nose.
- 4. Leave the outer cheeks and the jaw unset unless they shine.
- 5. Tap the puff or brush before it touches the face.
- 6. Press the powder in rather than sweeping it across the skin.
- 7. Spray setting mist from an arm away and let it dry untouched.
- 8. Blot before any touch-up powder during the event.
Salon example
Tanya, thirty, had an outdoor mehendi lunch in April: four hours in the sun and another four under a tent, with humidity above eighty percent. We built the base in two thin layers, used a cream blush on the cheeks, and then set only her forehead, nose, and chin with a pressed powder. I pressed the powder with a small puff and left her cheeks bare so that some light stayed in the skin. At the end I sprayed a setting mist from an arm away and waited two minutes before she stood up. She sent a photograph at six in the evening. The centre of her face was still even, the cheeks had a little shine, and the base had not separated around her nose. The shine looked healthy rather than greasy, which is the difference between skin and sweat in a photograph. Her sister asked for the same method at her own wedding two months later. The only change we made the second time was a lighter powder on the nose, because the first photographs showed a little shine there that looked like powder rather than skin.
Caution: Do not powder the whole face out of habit; dry cheeks with powder on top look flat and dusty in daylight.
The phone flash check
Before the client leaves, check the makeup the way the world will see it. Take a photograph at arm's length with the phone flash on, then take another in daylight near a window. Look at the jawline, under the eyes, and the centre of the face. The flash shows white cast, patchy powder, unblended edges, and the line between face and neck more clearly than any mirror. It also shows whether the base has settled into pores or into a line that the eye forgives in a warm room. Do this while the client is still in the chair, when you can still fix what you see. Two minutes of checking prevents an evening of photographs the client will dislike.
Ask the client to take her own photograph as well, because her phone and her settings are the ones that will record the event. If the flash reveals a problem, fix the cause instead of adding more product. White cast means too much powder or a product with mineral filters; remove the excess with a clean damp sponge or a tissue. Patchiness means the base went on over wet skincare; smooth it with a damp sponge and a tiny amount of base. A hard jawline needs blending, not a darker shade. A shiny forehead needs blotting, not another layer of powder. Then photograph again and show the client the difference, so that she learns what her own phone will do.
The distance of the photograph matters. A flash picture taken at thirty centimetres shows texture and powder in a way that a photograph from two metres does not, and a photograph from ten metres shows the face and neck as a shape rather than as skin. Take one of each if you can. The close picture is for you, to check the work; the far picture is for the client, to show how she will appear in a group photograph at the venue. Flash also exaggerates the difference between a warm face and a cool neck, which is why a base that looked perfect in the mirror can look like a mask in a phone picture taken by a cousin.
If a product continues to flash white after you have removed the excess, stop trying to fix it with powder and change the product. A different setting powder, a lighter application, or a switch to a finely milled powder closer to the skin colour will solve more than any amount of blending. Record which products flashed and which did not, because the same client will book you again and the same mistake is easy to repeat. Some clients will tell you that they never take flash photographs; believe them only for the event they have described, because weddings, receptions, and office parties almost always include at least one phone with the flash on.
- 1. Finish the makeup completely before you test it.
- 2. Take one photograph with flash at arm's length.
- 3. Take a second photograph in daylight near a window.
- 4. Check the centre of the face, under the eyes, and the jaw.
- 5. Compare the face with the neck in both photographs.
- 6. Fix the cause: blot, press, blend, or remove excess powder.
- 7. Photograph again and compare the two results with the client.
- 8. Note any product that flashed so you avoid it next time.
Salon example
Kavya, twenty-six, was going to an evening reception and wanted a flawless finish. In the salon mirror everything looked correct: even base, soft blush, and a jaw that matched her neck. I took a flash photograph at arm's length and the centre of her forehead went pale grey while her cheeks stayed warm. The cause was a translucent setting powder I had pressed on too generously. I removed the excess with a clean damp sponge, sprayed a little setting mist, and photographed again. The grey was gone, but the second picture showed that her jaw needed another two minutes of blending. We stepped outside and took a third photograph in daylight, which looked like her face rather than like makeup. She left with the three photographs on her phone and sent one to her mother from the car. That check took four minutes and saved the evening. The next client with the same powder got a lighter application from the start, and her photographs needed no correction at all. Kavya still uses the daylight picture as the reference for what her face should look like on a night out.
Caution: Do not rely on the salon mirror alone; warm bulbs and a short viewing distance hide white cast and hard lines until the photographs arrive.
This is a Nandu Nai textbook. It is a private brand book, not a government licence, and it does not give the right to give medical treatment.