
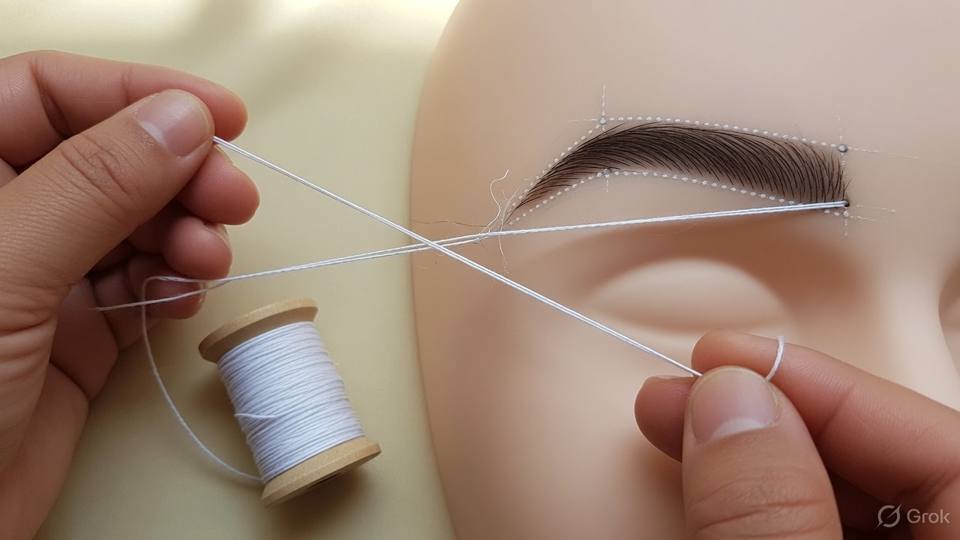
Threading setup and hand position
Threading removes hair with a folded cotton thread, and it suits the brows, the upper lip, the chin, and the sides of the face. It is precise and needs no wax, which makes it useful on clients whose skin reacts to wax or who are between wax appointments. The setup is simple but not casual. Use a fresh thread from a clean spool, or a thread sanitised by the salon's method, and keep it off the floor and away from the client's clothes. Wash your hands, cleanse the area, and dry it. Do not use a cloud of powder near the eyes; it settles on the lashes and irritates the client.
The thread is anchored around the fingers, and the centre is twisted into a loop. Work in short, controlled passes rather than long pulls. A long pull catches more skin and is harder to stop when something goes wrong. Remove a few hairs at a time, check the area, and continue. Keep the loop off the eyelid and ask the client to close the eye on the side you are working. If the client flinches or the skin reddens deeply, pause and let the area settle. Threading is fast, but speed is not the goal; a clean line without a tear is the goal.
Hand position protects both the client and your wrists. Support the skin with the free hand, keep the working hand close to the face, and avoid pulling the thread against the eye. Ask the client to hold the skin at the temple if you need more tension, but never ask them to stretch their own eyelid. Do not thread over an acne cyst, a pustule with a red halo, broken skin, a cold sore, or a mole that has changed. If the hair is very dense, work in sections and give the skin a short break. A tight thread and a rushed hand are the two causes of most threading marks.
Finish by checking both sides in the mirror. Faces are not symmetrical, and a brow that looks even on a tilted head may look uneven when the client sits up. Wipe the area with a calming wipe, and tell the client what redness is normal and how long it usually lasts. Record the shape you made, the areas you threaded, and any reaction. If the client is new, ask them to send a message if the area swells or develops bumps. The next visit then starts with a shape that has grown out, not with a shape that has to be guessed.
- 1. Wash your hands and use a fresh thread from a clean spool.
- 2. Cleanse and dry the area, and keep powder away from the eyes.
- 3. Anchor the thread, twist the centre into a loop, and keep the loop small.
- 4. Support the skin with the free hand and keep the working hand close to the face.
- 5. Work in short passes and remove a few hairs at a time.
- 6. Ask the client to close the eye on the side you are working and keep the loop off the lid.
- 7. Do not thread over a cyst, a pustule with a red halo, broken skin, a cold sore, or a changing mole.
- 8. Check both sides in the mirror and wipe the area with a calming wipe.
- 9. Record the shape and any reaction on the client card.
Salon example
Rhea, nineteen, books her first threading for her upper lip and brows. She has a small pustule with a red halo at the corner of her mouth, which she says is a heat boil. The esthetician looks, does not touch it, and explains that she will thread the brows but not the lip while the spot is inflamed. Rhea agrees. The esthetician washes her hands, uses a fresh thread, and asks Rhea to close one eye while she works on that brow. She removes a few hairs at a time, checks the shape in the mirror, and does not pull the thread against the lid. The brows take twelve minutes. The esthetician wipes the area, gives a cool gel, and reschedules the lip for a week later. She writes the refused area and the reason on the card, and Rhea returns when the spot has settled. On that visit the esthetician checks the corner of the mouth first, sees that the redness has gone, and threads the lip in two short passes with a calming wipe between them and no pressure on the healing skin.
Caution: Threading is precise, not rough; a long, fast pull catches skin and can tear the eyelid area, which no shape is worth.
Brow mapping around the bone
A good brow shape follows the brow bone that the client already has. It does not draw a new brow over the face, and it does not force the same arch on every client. Start with three landmarks. The brow should begin roughly above the side of the nose, rise near the outer edge of the iris or where the bone lifts, and taper toward the outer corner of the eye. These are starting points, not laws. A wide-set eye, a low brow bone, a scar, or a strong cowlick changes the map. Look at the bone, the eye, and the way the hair grows before you remove a single hair.
Asymmetry is normal, and the client often notices it more than you do. One brow may sit higher, one may be fuller, and one may have a cowlick that pushes hair in a different direction. Work with the stronger brow as the reference, and bring the other toward it without trying to make them identical. Do not raise an arch above the bone to chase a trend. Do not shave or thread the brow into a thin line as the default; thin brows date the face and take months to grow back. On a first visit, leave the brow a little fuller than the client asked for. You can remove more next time, but you cannot add hair back today.
Show the client the shape before you remove a lot. Use a brow pencil to outline the proposed line, or hold a mirror while you explain which hairs you plan to take. Get a clear yes. If the client asks for a shape that will not suit the bone, say what you would do instead in one sentence, then follow their choice if it is safe. A client who feels heard is easier to guide than a client who feels overruled. If the skin is red from a previous service or the brow area is peeling, do not thread deeply; tidy the centre and wait for the skin to settle.
The finished shape should look like the client, only tidier. Check the distance between the brows, the height of the arch, and the tail. Remove stray hairs between the brows and above the nose, but do not create a hard block. A soft inner corner suits most faces. If the client wears glasses, check the shape with the glasses on, because the frame changes the visual balance. Photograph the shape only with consent, and note the mapping in the card. A written note is more reliable than a photograph on a personal phone, and it does not put the client's face on a device that may be shared.
- 1. Look at the brow bone, the eye shape, and the natural hair direction before removing hair.
- 2. Mark the start above the side of the nose, the arch near the outer iris, and the tail toward the outer corner.
- 3. Compare both brows and use the stronger one as the reference, not a perfect mirror.
- 4. Draw the proposed shape with a brow pencil and show the client in a mirror.
- 5. Get a clear yes before removing a large amount of hair.
- 6. Leave the brow fuller on a first visit; you can remove more next time.
- 7. Do not raise the arch above the bone or thread the brow into a thin line by default.
- 8. Check the shape with the client's glasses on if they wear them.
- 9. Record the mapping and the amount removed on the card.
Salon example
Farida, forty-two, brings a photograph of a high, thin arch and asks for the same shape. Her brow bone is low, her eyes are deep-set, and her natural brows are full with a strong cowlick on the left. The esthetician does not copy the photograph. She marks the start, arch, and tail on Farida's own bone, shows her in the mirror, and explains that a high arch would sit above the bone and make the brow look surprised. Farida is unsure, so the esthetician removes only the stray hairs below the brow and the centre, leaving the top line almost untouched. She shows the result and asks Farida to live with it for a week. Farida returns and asks for a little more from the tail, not the arch. The second visit removes a small amount, and the shape still looks like her. The card records the low bone, the cowlick, and the decision to go slowly, so the next esthetician does not start from a photograph again or promise an arch the bone cannot hold without the client seeing the trade-off.
Caution: A photograph is a reference, not a measurement; mapping to someone else's bone can leave a client with a brow that does not fit their face.
Aftercare and knowing when to refer
After threading, the area may be pink and slightly tender. That is normal and usually settles within a few hours. Wipe the area with a cool, calming wipe or a light gel that the label allows. Do not apply a heavy, fragranced cream, and do not let the client apply makeup to the area for a few hours if the skin is red. Tell them not to scrub, not to use a retinoid or strong acid on the area that night, and not to pick at any small bumps. A cool compress helps if the area feels hot. Most clients can return to normal skincare the next day if the skin looks calm.
Some reactions are not normal. Spreading redness, swelling, warmth, a growing bump, or a blister needs a doctor, not another product. A small white bump around a follicle may be folliculitis, and it should be looked at if it spreads or becomes painful. If the client has a cold sore after threading, the virus may have been reactivated by the friction, and the area is contagious. Do not treat it; advise the client to see a doctor and reschedule the next service. If a client has reacted to threading before, note it and consider whether wax or another method is safer for that area.
The aftercare advice should be short enough to remember. No sun on the area today, no sauna or steam, no strong scrub for forty-eight hours, and no retinoid that night. Keep the area clean and moisturised with a plain product. Do not apply deodorant to a freshly threaded underarm, and do not wear a tight collar over a threaded chin or neck. If the client has an event the next day, say that mild redness may still be visible and that makeup can cover it only after the skin has settled. Do not promise a completely calm face for a photograph.
Record the shape, the areas treated, the products used, and any reaction. If the client is happy, note the mapping so the next visit can repeat it. If the client is not happy, note what they wanted and what was agreed. A complaint about shape is easier to resolve when the card shows the conversation. A complaint about a reaction is easier to defend when the card shows the aftercare advice. The record is not a substitute for skill, but it is the memory of the service, and memory is unreliable on a busy Saturday, when three faces can blur into one.
- 1. Wipe the area with a cool, calming wipe or a light gel.
- 2. Tell the client that mild redness and tenderness for a few hours are normal.
- 3. Advise no makeup on the area for a few hours if the skin is red.
- 4. Advise no scrub, retinoid, or strong acid on the area that night.
- 5. Advise no sun, sauna, or steam on the area that day.
- 6. Tell the client to call if redness spreads, swelling appears, or a bump grows.
- 7. Refer a cold sore, a spreading folliculitis, or a blister to a doctor.
- 8. Record the shape, the products, the advice, and any reaction.
Salon example
Naina, thirty-three, has her brows and upper lip threaded before a dinner. The service is quick, and the esthetician notices a little redness on the upper lip but thinks it is normal. That evening Naina sends a photograph: the lip area is swollen and has small white bumps around the follicles. The esthetician does not suggest another product or a home remedy. She asks Naina to keep the area clean, to avoid makeup and scrubs, and to see a doctor if the swelling spreads or becomes painful. She records the reaction, the thread used, and the advice. The doctor treats it as a mild folliculitis, and it settles in four days. At the next booking the esthetician patch tests the area with a small thread pass and waits before doing the full lip. The card notes the earlier reaction, the thread, the doctor visit, and the successful test, so the next visit can repeat what worked and avoid what did not. Naina is also asked to wait a week before any lip wax, so the skin has a full recovery before another method.
Caution: Redness that spreads or a bump that grows is not a normal after-effect; stop selling aftercare and send the client to a doctor.
This is a Nandu Nai textbook. It is a private brand book, not a government licence, and it does not give the right to give medical treatment.