
Collar-length layers
A collar-length layered cut puts the hem at the shirt collar, 22 to 26 cm from the crown, and keeps a solid outline with long layers inside it. The perimeter stays heavy enough to rest on the neck instead of flicking out, while the interior loses just enough weight to move. It suits straight, wavy and softly curly hair of medium density, and it is the safest first long cut for a man who has worn short hair and wants length without a year of awkward stages. A daily helmet and humid air flatten the crown, so the shape is built to fall into place after a wash with no round brush. On fine hair the layers stay below the jaw, because a short layer at the crown leaves the top looking thin and the ends looking empty.
Measure dry, with the hair parted where he wears it, and show 22 to 26 cm at the collar before the cape is fastened. Cut the perimeter first at zero elevation, all the way round, so nothing short escapes the hem. Then section into four and take vertical partings inside the shape, lifting at 135 to 160 degrees; above 90 degrees removes weight rather than building it, and this much lift is enough on medium density. The shortest layer stays at the jaw or below, 4 to 6 cm above the hem, which keeps the top surface calm when the hair air-dries. Cross-check both sides at the centre back, dry the hair, and cut only the last centimetre if a corner turns out. Allow 45 to 75 minutes, and do not remove 15 cm just to make the sectioning easier.
- 1. Consult with dry hair, hold the comb at the collar, show 22 to 26 cm from the crown, and agree the number before the cape.
- 2. Section into four, crown to nape and ear to ear, then take vertical partings no wider than the comb inside each quarter.
- 3. Cut the perimeter first at zero elevation, carrying the centre-back guide around the head with even tension.
- 4. Cut the interior on vertical sections, keeping the shortest layer at the jaw or below and the top surface flat.
- 5. Name the elevation aloud: 135 to 160 degrees, which is above 90 and removes weight instead of building it.
- 6. Cross-check both sides at the centre back and compare the shortest layer with the hem at eye level.
- 7. Dry check from the front, both sides and the back, with the head level and then tilted down, and trim only the last centimetre.
- 8. Rebook in 6 to 8 weeks, because the collar rubs the ends and the hem loses its line before the layers move.
Salon example: Arjun's first long cut
Arjun, twenty-eight, works in a warehouse and wears a helmet for eight hours a day. He had short back and sides and wanted length at the collar without looking untidy at work. I checked density at three partings, found it medium, and ran a wet stretch that sprang back at about 30 percent. We agreed 24 cm from the crown at the collar, which sat just below his nape hairline, and I showed the mark with the comb before the cape. I cut the perimeter at zero elevation, then took vertical sections at 150 degrees and kept the shortest layer at the jaw. Both sides were compared at the centre back, and after drying I trimmed 1 cm at the front corners only. He rebooked in seven weeks and said the helmet flattened the top far less than he expected. I wrote 24 cm on his card so the next visit starts from the same mark.
Caution: Do not lift the interior above 160 degrees on medium hair, because the layers collapse, the crown flattens further under a helmet, and the hem loses the weight that keeps it sitting on the neck.
Shoulder-length layers

Shoulder-length layers keep the outline at the shoulder line and cut internal layers that never break it. From the front the shape reads as one length; from the back, the layers move under the top surface. The hem sits 30 to 34 cm from the crown, on the shoulder bone rather than below it, so the ends rest on the shoulder and cannot flick outward. It suits medium and thick hair, straight to wavy, and a man who wants to tie the hair on hot days without losing the shape he paid for. Fine hair needs the layers kept low, from the jaw down, because a high layer empties the mid-lengths and the crown flattens faster under humidity and a helmet. The whole cut is planned so an air-dry falls back into the outline.
Agree the outline in centimetres first, then the shortest layer. Cut the perimeter at zero elevation from a centre-back guide and keep every following section on that line. Section into four and take vertical partings for the interior. Lift at 120 to 150 degrees; above 90 degrees removes weight, and 120 is enough on most men because the front hair is shorter and has less to spare. The shortest layer sits at the jaw or chin, 8 to 12 cm above the hem, and the front sections are over-directed forward so the face frame lands where he parts the hair. Cross-check both sides against the centre part, dry, and refine. Plan 45 to 75 minutes, and refuse to shorten the outline by 15 cm to avoid the interior work.
- 1. Consult with dry hair, agree 30 to 34 cm at the shoulder bone in centimetres, and show the mark with the comb at the front and the back.
- 2. Section into four, from the crown to the nape and ear to ear, and comb a clean centre part for the interior work.
- 3. Cut the perimeter first at zero elevation, using a centre-back guide and even tension all the way round.
- 4. Cut the interior on vertical sections, with the shortest layer at the jaw or chin and the outline left untouched.
- 5. Use 120 to 150 degrees elevation and say the number, so the weight comes out of the inside and not off the ends.
- 6. Cross-check both sides against the centre part, then over-direct the front forward and compare the two face frames.
- 7. Dry check from the front, both sides and the back, then tie the hair loosely and see whether the outline still holds.
- 8. Rebook in 6 to 8 weeks, and explain that the layers move first while the shoulder line keeps its length.
Salon example: Nikhil's shoulder outline
Nikhil, thirty-four, is a site supervisor and wanted his hair long enough to tie at the back of the neck but still neat for meetings. His hair is thick and wavy, and the ends had been cut straight across six months earlier, so the corners sat wide. I checked density, found it high, and confirmed a wet stretch of about 30 percent. We agreed 32 cm from the crown, on the shoulder bone, and the shortest layer at the chin, 10 cm above the hem. I cut the perimeter at zero elevation from the centre back, then took vertical sections at 130 degrees. The front was over-directed forward, and both sides were checked at the centre part. Dried, the outline stayed solid and the interior moved. He tied it loosely and the shape still read as intended, so he rebooked in eight weeks. I wrote 32 cm and 10 cm on his card.
Caution: Do not cut a short crown layer on fine hair, because the top will flatten under a helmet and the mid-lengths will look emptier than before the cut.
Long one-length
A long one-length cut puts every hair on the same line, so the hem reads as a single edge from the back and from both sides. It is the most honest long shape, because no layer hides a thin end and no interior shape lifts the crown. It suits straight and gently wavy hair of medium to thick density, and a man who wants to wear the hair down, half-up or in a low tie without changing the cut. The length sits at mid-back, 40 to 45 cm from the crown, where the weight pulls the hair straight and keeps the outline calm in humid weather. Fine hair can wear this shape at the shoulder, not at mid-back, because weight on thin ends makes them look stringy within weeks. A helmet flattens the top, and this cut accepts that instead of fighting it.
Agree one number, the hem at 40 to 45 cm, and say clearly that every hair will reach it. Cut at zero elevation, hair combed flat to the body, with the shears parallel to the floor. Section into four and take horizontal partings no wider than the comb, starting at the nape centre, then carry the guide upward and around. Keep tension identical on both sides, because one loose section leaves a step that shows for months. Check the centre-back guide after every second section, then dry the hair and refine the line only. Do not lift a section to save time and do not remove 15 cm to make the parting easier; the length is the cut. Allow 45 to 75 minutes for the sectioning and the dry finish.
- 1. Consult with dry hair and agree 40 to 45 cm from the crown, showing the hem with the comb at mid-back before the cape.
- 2. Section into four, crown to nape and ear to ear, then take horizontal partings from the nape upward.
- 3. Cut the perimeter first at zero elevation from a centre-nape guide, and clip the guide so the line cannot drift.
- 4. Carry the guide through the whole interior, bringing each section down to the same point with equal tension.
- 5. Use zero degrees elevation, with the shears parallel to the floor and one clean closing cut per section.
- 6. Cross-check the left and right sides by combing them forward and comparing them at eye level, then from the back.
- 7. Dry check from the front, both sides and the back, and trim only the small step that the dry line exposes.
- 8. Rebook in 6 to 8 weeks, and explain that the ends thin first even though the line grows out evenly.
Salon example: Sandeep's one line
Sandeep, forty-one, teaches at a college and had been growing his hair for eighteen months with no cut at all. It reached below the shoulder blades and the ends were uneven from old layers. He wanted one line and no layers. I checked density, found it thick, and ran a wet stretch that returned at about 30 percent. We agreed 43 cm from the crown, which put the hem at mid-back, and I showed the mark before the cape. I cut the centre-nape guide at zero elevation, carried it around in horizontal partings, and kept the tension the same on both sides. The two fronts were combed forward and compared, then the hair was dried and only the dry steps were trimmed. It took 70 minutes. He rebooked in eight weeks and said the line held with a simple wash and air-dry. I wrote 43 cm on his card.
Caution: Do not cut a hard one-length line on very curly hair, because the curls pull up unevenly and the hem dries into a staircase.
U-shape back
A U-shape keeps the centre back longest and shortens the sides, so the hem forms one rounded curve across the back. The heaviest point sits on the centre back, 40 to 45 cm from the crown, and the sides finish 4 to 6 cm higher. It suits straight, wavy and softly curly hair of medium to thick density, and a man who wants length at the back but a tidier line near the ears and jaw. The curve softens the back view and stops the hem from sitting like a heavy straight edge on the neck. Fine hair can wear a shallow U only, because a deep curve takes weight off the sides and leaves them wispy. Humidity and a helmet flatten the crown, so the curve is cut to fall cleanly without styling.
Agree the centre-back length and the side length in centimetres before the first cut. Cut the centre guide at zero elevation and keep it visible, then work outward in vertical sections, angling each section toward the centre so the hem rises steadily. Lift the side sections no more than 10 degrees; a higher lift removes weight and the curve starts to read as layers. Do not take the sides up in one step, because a step shows from behind every time the hair moves. Cross-check by combing both sides forward at the shoulders. Dry the hair, look at the back in the hand mirror, and refine the curve in small cuts. Plan 45 to 75 minutes, and do not shorten the centre by 15 cm to make the sides easier to reach.
- 1. Consult with dry hair, agree the centre back at 40 to 45 cm and the sides 4 to 6 cm shorter, and show both marks with the comb.
- 2. Section into four, then comb the centre back into a clean line so the longest point has an exact home.
- 3. Cut the centre-back guide first at zero elevation and clip it where every following section can see it.
- 4. Work outward in vertical sections, angling each one toward the centre so the hem rises in a curve.
- 5. Name the elevation: zero at the centre and no more than 10 degrees on the sides, so the weight stays at the hem.
- 6. Cross-check both sides by combing them forward at the shoulders and comparing the rise from centre to side.
- 7. Dry check from the back in the hand mirror, then from both sides, and refine the curve in small cuts only.
- 8. Rebook in 6 to 8 weeks, and explain that the sides show regrowth before the centre back does.
Salon example: Rohit's shallow U
Rohit, twenty-six, is a gym trainer with thick, slightly wavy hair just past his shoulders. He wanted a U from a photo that showed a deep curve. I checked density, found it thick at the back and medium at the temples, and confirmed a wet stretch of about 30 percent. I refused the deep U, because a 10 cm rise would have taken weight off the sides where his hair is finer. We agreed 42 cm at the centre back and 37 cm at the sides, a 5 cm rise, and I showed both marks before the cape. I cut the centre guide at zero elevation, worked outward in angled sections, and kept the side lift at 10 degrees. The sides were compared at the shoulders, then the hair was dried and checked from behind in the mirror. He rebooked in seven weeks. I wrote 42 cm and 37 cm on his card.
Caution: Do not build the U by lifting the side sections above 10 degrees, because the hem loses weight and the curve reads as layers from across the room.
V-shape back
A V-shape brings the centre back to a clear point and shortens the sides, so the hem reads as a single V from behind. The point sits on the exact centre back at 40 to 45 cm from the crown, and the sides finish 5 to 8 cm higher, joining the point along two straight lines. It suits straight, wavy and loosely curly hair of medium to thick density, and a man who wants a sharper back than a U gives without losing overall length. A long V draws the eye down the spine and can make a narrow back look longer; a short V at the shoulder looks crisp. Fine hair needs a shallow V only, because a deep point leaves the sides thin and the point stringy within a few weeks. The shape is planned so an air-dry still shows the point.
Agree the point length and the side length in centimetres, then cut the point guide at zero elevation and keep it visible for both diagonals. Work one side fully, with vertical sections combed flat and the shears parallel to the line from the point to the side. Lift no more than 15 degrees on the sides to soften the edge. Take small cuts near the point so the two lines meet without a notch, then mirror the second side from the same point and the same side guide. Cross-check from the back and from above. Dry the hair, look at the point in the hand mirror, and refine. Plan 45 to 75 minutes. Do not flatten the point by removing 15 cm to make the sides level.
- 1. Consult with dry hair, agree the point at 40 to 45 cm and the sides 5 to 8 cm shorter, and show every mark with the comb.
- 2. Section into four and comb the exact centre back, so the point cannot end up off centre.
- 3. Cut the point guide first at zero elevation and clip it where both diagonals can see it.
- 4. Take vertical sections down each diagonal, keeping the shears parallel to the line from the point to the side.
- 5. Use zero elevation at the point and no more than 15 degrees on the sides, so the hem keeps its weight.
- 6. Cross-check both diagonals from the back and from above, then compare the two side lengths at the shoulders.
- 7. Dry check from the front, both sides and the back, and look at the point in the hand mirror with the head level.
- 8. Rebook in 6 to 8 weeks, and explain that the point grows out first and reaches the next length last.
Salon example: Vivek's soft V
Vivek, thirty-two, runs a small cafe and wanted a V-shape with a clear point at the back. His hair is straight, medium to thick, and reached the middle of his back. He asked for the point at 45 cm and the sides at the shoulder, a rise of about 10 cm. I checked density and found the temples finer than the back, so I refused that steep a rise. We agreed 42 cm at the point and 35 cm at the sides, a 7 cm rise, and I showed both numbers with the comb. I cut the point at zero elevation, followed each diagonal in vertical sections, and kept the side lift under 15 degrees. I took small cuts where the lines met, then checked the two sides from above. Dried, the point sat exactly on the centre part, and he rebooked in seven weeks. I wrote both numbers on his card.
Caution: Keep the point exactly on the centre back part, because a V that is even 2 cm off centre is visible from across the room and cannot be hidden by styling.
Modern mullet
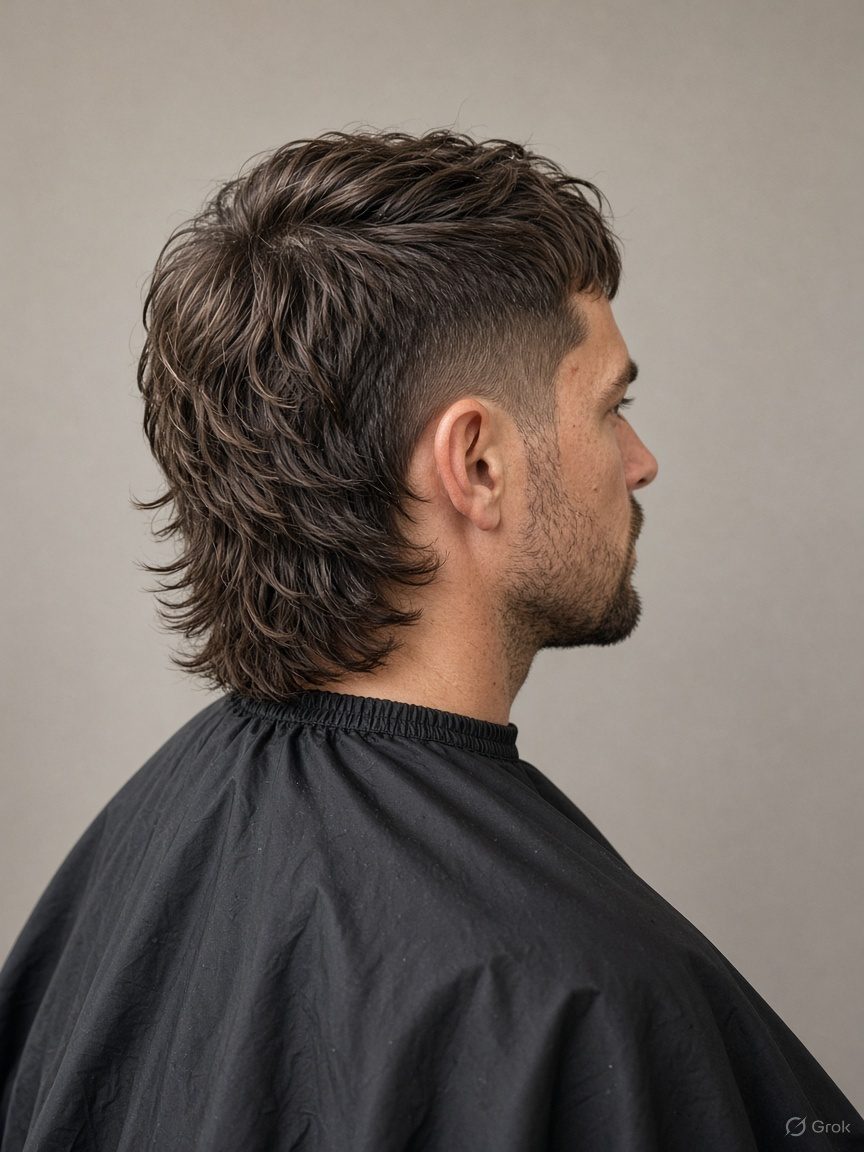
A modern mullet keeps the sides short over the ears and leaves 18 to 22 cm at the back, but the join between the two is blended rather than cut as a step. That blend is what separates it from the classic: the short side flows into the long back over 2 to 3 cm, so the silhouette reads as one shape. It suits straight, wavy and curly hair of medium to thick density, and a man who wants a clear change without losing all his length. On fine hair the back stays narrower, because a wide long panel on thin hair looks sparse. Humidity and a helmet flatten the crown, so the top is left with enough length to fall back into place. A modern mullet is a cut, not a styling trick, and it must look intended after a wash.
Agree the back length and the side length in centimetres first, usually 20 cm at the back and 8 cm at the ear. Cut the back perimeter at zero elevation, then take the sides shorter with vertical sections. Blend the join with a vertical section held at roughly 45 degrees, cutting from the short side into the long back, and check the join with the hair combed down. Texturise only the last 2 cm of the back with point cutting if the ends look heavy. Cross-check both sides at the ear. Dry the hair, because the join changes completely once the wave returns, and refine. Plan 45 to 75 minutes, and do not cut the back down to 5 cm or remove 15 cm to make the blend easier.
- 1. Consult with dry hair, agree 18 to 22 cm at the back and 6 to 10 cm at the ear, and show both marks with the comb.
- 2. Section into four, then divide the back from the sides with a clean vertical parting behind each ear.
- 3. Cut the back perimeter first at zero elevation, so the length is secure before the sides are shortened.
- 4. Cut the sides with vertical sections, keeping the hair over the ear short and the hairline clean.
- 5. Blend the join on a vertical section at about 45 degrees, and never leave a hard horizontal line.
- 6. Cross-check both sides at the ear and look at the join from the side and from behind before drying.
- 7. Dry check from the front, both sides and the back, then point cut only the last 2 cm if the back looks heavy.
- 8. Rebook in 6 to 8 weeks, because the short sides lose their shape long before the back does.
Salon example: Karan's blended mullet
Karan, twenty-four, is a delivery rider and wanted a modern mullet he could wear under a helmet. His hair is thick and wavy, and the back already reached 16 cm. He asked for the sides at 5 cm and the back left long. I checked density and ran a wet stretch that returned at about 30 percent. We agreed 20 cm at the back and 8 cm at the ear, and I showed both marks before the cape. I cut the back at zero elevation, shortened the sides on vertical sections, then blended the join at 45 degrees so no shelf showed. I point cut only the last 2 cm of the back. Dried, the join still read cleanly and the wave fell into the short side. He rebooked in six weeks and said the helmet flattened the top less than the sides. I wrote both numbers on his card.
Caution: Do not leave a hard horizontal step at the join unless the client asked for a classic mullet, because the two cuts grow out at different speeds and the step turns into a shelf.
Classic mullet

A classic mullet keeps the front and sides short and leaves the back clearly longer, with the difference stated and intentional. The front sits at 10 to 12 cm, the sides at 6 to 8 cm, and the back at 18 to 22 cm, so the step is visible from the side. It suits straight, wavy and curly hair of medium to thick density, and a man who wants the shape as a statement rather than a soft blend. The short front is cut to fall forward or back without a fringe decision, and the long back is heavy enough to sit flat on the neck. Fine hair can wear it, but the back stays narrower and the ends are point cut so they do not look thin. A helmet flattens the top, so the front is kept long enough to lift again with a wash.
Agree the three numbers in centimetres and write them down, because the step is the whole cut. Cut the back perimeter first at zero elevation and keep it flat to the body. Then cut the sides shorter with vertical sections and the front to the agreed length. Soften the step by 1 to 2 cm only, using vertical point cutting, so it stays a step and does not become a blend. Cross-check the two sides at the ear and the front at the centre part. Dry the hair, because the step looks sharper dry, and confirm the client still wants it that clear. Plan 45 to 75 minutes, and do not cut the back to shoulder-blade level or remove 15 cm to make the step easier to manage.
- 1. Consult with dry hair, agree 10 to 12 cm at the front, 6 to 8 cm at the sides and 18 to 22 cm at the back, and show each mark.
- 2. Section into four, then separate the back from the sides with a vertical parting behind each ear.
- 3. Cut the back perimeter first at zero elevation, so the long panel is flat and secure.
- 4. Cut the sides and front to their agreed numbers on vertical sections, keeping the front weight forward.
- 5. Soften the step by 1 to 2 cm with vertical point cutting, keeping it a visible step rather than a blend.
- 6. Cross-check both sides at the ear and the front at the centre part, then look at the step from the side.
- 7. Dry check from the front, both sides and the back, because the step reads sharper once the hair is dry.
- 8. Rebook in 6 to 8 weeks, and explain that the short front will need trimming before the back does.
Salon example: Manish's clear step
Manish, twenty-nine, plays in a band and wanted a classic mullet with a clear step. His hair is straight and thick, and the back already reached 19 cm. He asked for a 12 cm front, a 7 cm side and a 22 cm back. I checked density and found it strong throughout, then confirmed a wet stretch of about 30 percent. We kept his three numbers, and I showed each one with the comb before the cape. I cut the back at zero elevation, cut the sides and front on vertical sections, then softened the step by 2 cm with vertical point cutting so it stayed a step. The sides were checked at the ear and the front at the centre part. Dried, the step looked deliberate, and he rebooked in six weeks. I wrote all three numbers on his card.
Caution: Do not blend a classic mullet past 2 cm at the step, because once the join softens the cut becomes a modern mullet and the client did not agree to that.
Wolf cut
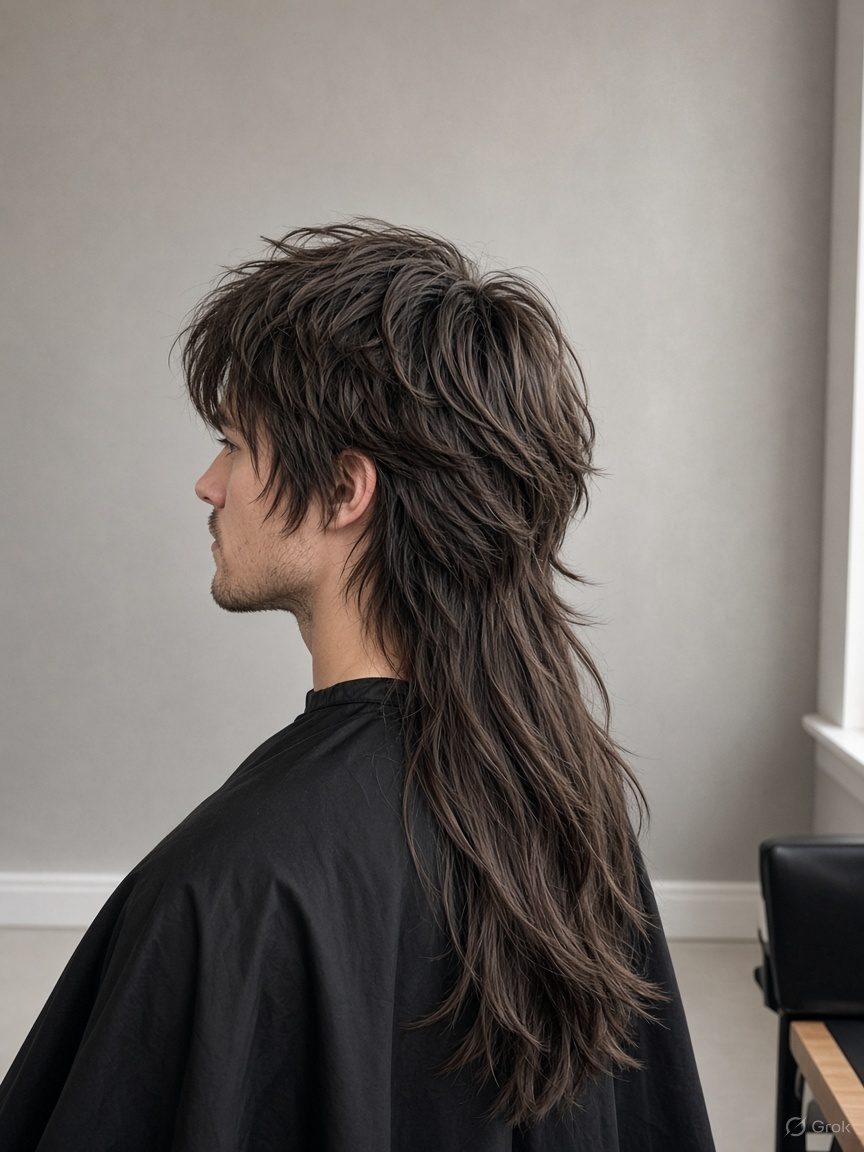
A wolf cut is a short shag on top with a longer back, so the top carries short layers and the back keeps 18 to 22 cm. The shape is full at the crown and light at the ends, and the join between top and back is soft rather than stepped. It suits wavy and curly hair of medium to thick density, because the wave fills the short layers and hides the gaps between them. Straight hair can wear it, but only with texture cut into the ends, or it hangs flat and the layers disappear. On frizz-prone hair the cut is done with shears only, because a razor opens the cuticle and the humidity turns the surface rough. Fine hair needs fewer layers and more length on top, otherwise the crown looks thin. The shape is built so a wash-and-air-dry still shows the layers.
Agree the back length and the top length in centimetres, usually 20 cm at the back and 10 to 12 cm on top, then cut the back perimeter at zero elevation. Section into four and work the top in vertical sections at 90 to 135 degrees; at 90 the weight stays neutral, above 90 it comes out. Keep the shortest layer around the crown no shorter than 8 cm, so the top can still lie down. Do not use a razor on frizz-prone hair; point cut the last 2 cm instead. Cross-check the two sides at the crown and the back. Dry the hair and cut the curls or waves where they sit. Plan 45 to 75 minutes, and do not take the back down to the collar or remove 15 cm to avoid the blend.
- 1. Consult with dry hair, agree 18 to 22 cm at the back and 10 to 12 cm on top, and show both marks with the comb.
- 2. Section into four, then divide the top from the back with a curved parting over the crown.
- 3. Cut the back perimeter first at zero elevation, keeping the long panel flat and the ends soft.
- 4. Cut the top in vertical sections, with the shortest layer around the crown no shorter than 8 cm.
- 5. Use 90 to 135 degrees elevation, and say the number: 90 keeps weight, above 90 removes it.
- 6. Cross-check the two sides at the crown and the back, then compare the layer lengths from the side.
- 7. Dry check from the front, both sides and the back, and point cut only the last 2 cm on frizz-prone hair.
- 8. Rebook in 6 to 8 weeks, because the short top layers lose their shape before the back does.
Salon example: Aakash's dry wolf cut
Aakash, twenty-two, is a student with 3C curls that frizz in the monsoon. He wanted a wolf cut but had been told a razor would give him the texture. I checked density, found it thick, and tested one curl dry: it shrank by about 45 percent. I refused the razor, because his hair already frizzes and a razor would have made the surface rougher. We agreed 20 cm at the back and 11 cm on top, measured stretched, and I showed both marks before the cape. I cut the back at zero elevation, then cut the top dry, curl by curl, at 90 to 120 degrees, keeping the shortest layer at 9 cm. I point cut the last 2 cm. Dried, the layers showed without a razor and the back stayed long. The cut took 80 minutes, and he rebooked in six weeks.
Caution: Never use a razor on frizz-prone or curly hair for this cut, because it opens the cuticle and the humidity turns the ends rough within days.
Shag
A men's shag puts layers inside the shape and leaves the perimeter soft, so the hair moves without a hard hem. The outline sits at 20 to 25 cm from the crown, on the neck, and the layers start at the jaw and work upward. It suits wavy and curly hair of medium to thick density, and straight hair with natural texture, because the layers need movement to show. On a man the shag stays narrower than a woman's version: the sides are not thinned to the skin, and the fringe is cut as part of the face frame rather than as a separate curtain. Fine hair needs fewer, longer layers, because too many short layers leave the ends looking thin. Humidity and a helmet flatten the crown, so the top layers are cut to fall back with a wash and no styling.
Agree the perimeter in centimetres, then cut it at zero elevation so the outline is soft but present. Section into four and take vertical sections for the interior. Lift at 90 to 135 degrees; at 90 the weight stays neutral, and above 90 it comes out, which is what a shag needs in the interior. Keep the shortest layer at the jaw on most men, and no higher than the cheekbone on thick wavy hair. Point cut the last 1 to 2 cm so the ends break up, and check the two sides at the centre part. Dry the hair, because a shag only proves itself dry, and refine the layers where the wave sits. Plan 45 to 75 minutes, and do not shorten the perimeter by 15 cm to avoid the layering.
- 1. Consult with dry hair, agree 20 to 25 cm at the perimeter, and show the mark with the comb at the neck.
- 2. Section into four, then take vertical partings from the crown forward and back for the interior.
- 3. Cut the perimeter first at zero elevation, keeping it soft rather than blunt and heavy.
- 4. Cut the interior on vertical sections, with the shortest layer at the jaw and no higher than the cheekbone.
- 5. Use 90 to 135 degrees elevation, and explain that 90 holds weight while above 90 takes it out.
- 6. Cross-check both sides at the centre part, then compare the shortest layer with the perimeter.
- 7. Dry check from the front, both sides and the back, and point cut only the last 1 to 2 cm.
- 8. Rebook in 6 to 8 weeks, because a soft perimeter loses its shape sooner than a solid line.
Salon example: Dev's soft shag
Dev, twenty-seven, works in a music shop and has wavy hair that he wears behind his ears. He wanted a shag with soft ends and no hard line. His hair is medium density, and the perimeter already sat at the neck. I checked density and ran a wet stretch that returned at about 30 percent. We agreed 23 cm at the perimeter and the shortest layer at the jaw, and I showed the length with the comb before the cape. I cut the perimeter at zero elevation, then took vertical sections at 120 degrees, keeping the crown layers long enough to lie down. I point cut the last 2 cm and checked both sides at the centre part. Dried, the ends broke up and the outline still showed. He rebooked in seven weeks. I wrote 23 cm on his card and told him the soft ends would need a small trim first.
Caution: Do not point cut more than the last 2 cm on fine hair, because the ends will thin out and the soft perimeter will look straggly rather than shaped.
Feathered face frame
A feathered face frame softens the front of a longer men's cut by point cutting only the last 1 to 2 cm around the face. The rest of the hair keeps its length and its line, so the shape stays masculine and the front stops sitting like two heavy curtains. The frame sits between the cheekbone and the jaw, 15 to 20 cm from the crown at the front, and it blends back into the longer side hair. It suits straight, wavy and softly curly hair of medium density, and a man growing out a middle part or a curtain who finds the front too solid. On fine hair the frame stays long, because short feathers at the cheek leave the front looking sparse. Humidity makes a soft frame drop, so the point cutting is kept light and the outline stays strong.
Agree the frame length in centimetres and mark where it starts and ends before the first cut. Cut the perimeter and the face frame at zero elevation first, so the outline is correct, then point cut only the last 1 to 2 cm of the frame with the shears held vertically. Do not slide-cut up the length and do not use a razor, because both remove weight too far from the ends. Section into four and check that the frame on each side matches at the centre part. Cross-check by combing the front forward and comparing both sides at eye level. Dry the hair and point cut again only where the frame still looks heavy. Plan 45 to 75 minutes, and do not shorten the sides by 15 cm to make the frame blend.
- 1. Consult with dry hair, agree 15 to 20 cm at the face frame, and show where the frame starts and ends with the comb.
- 2. Section into four and comb a clean centre part, so the two sides of the frame can be compared.
- 3. Cut the perimeter and the face frame first at zero elevation, before any softening is done.
- 4. Point cut only the last 1 to 2 cm of the frame with the shears held vertically, leaving the rest of the length intact.
- 5. Keep the elevation at zero on the frame, and never slide-cut up the length or use a razor.
- 6. Cross-check both sides at the centre part by combing the front forward and comparing at eye level.
- 7. Dry check from the front and both sides, and point cut again only where the frame still looks heavy.
- 8. Rebook in 6 to 8 weeks, because the frame grows into the face first and the ends lose their softness.
Salon example: Sameer's light frame
Sameer, thirty-six, is a bank manager growing out a middle part. His hair is straight and medium density, and the front sat like two heavy curtains against his cheeks. He wanted the front softer but not shorter. I checked density and found the temples a little finer than the back, then confirmed a wet stretch of about 30 percent. We agreed the frame at 17 cm, ending at the jaw, and I showed the mark before the cape. I cut the perimeter and the frame at zero elevation, then point cut only the last 2 cm with the shears vertical. I did not slide-cut or use a razor. Both sides were combed forward and compared at eye level, then dried and checked again. The front moved without losing length, and he rebooked in eight weeks. I wrote 17 cm on his card.
Caution: Do not feather more than the last 2 cm or use a razor on the face frame, because the front will thin and the face will look narrower instead of softer.
Middle part, medium
A medium middle part keeps the front between the cheek and the chin and opens the hair from a centre parting, so the face is framed on both sides. The front sits at 14 to 18 cm from the crown, and the back at 22 to 26 cm, on the neck. It suits straight and gently wavy hair of medium density, and a man who wants a calm, symmetrical shape that survives a helmet. The parting is cut where the hair naturally falls, not forced, because a forced centre part pulls against the crown and opens a gap. On fine hair the front stays longer, at the chin, so the two sides have enough weight to sit down. Humidity lifts the front away from the face, so the cut is planned to fall back with a wash and a towel dry.
Agree the front and back lengths in centimetres, then find the natural parting with dry hair before the cape. Cut the perimeter at zero elevation, front and back, so the outline is set. Section into four along the agreed part, then cut the front sections at zero to 30 degrees, over-directing each side slightly toward the face so it lands where he wears it. Keep the back flat, with no layers above the jaw. Cross-check both sides at the part, then check the front lengths at the cheek and the chin. Dry the hair with the part in place and trim only the corners that lift. Plan 45 to 75 minutes, and do not shorten the back by 15 cm to make the front easier to blend.
- 1. Consult with dry hair, agree 14 to 18 cm at the front and 22 to 26 cm at the back, and show both marks with the comb.
- 2. Find the natural centre parting on dry hair, then section into four along that line.
- 3. Cut the perimeter first at zero elevation, front and back, so the outline is set before any softening.
- 4. Cut the front sections at zero to 30 degrees, over-directing each side toward the face so it falls where he wears it.
- 5. Keep the back flat at zero elevation with no layers above the jaw, and say the numbers aloud.
- 6. Cross-check both sides at the part, then compare the front lengths at the cheek and the chin.
- 7. Dry check with the part in place, from the front and both sides, and trim only the corners that lift.
- 8. Rebook in 6 to 8 weeks, because the part opens wider as the front grows and the corners go first.
Salon example: Harsh's natural part
Harsh, thirty-one, is a software tester who wears his hair parted in the middle. His hair is straight and medium density, and the front had reached his mouth, which made the parting look wide. He wanted a medium length he could comb with his fingers. I checked density, found it even, and confirmed a wet stretch of about 30 percent. We agreed 16 cm at the front, ending at the jaw, and 24 cm at the back, and I showed both marks before the cape. I cut the perimeter at zero elevation, then the front at 20 degrees with each side over-directed toward the face. I kept the back flat with no layers above the jaw. Both sides were checked at the part, then dried with the part in place. He rebooked in seven weeks. I wrote 16 cm and 24 cm on his card.
Caution: Do not force a centre part that the hair does not grow into, because the crown will lift and a visible gap will open along the parting within a week.
Curtain, medium length
A medium curtain keeps the fringe long enough to open from a centre part, with the two halves falling to the cheekbones or the jaw. The fringe sits at 14 to 18 cm from the crown at the front, and the back at 22 to 28 cm. It suits straight, wavy and softly curly hair of medium density, and a man who wants a soft front without a short fringe across the forehead. The fringe is cut with a slight forward over-direction so the two halves meet at the part and then fall away, not straight down like a block. On fine hair the fringe stays longer, because short curtain halves separate and look thin at the temples. Humidity makes the fringe curl away from the face, so the cut is built to sit with a wash and a towel dry.
Agree the fringe length and the back length in centimetres, then cut the back perimeter at zero elevation. Section into four and comb the centre part, then take the fringe as its own section, no wider than the front hairline. Cut the fringe at zero elevation with the hair over-directed forward, so it is longer when it falls back into place. Keep the two halves equal by cutting one side and mirroring it from the same guide. Do not lift the fringe above 30 degrees, or it will spring and the curtain will not close. Cross-check both halves at the part and the corners at the cheekbone. Dry the hair, part it, and refine only the corners. Plan 45 to 75 minutes, and do not shorten the back by 15 cm to make the fringe easier to reach.
- 1. Consult with dry hair, agree 14 to 18 cm at the fringe and 22 to 28 cm at the back, and show both marks with the comb.
- 2. Cut the back perimeter first at zero elevation, then section into four and comb the centre part.
- 3. Take the fringe as its own section, no wider than the front hairline, and cut it at zero elevation.
- 4. Over-direct the fringe forward so it sits longer when it falls back, and keep both halves equal from one guide.
- 5. Keep the fringe at zero to 30 degrees elevation, because a higher lift makes it spring and the curtain will not close.
- 6. Cross-check both halves at the part and both corners at the cheekbone before drying.
- 7. Dry check with the part in place, from the front and both sides, and refine only the corners that sit heavy.
- 8. Rebook in 6 to 8 weeks, because the fringe reaches the eyes first and the corners lose their line.
Salon example: Yash's soft curtain
Yash, twenty-five, is a photographer who wanted a curtain fringe he could push behind his ears. His hair is wavy and medium density, and the front had reached his nose. He asked for the fringe to end at the eyes. I checked density and ran a wet stretch that returned at about 30 percent. I refused the eye length, because his wave would have pulled the fringe up and left it too short to part. We agreed 17 cm at the fringe, ending at the cheekbone, and 25 cm at the back, and I showed both marks before the cape. I cut the back at zero elevation, then cut the fringe forward with a slight over-direction and mirrored the second half. I kept the lift at zero. Dried and parted, both halves met cleanly and the corners sat soft. He rebooked in seven weeks. I wrote 17 cm and 25 cm on his card.
Caution: Do not cut the curtain fringe shorter than the cheekbone on wavy hair, because the wave pulls it up and the two halves stop meeting at the part.
Surfer layers
Surfer layers are long layers with lived-in ends, cut so the hair looks worn rather than freshly styled. The outline sits at 30 to 35 cm from the crown, on the collarbone, and the layers run from the jaw down, with the ends point cut by 1 to 2 cm. It suits wavy and straight hair of medium to thick density, and a man who wants length he can wash, shake and leave. The shape is deliberately loose: the crown stays long, the mid-lengths carry the movement, and the ends are never sharp. On fine hair there is no short crown layer at all, because it empties the top and the humidity flattens what is left. A helmet rubs the back, so the ends are cut to survive being pressed and still fall back. The cut is planned for an air-dry, not for a blow-dry.
Agree the outline in centimetres and the shortest layer, then cut the perimeter at zero elevation so the length is safe. Section into four and take vertical sections for the interior, lifting at 120 to 150 degrees; above 90 degrees removes weight, and this is where the lived-in movement comes from. Keep the shortest layer at the jaw or below, and on fine hair keep every layer below the chin. Point cut the last 1 to 2 cm of the ends, never higher. Cross-check both sides at the centre part and the outline at the collarbone. Dry the hair and refine only where the ends sit heavy. Plan 45 to 75 minutes, and do not cut 15 cm off the outline to make the layering quicker.
- 1. Consult with dry hair, agree 30 to 35 cm at the collarbone and the shortest layer at the jaw, and show both marks with the comb.
- 2. Section into four and comb a centre part, so the two sides of the outline can be compared later.
- 3. Cut the perimeter first at zero elevation, keeping the outline solid before the interior is touched.
- 4. Cut the interior on vertical sections, with the shortest layer at the jaw and every layer below the chin on fine hair.
- 5. Use 120 to 150 degrees elevation, and say that above 90 removes weight and creates the lived-in movement.
- 6. Cross-check both sides at the centre part, then compare the outline at the collarbone on both sides.
- 7. Dry check from the front, both sides and the back, and point cut only the last 1 to 2 cm where the ends sit heavy.
- 8. Rebook in 6 to 8 weeks, because lived-in ends lose their shape quietly and the outline follows.
Salon example: Ishaan's air-dry shape
Ishaan, twenty-nine, is a sailing instructor with wavy hair that he never blow-dries. He wanted surfer layers that looked the same wet or dry. His hair is medium to thick, and the outline already sat at the collarbone. I checked density and confirmed a wet stretch of about 30 percent. We agreed 33 cm at the outline and the shortest layer at the jaw, and I showed both marks before the cape. I cut the perimeter at zero elevation, then took vertical sections at 140 degrees and kept the layers below the jaw. I point cut the last 2 cm of the ends. Both sides were checked at the centre part, then the hair was dried with a towel and no product. The ends fell loose and the outline still read. The cut took 55 minutes, and he rebooked in eight weeks. I wrote 33 cm on his card.
Caution: Do not cut a short crown layer on fine hair for this shape, because the top will flatten under humidity and a helmet, and the long layers cannot lift it back.
Length for a bun
A bun-length cut is not a bun; it is the length that makes a bun possible, and the bun itself is a finish he does at home. The cut keeps every hair long enough to gather at the back of the head, usually 25 to 30 cm from the crown, with the front and sides long enough to reach the tie without pulling. It suits straight, wavy and curly hair of medium to thick density, and a man who wears the hair up for work or sport and down at other times. The perimeter stays solid and the interior stays flat, because layers inside a bun-length cut fall out of the tie and leave short pieces around the face. On fine hair the front is left longer, since a tight pull exposes the hairline. Humidity and a helmet flatten the crown, but a bun hides that, so the cut is judged with the hair down as well.
Agree the length in centimetres and test it in a low tie before the first cut, with the hair dry. Cut the perimeter at zero elevation, front and back, and keep the front corners long enough to reach the tie without tension. Section into four and check that no interior layer is shorter than the tie point, because a short layer will escape the bun. Do not thin the hairline or the nape. Cross-check both sides at the centre part and test the tie again after cutting. Dry the hair and check it both down and gathered, because the two views must both work. Plan 45 to 75 minutes, and do not take 15 cm off to make the front easier to manage.
- 1. Consult with dry hair, agree 25 to 30 cm from the crown, and test a low tie before the cape to see what actually reaches.
- 2. Section into four, then check that every section is long enough to reach the tie point at the back.
- 3. Cut the perimeter first at zero elevation, front and back, keeping the front corners long enough to gather without tension.
- 4. Keep the interior flat, with no layer shorter than the tie point, so nothing escapes the bun.
- 5. Use zero elevation throughout and say the number, because any lift here removes the length the bun depends on.
- 6. Cross-check both sides at the centre part, then test the tie again with the hair gathered loosely.
- 7. Dry check with the hair down and then gathered, from the front, both sides and the back.
- 8. Rebook in 6 to 8 weeks, and explain that the bun is a finish, not a different cut.
Salon example: Tarun's tie test
Tarun, thirty-eight, is a yoga teacher who wears his hair in a low bun every morning. His hair is straight and medium density, and the front had been layered, so short pieces kept falling out of the tie. He wanted the length kept and the escape stopped. I checked density and ran a wet stretch that returned at about 30 percent. We agreed 28 cm from the crown and tested a low tie on dry hair before the cape. I cut the perimeter at zero elevation front and back, kept every interior section below the tie point, and left the front corners long. I did not thin the hairline or the nape. Both sides were checked at the centre part, then the hair was dried and tested again down and gathered. The bun held without pulling, and he rebooked in eight weeks. I wrote 28 cm on his card.
Caution: Do not pull the hairline tight to make the bun neat, because repeated tension there thins the front over months and no cut can restore it.
Length for a half-up style
A half-up length keeps the perimeter long and removes only a little weight from the inside, so the front can be gathered while the rest stays down. The outline sits at 25 to 30 cm from the crown, and the interior loses weight at 120 to 150 degrees, never at the hairline. It suits straight, wavy and curly hair of medium to thick density, and a man who wears the front tied back for work and loose at other times. Unlike a bun-length cut, which keeps the interior flat, this shape needs some interior movement so the loose half does not hang like a curtain. On fine hair the interior stays almost untouched, because removing weight leaves the ends thin. Humidity flattens the crown, so the cut is built to sit with a wash and a quick towel dry.
Agree the outline in centimetres and test a half-up tie on dry hair before the first cut, so the gathered section is the right size. Cut the perimeter at zero elevation so the length is secure. Section into four, then cut the interior on vertical sections at 120 to 150 degrees; above 90 removes weight, and 120 is enough on medium density. Keep every layer below the tie point at the back, and leave the front hairline untouched so nothing short escapes the tie. Cross-check both sides at the centre part, then test the half-up again after cutting. Dry the hair and check it both ways. Plan 45 to 75 minutes, and do not shorten the outline by 15 cm to avoid the interior work.
- 1. Consult with dry hair, agree 25 to 30 cm at the outline, and test a half-up tie to see how much front hair is gathered.
- 2. Section into four and mark the tie point at the back, so no interior layer is cut above it.
- 3. Cut the perimeter first at zero elevation, keeping the outline long and solid.
- 4. Cut the interior on vertical sections, removing a little weight inside while leaving the front hairline alone.
- 5. Use 120 to 150 degrees elevation, and explain that above 90 removes weight and 120 is enough here.
- 6. Cross-check both sides at the centre part, then test the half-up again with the front gathered loosely.
- 7. Dry check with the hair down and then half-up, from the front, both sides and the back.
- 8. Rebook in 6 to 8 weeks, and explain that the gathered front shows regrowth before the outline does.
Salon example: Girish's half-up
Girish, thirty-three, is a chef who ties the top half of his hair back during service. His hair is wavy and thick, and the front had been layered too short to gather. He wanted the outline long and the inside lighter. I checked density and confirmed a wet stretch of about 30 percent. We agreed 27 cm at the outline and tested a half-up tie on dry hair before the cape. I cut the perimeter at zero elevation, then took vertical sections at 130 degrees and kept every layer below the tie point. I left the front hairline untouched. Both sides were checked at the centre part, and the half-up was tested again after the cut. Dried, the gathered front held and the loose half still moved. The cut took 60 minutes, and he rebooked in seven weeks. I wrote 27 cm and the tie point on his card.
Caution: Do not cut the front hairline short to make the half-up look tidy, because short pieces will escape the tie and the hairline will thin under repeated tension.
Rocker layers
Rocker layers are long layers with more texture at the ends, so the shape looks worn and a little rough without losing length. The outline sits at 35 to 40 cm from the crown, below the shoulder blades, and the layers start at the jaw and run down, with the last 2 to 3 cm point cut. It suits wavy and straight hair of medium to thick density, and a man who wants a long shape that reads as deliberate rather than neat. The top stays long and flat, and the movement lives in the mid-lengths and ends. On fine hair the texture stays in the last 2 cm only, because more than that leaves the ends thin and the outline weak. Humidity softens the texture, so the cut is made slightly sharper dry than the finished look. A helmet presses the back flat, and the layers are what let it recover.
Agree the outline in centimetres and the shortest layer, then cut the perimeter at zero elevation. Section into four and take vertical sections at 120 to 150 degrees; above 90 degrees removes weight and builds the movement this cut needs. Keep the shortest layer at the jaw and the crown long, then point cut the last 2 to 3 cm of the ends with the shears vertical. Do not use a razor on porous hair, because it roughs the surface too far up the strand. Cross-check both sides at the centre part and the outline at the shoulder blades. Dry the hair and refine the texture only where it looks flat. Plan 45 to 75 minutes, and do not remove 15 cm from the outline to make the texture easier to see.
- 1. Consult with dry hair, agree 35 to 40 cm at the outline and the shortest layer at the jaw, and show both marks with the comb.
- 2. Section into four and comb a centre part, so both sides of the long outline can be compared.
- 3. Cut the perimeter first at zero elevation, keeping the outline strong before any texture is added.
- 4. Cut the interior on vertical sections, with the shortest layer at the jaw and the crown left long.
- 5. Use 120 to 150 degrees elevation, and say that above 90 removes weight and creates the movement.
- 6. Cross-check both sides at the centre part, then compare the outline at the shoulder blades.
- 7. Dry check from the front, both sides and the back, and point cut the last 2 to 3 cm only where the ends look flat.
- 8. Rebook in 6 to 8 weeks, because textured ends soften first and the shape starts to look round.
Salon example: Pranav's worn ends
Pranav, thirty-five, is a sound engineer with straight, heavy hair that reached below his shoulder blades. He wanted long layers with rough ends but no short crown. I checked density, found it thick, and confirmed a wet stretch of about 30 percent. We agreed 38 cm at the outline and the shortest layer at the jaw, and I showed both marks before the cape. I cut the perimeter at zero elevation, then took vertical sections at 140 degrees and kept the crown long. I point cut the last 2 to 3 cm with the shears vertical and kept the razor away, because his ends were porous from old treatments. Both sides were checked at the centre part, then the hair was dried and the flat areas textured. The shape moved without looking thin. The cut took 65 minutes, and he rebooked in eight weeks.
Caution: Do not use a razor on porous or chemically treated ends, because the surface will rough up and the texture will turn into frizz in humid weather.
Soft step cut
A soft step cut leaves visible steps in the back, 3 to 5 cm apart, instead of a smooth gradient. The steps are cut as soft lines, so the shape looks layered but the lines can still be seen when the hair moves. The outline sits at 20 to 25 cm from the crown, on the neck, and each step is agreed in centimetres before the cut. It suits straight and wavy hair of medium to thick density, and a man who wants a layered back without a shag. On fine hair the steps are kept wide and few, because close steps remove too much weight and the ends look thin. The steps grow out as visible lines, so the client must accept that the next visit will show them. Humidity and a helmet flatten the crown, so the top step stays low.
Agree the number of steps and the gap in centimetres, usually three steps 4 cm apart, then cut the outline at zero elevation. Section into four and work upward from the nape in horizontal sections, cutting each step at 45 degrees so the line is soft rather than blunt. Do not cut a step above the jaw. Check that the steps on both sides sit at the same height, then soften each line with point cutting at the corner only. Cross-check from the back with the head level. Dry the hair, because the steps show more clearly dry, and refine the corners. Plan 45 to 75 minutes, and do not remove 15 cm to reduce the number of steps.
- 1. Consult with dry hair, agree 20 to 25 cm at the outline and the number of steps with their 3 to 5 cm gaps, and show the marks.
- 2. Section into four, then take horizontal partings across the back for the step lines.
- 3. Cut the outline first at zero elevation, so the lowest step has a fixed base to sit on.
- 4. Cut each step at 45 degrees, working upward from the nape, with no step above the jaw.
- 5. Keep the elevation at 45 degrees on the step lines, and say that the angle is what makes them soft rather than blunt.
- 6. Cross-check both sides at the same height and look at the steps from behind with the head level.
- 7. Dry check from the front, both sides and the back, and soften only the corners of each step.
- 8. Rebook in 6 to 8 weeks, and explain that the steps will show as lines as they grow out.
Salon example: Aniket's three steps
Aniket, thirty, is a sales manager who wanted layers with visible steps at the back. His hair is straight and medium density, and the back sat at the neck. He asked for five steps, 3 cm apart. I checked density and ran a wet stretch that returned at about 30 percent. I refused five steps, because that many lines would have thinned the back and left the ends looking sparse. We agreed three steps, 4 cm apart, with the outline at 23 cm, and I showed the numbers before the cape. I cut the outline at zero elevation, then cut each step at 45 degrees from the nape upward, with no step above the jaw. Both sides were checked at the same height, then dried and the corners softened. The steps showed as soft lines, and he rebooked in seven weeks.
Caution: Do not cut more than four steps on medium-density hair, because the weight loss adds up and the back will look thin before the steps grow out.
Long cut, weight at the nape
A long cut with weight at the nape keeps the mass of the hair low, near the neck, and leaves the crown and mid-lengths lighter. The outline sits at 25 to 30 cm from the crown, and the nape keeps its full thickness, so the shape sits down instead of ballooning. It suits straight, wavy and curly hair of medium to thick density, and a man whose hair grows wide rather than long. Removing weight from the nape, which is the usual shortcut, makes the ends lift and the whole shape look thin, so this cut protects that area. On fine hair the weight at the nape is the only thing holding the shape, which is why nothing there is thinned. Humidity and a helmet flatten the crown, and the low weight keeps the shape reading as intended after a wash.
Agree the outline in centimetres and state that the nape will not be thinned. Cut the perimeter at zero elevation, all the way round, and keep the nape guide full. Section into four and cut the interior only above the jaw, at 90 to 135 degrees, so the weight stays low and the top keeps some movement. Do not slide-cut, do not thin, and do not use a razor at the nape. Cross-check the outline at the centre back and both sides. Dry the hair, look at the back with the head level, and confirm the hem still sits down. Plan 45 to 75 minutes, and do not take 15 cm off the nape to make the back lighter.
- 1. Consult with dry hair, agree 25 to 30 cm at the outline, and say clearly that the nape will keep its weight.
- 2. Section into four, then mark the jaw line, because no weight is removed below it.
- 3. Cut the perimeter first at zero elevation and keep the nape guide full and flat.
- 4. Cut the interior only above the jaw at 90 to 135 degrees, leaving the nape and the ends untouched.
- 5. Name the elevation: 90 to 135 degrees on the interior, and zero at the nape, so the mass stays low.
- 6. Cross-check the outline at the centre back and both sides, then compare the nape thickness on both sides.
- 7. Dry check from the front, both sides and the back, and confirm the hem still sits down without styling.
- 8. Rebook in 6 to 8 weeks, and explain that the nape grows out last and should not be thinned at the next visit.
Salon example: Suresh's low weight
Suresh, forty-four, is a postmaster with thick hair that grew wide at the shoulders instead of falling long. He asked for layers all through, including the nape. I checked density and found the nape the thickest part, then confirmed a wet stretch of about 30 percent. I refused the nape layers, because thinning there would have lifted the ends and made the shape wider. We agreed 27 cm at the outline, with the interior cut only above the jaw at 120 degrees. I cut the perimeter at zero elevation and left the nape full. Both sides were checked, then the hair was dried and the hem checked with the head level. The shape sat down and the ends looked solid, and he rebooked in eight weeks. I wrote on his card that the nape stays unthinned at every visit.
Caution: Do not thin or slide-cut the nape on this cut, because the ends will lift, the shape will widen, and the weight cannot be put back until it grows.
Long cut, receding temples
A long cut for receding temples keeps weight at the temples and refuses the tight pull-back that exposes the hairline. The outline sits at 25 to 30 cm from the crown, and the front is cut to fall forward or to the side, with 3 to 5 cm of weight left at each temple. It suits straight, wavy and curly hair of medium density, and a man who wants length without drawing attention to the corners. The cut never uses a centre pull or a high tie as the shape, because both flatten the temple hair and show the recession. On fine hair the temple weight is the whole plan, so nothing there is thinned or point cut. Humidity and a helmet flatten the crown, so the top is left long enough to fall back without styling. The client must also agree not to tie the hair tightly at home.
Agree the outline in centimetres and show where the temple weight will sit before the cut. Cut the perimeter at zero elevation, with the front sections falling forward and the temple corners left 3 to 5 cm longer than the cheek line. Section into four and cut the interior only above the jaw at 90 to 120 degrees, keeping weight near the face. Do not thin the temples, do not use a razor there, and do not cut a short front to make the recession look even, because it never does. Cross-check both sides at the part without pulling the hair back. Dry the hair and check the temples from the front with the hair falling naturally. Plan 45 to 75 minutes, and do not remove 15 cm to make the front easier to manage.
- 1. Consult with dry hair, agree 25 to 30 cm at the outline and 3 to 5 cm of temple weight, and show both marks with the comb.
- 2. Section into four without pulling the hair back, so the natural fall at the temples is visible.
- 3. Cut the perimeter first at zero elevation, with the front falling forward and the temples left longer.
- 4. Cut the interior only above the jaw at 90 to 120 degrees, keeping the weight near the face.
- 5. Keep zero elevation at the temple corners and say so, because any lift there exposes the hairline.
- 6. Cross-check both sides at the part with the hair falling naturally, never pulled back or held tight.
- 7. Dry check from the front and both sides, and confirm the temples are covered with the hair down.
- 8. Rebook in 6 to 8 weeks, and agree that the hair will not be tied tightly at home.
Salon example: Rajeev's temple weight
Rajeev, forty-nine, is a school principal with receding temples and hair that reached his shoulders. He had been tying it back tightly, and the corners looked barer each year. He wanted length but not the pulled-back look. I checked density, found it medium with fine temple hair, and confirmed a wet stretch of about 28 percent. We agreed 28 cm at the outline and 4 cm of weight at each temple, and I showed both marks before the cape. I cut the perimeter at zero elevation with the front falling forward, kept the temple corners long, and cut the interior only above the jaw at 110 degrees. I did not thin or razor the temples. Both sides were checked with the hair falling naturally, then dried and checked from the front. He rebooked in eight weeks and agreed to wear the hair loose.
Caution: Never cut a short front to make receding temples look even, because the shorter hair stands up and exposes the hairline more clearly than long hair does.
Long curly cut, dry

A long curly cut is done dry, curl by curl, because wet curly hair lies about its length. On 3C to 4C hair the shrink is 30 to 50 percent, so a curl that looks long wet can sit at the jaw once dry. The outline is agreed in the stretched state, then cut to the length the curl actually holds. It suits medium to thick curly hair, and a man who wants length without a pyramid shape. The cut follows the curl pattern rather than a horizontal line, so no section is pulled straight unless the client wants that part shorter. On fine curly hair the shape stays narrower at the sides and no weight is removed from the ends. Humidity is the normal condition, so the cut is judged dry and must look intended after a wash.
Agree the outline in centimetres stretched and the shrink percentage, then cut the hair dry, curl by curl, with the client seated upright. Take the back first and work around, cutting each curl where it falls rather than lifting it above 90 degrees. At 90 degrees the weight stays neutral; above 90 it comes out, and curly hair rarely needs that. Keep 30 to 50 percent of the shrink in the plan: a 30 cm stretched length can sit at 15 to 21 cm dry. Never comb a curl straight to check it. Cross-check both sides dry, then wash and dry the hair to confirm the shape. Plan 60 to 90 minutes for the dry cut, and do not cut 15 cm off to make the curls easier to manage.
- 1. Consult with dry hair, agree the stretched outline in centimetres and the shrink at 30 to 50 percent, and show both marks.
- 2. Section into four on dry hair, following the curl pattern rather than pulling a straight part through it.
- 3. Cut the back first and work around the head, so the perimeter is set before the interior.
- 4. Cut each curl dry where it falls, and never comb a curl straight to check its length.
- 5. Keep the elevation at 90 degrees or below, because above 90 removes weight that curly hair needs for shape.
- 6. Cross-check both sides dry, then compare the same curl pattern on each side at eye level.
- 7. Wash and dry the hair, then check the shape from the front, both sides and the back before finishing.
- 8. Rebook in 6 to 8 weeks, because the curl pattern changes as it grows and the shape moves first.
Salon example: Imran's dry curly cut
Imran, twenty-six, is a graphic designer with 4A curls that shrank by nearly half. He wanted a long curly cut but had always been cut wet, which left the shape uneven. I checked density, found it thick, and measured a stretched section at 32 cm, then estimated the shrink at 45 percent. We agreed a dry length of about 18 cm at the outline, which matched the stretched number, and I showed the mark on a dry curl before the cape. I cut the hair dry, curl by curl, starting at the back and keeping every section at 90 degrees or below. I never combed a curl straight. After the cut I washed and dried the hair and checked the shape from all sides. It sat as a long shape, not a pyramid, and the cut took 85 minutes. He rebooked in six weeks.
Caution: Do not cut long curly hair wet and do not plan the length without the 30 to 50 percent shrink, because the finished shape will be far shorter than the client agreed.
This is a Nandu Nai textbook. It is a private brand book, not a government licence, and it does not give the right to give medical treatment.