
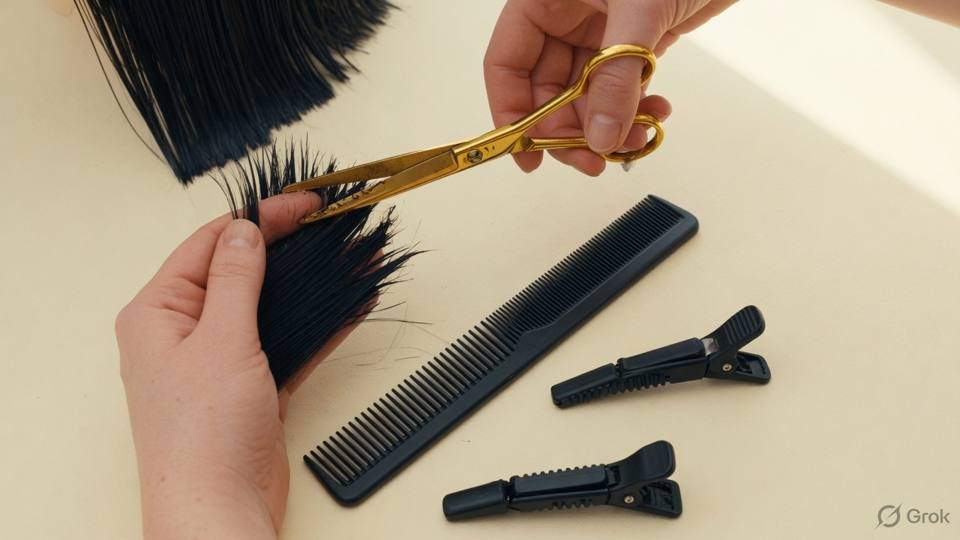
Shears, comb and clips
The shears are the most important tool in the salon and the one most often used badly. A cutting shear is usually five and a half to six inches long, with a convex or bevel edge. Convex blades slice cleanly through wet or dry hair and suit slide cutting and point cutting. Bevel blades are stronger and suit blunt lines and coarse hair. The tip of the blade is for detail; the whole blade is for lines. A stylist who cuts everything with the tips gets soft perimeters that never look sharp. A stylist who cuts everything with the whole blade cannot point cut. Know which part of the blade you are using before you close your hand.
Keep the shears sharp and clean. A dull blade crushes the hair instead of cutting it, and crushed ends split within a week. Oil the pivot every few days, wipe the blades after every client, and store them closed in a case, not loose in a drawer with combs. Never cut paper, tape, thread or a colleague's hair with your cutting shears; paper dulls the edge faster than hair. If the shears pull rather than glide, they need sharpening. Thinning shears are a separate tool with a separate rule: one pass, then dry and look. They remove more hair than the eye can see and they cannot be undone.
The comb does three jobs: sectioning, tension and control. A fine tail comb parts clean lines and lifts small sections. A cutting comb with fine and wide teeth holds the hair under tension and lets you cut over it. A wide-tooth comb detangles wet, conditioned hair without pulling. Use the comb that matches the job, not the one in your hand. Clips hold the sections without creasing the hair; metal clips with flat jaws are gentler than tight spring clips, and they should never be clamped so hard that they leave a dent in wet hair. A dent becomes a bend in the finished shape, especially on fine hair.
Set the station before the client sits down. Shears closed and on the trolley, comb facing the same way, clips in a clean dish, water spray within reach, towel and cape ready. Wipe the trolley between clients. Put the shears down when you turn to pick up the dryer, and never hold them open while you talk with your hands. A tool that is always in the same place saves minutes across a day and prevents the small accidents that happen when a stylist reaches across a client for a comb. The station is part of the cut: a tidy station produces a tidier line.
- Use a 5.5 to 6 inch cutting shear with a convex or bevel edge for wet and dry cutting.
- Cut lines with the whole blade and detail with the tips, not the other way round.
- Oil the pivot every few days and wipe the blades after every client.
- Store shears closed in a case, never loose in a drawer with combs.
- Never cut paper, tape or thread with cutting shears.
- Use a tail comb for parting, a cutting comb for tension and a wide-tooth comb for wet detangling.
- Clip sections loosely enough to hold without leaving a dent in the hair.
- Set the trolley before the client sits and wipe it between clients.
Salon example: the blunt line that would not sit
A new client, Sana, comes in with a collarbone bob that was cut two weeks earlier at another salon. The line looks soft and uneven at the left side, and the ends feel crushed rather than cut. She says the stylist used thinning shears all over the ends because the hair felt heavy. Her hair is medium density and wavy, so the thinning opened the perimeter and the wave lifted the soft ends. I check my shears on a test strand: they glide. Then I show her the difference between a cut end and a crushed end under the light. I re-cut the perimeter with the whole blade, taking three millimetres, and point cut only the last centimetre at the front. I do not use the thinning shears. The line closes and the wave sits under it. She books eight weeks ahead. I write 'no thinning at the perimeter' on her card so the next stylist does not repeat the mistake. Before she leaves, I show her how to check the line herself with a hand mirror against the back mirror, so she can see the difference at home.
Caution: If the shears pull, crush or bend the hair instead of cutting it, stop and sharpen them. Do not finish a client with a dull blade and do not lend your cutting shears to the floor.
Section size, tension and the guide
A section is the group of hair you cut in one go. Its size decides how accurate the cut can be. A section wider than two fingers is too wide for a precise line, because the hair at the back of the section is longer than the hair at the front and the cut averages the two. A section that is too thin wastes time and makes the cut patchy. For most cutting, take subsections about one to two centimetres thick, and keep the base clean with a straight parting. A clean parting gives a clean line; a ragged parting gives a ragged line even with a sharp blade.
Tension is how hard you pull the hair before you cut. Too little tension and the hair moves under the blade, so the line is soft and the two sides do not match. Too much tension and the hair stretches, so the cut is short when it relaxes. On wet hair, use firm, even tension and keep the hair flat against your fingers. On dry hair, use lighter tension because dry hair has less stretch. The tension must be the same on both sides of the head, or one side will be longer. Check by taking the same section on each side and comparing the lengths between your fingers.
The guide is the first section you cut, and every later section follows it. Choose the guide deliberately: the perimeter for a blunt line, the shortest layer for a graduated shape, the centre back for a symmetrical cut. Cut the guide, comb it flat, check it against the plan, and only then take the next section to it. If the guide is wrong, stop and re-cut it before you continue. A mistake in the guide travels around the whole head; a mistake in a later section affects one area. This is why the first cut is the slowest and the most important.
The procedure is the same for most shapes. Part the hair with the natural parting and a clean cross section. Clip the top and the sides out of the way. Start at the back, cut the guide, then work section by section, taking each new section to the guide. Keep the subsection size even and the tension constant. Cross-check both sides by taking the same section on each side, not by trusting the mirror. Dry the hair, check the balance from three angles, then detail. If the client has a strong part, cut with it rather than against it. If the hair is very dense, take smaller sections and more of them; density slows the cut, not the tension.
- Part with the client's natural parting and a clean cross section.
- Clip the top and sides away so only the working section is loose.
- Take subsections 1 to 2 cm thick, no wider than two fingers.
- Keep firm, even tension on wet hair and lighter tension on dry hair.
- Cut the guide first, comb it flat and check it against the plan.
- Take every later section to the guide instead of guessing the length.
- Cross-check both sides with the same section on each side, not with the mirror.
- Dry, check from three angles, then detail the ends.
Salon example: Meena's uneven bob
Meena comes in with a bob that sits higher on the right side. She has dense, straight hair and a strong side part, and the previous cut was done in wide sections. I part the hair where she wears it, clip the top away and start at the nape. The first subsection is two centimetres thick. I cut the guide at collarbone length, comb it flat and check it against the mirror. Then I take each section to the guide with the same tension, moving from the nape to the ears. On the right side, the hair is denser, so I take narrower subsections rather than pulling harder. When I reach the front, I cross-check by taking the same section on both sides and holding the ends together. The right side is four millimetres short. I correct it at the perimeter, not by lifting the layers. The finished line is level, and the part still falls where she wears it. She books eight weeks ahead. She says the bob has never sat this level, and books her daughter for the same day next month.
Caution: Do not cut a wide section and average the length with your fingers. If a section is wider than two fingers, re-part it thinner before the blade touches the hair.
Elevation, overdirection and safety
Elevation is the angle at which you hold the hair away from the head before you cut. Zero elevation means the hair is flat against the skin; the cut leaves a solid line. Forty-five degrees builds graduation and weight just above the perimeter. Ninety degrees is horizontal to the head and creates uniform layers. Above ninety degrees, up to one hundred and eighty, removes weight from the ends and creates shorter layers on top. The angle is not a style choice on its own: it decides where the weight sits and how long the top layers will be. Change the angle and you change the shape, even with the same section size.
Overdirection is pulling the hair away from its natural fall before cutting. If you comb the hair from the side to the centre back and cut it there, the section gains length when it falls back into place. Overdirecting toward the face shortens the back and lengthens the front; overdirecting toward the back does the opposite. Overdirection is useful for keeping length at the front while tightening the back, and for blending a short side into a longer top. It is also the easiest way to make a cut uneven, because the amount of pull is invisible in the finished shape. Use it deliberately and write the direction on the card.
In plain words, elevation is how high you lift, and overdirection is where you pull. Lift the hair flat and you keep weight; lift it up and you remove weight. Pull it forward and the front gets longer; pull it back and the back gets longer. The client does not need the vocabulary, but the client does need the result, so translate: 'I am keeping the weight at the ends and taking the heaviness out from underneath.' When you teach an apprentice, use the same plain words before the technical ones. A stylist who can say what the angle does can correct it on the head.
Safety is part of the technique. Carry shears closed and pointing down, never open in your hand. Do not walk with the tips forward or put shears in a pocket. If a shear falls, let it fall; do not try to catch it. Keep the blade away from the client's ear and neck when you change your grip, and never cut toward your own fingers. Disinfect shears and combs between clients, and keep a separate set for a client with a scalp condition. When you use a clipper, check the guard is locked before you start and keep the cord away from the chair wheels. A cut takes forty-five to seventy-five minutes; a hand injury takes weeks.
- Use zero elevation for a solid perimeter and 45 degrees for graduation.
- Use 90 degrees for uniform layers and above 90 to remove weight from the ends.
- Decide the elevation before you lift the section, not after the cut.
- Overdirect toward the face to keep the front longer and tighten the back.
- Keep the pull consistent across the section, because uneven pull makes an uneven line.
- Say the effect in plain words to the client before you cut.
- Carry shears closed and pointing down, and let a falling shear fall.
- Lock the clipper guard and keep the cord clear of the chair before you start.
Salon example: Ritu's long front, short back
Ritu wants a bob that is short at the back and long enough at the front to tuck behind her ears. Her hair is medium density and straight, with a slight cowlick at the right temple. If I cut every section at zero elevation, the front will be the same length as the back and will not tuck. I section the hair from the centre back, cut the guide at the nape at zero elevation, and then overdirect the side sections toward the face before cutting. That keeps the front about three centimetres longer than the back. I use forty-five degrees at the back to build a little weight above the perimeter. On the right side, the cowlick lifts the temple hair, so I leave that section a centimetre longer and check it dry. The finished shape is short at the nape, longer at the jaw, and tucks cleanly. I write the elevation and the overdirection on the card so the next cut can repeat it. She says she will try the same tuck at home after her next wash.
Caution: Never carry open shears across the floor or cut toward your own fingers. If a shear drops, step back and let it fall, then pick it up by the handle with the blade closed.
This is a Nandu Nai textbook. It is a private brand book, not a government licence, and it does not give the right to give medical treatment.