
Prep and thin coats
Gel polish lasts because it bonds to a clean, dry plate, and it fails when it bonds to oil, dust, or skin. Prep starts with the cuticle: soften it, push it back, and remove only dead tissue at the edge. Do not cut the living seal, because a cut there will ooze and the product will not sit flat beside it. File the free edge to the shape, then use a soft brush to clear the dust from the side walls and the surface. Wipe the plate with the cleanser the product instructions name, and let it dry. From this point, nothing oily touches the nail: no lotion, no cuticle oil, no hand cream until the top coat is cured.
The base coat goes on thin, in one even layer, with the brush strokes running from the cuticle toward the tip. Keep a small margin at the cuticle so the product does not touch the skin, and cap the free edge with a light pass of the brush. Thin does not mean patchy; it means an even film that the lamp can cure through. A thick base coat cures unevenly, stays soft underneath, and lifts at the edges within a week. If the base looks streaky, smooth it with the brush rather than adding more product. The first layer is the foundation of the whole set, and it is the cheapest place to be patient.
Colour goes on in two thin coats, and the first coat can look slightly sheer. That is normal. A single thick coat looks opaque sooner, but it wrinkles in the lamp, shrinks away from the cuticle, and cures only on the surface. Apply the first coat, cap the edge, and cure for the full time. Apply the second coat the same way, cap the edge again, and cure again. If the colour needs a third coat, use a third thin one rather than a heavy second. Keep the brush moving in the same direction, and do not press hard enough to leave ridges. Between coats, look at the side walls and the cuticle line, and clean any product that has touched skin before it cures.
A clean cuticle gap is not a style choice; it is the difference between a set that lasts and one that lifts. Product that touches the skin bonds to the skin rather than to the plate, and as the skin moves, the seal breaks. Keep a hairline margin all the way around, and check it under the lamp before curing. If gel has touched the skin, wipe it away with a clean brush and the product cleanser, then cure again. Do not flood the gap to hide a short nail or a ragged cuticle line. A slightly larger margin looks deliberate; a flooded line looks bulky and fails first. Learn to see the gap as part of the design.
- 1. Consult, then remove old product with a soak, never with a pry.
- 2. Push the cuticle back, and leave the living seal uncut.
- 3. File the free edge to shape, then brush the dust out of the side walls.
- 4. Wipe the plate with the named cleanser, and keep oil off it until the end.
- 5. Apply a thin base coat, leave a hairline gap, and cap the free edge.
- 6. Cure the base for the full lamp time before the first colour coat.
- 7. Apply two thin colour coats, capping the edge and curing each one fully.
- 8. Check the cuticle line and side walls before the top coat, and clean any skin contact.
Salon example
A client named Alka brings a photo of a milky white gel set and asks for the same look. The technician removes the old polish with a soak, shapes the nails, and pushes the cuticle without cutting. She wipes the plate with cleanser and keeps the bottle of cuticle oil on the far side of the table, out of reach until the end. She applies a thin base coat, caps the edge, and cures it for the full time even though the lamp feels warm and the client is chatting. The first colour coat looks patchy, and Alka asks whether it needs a thicker layer. The technician explains that the second thin coat will cover it and that a thick coat would wrinkle. She applies the second coat, caps the edge, and cures again. She checks the cuticle line under the lamp, finds a tiny dot of gel on the skin, and removes it with a clean brush before the top coat. The set is flat and even, and Alka says it looks like the photo. Three weeks later it has grown but has not peeled.
Caution: A thick gel coat can look dry on top and stay soft underneath.
Cap the free edge and cure fully
The free edge is where a gel set begins to fail, because it is the part of the nail that takes the most impact and loses the most moisture. Capping means running the brush along the cut edge of the nail so a thin film of product wraps around it. Do this on the base coat, on every colour coat, and on the top coat. The cap should be thin, because a heavy bead at the tip looks lumpy and can chip away in one piece. A capped edge seals the layers against water and stops the lifting that starts at the tip and travels back toward the cuticle. It takes a few seconds per nail and it is the highest-value habit in the service.
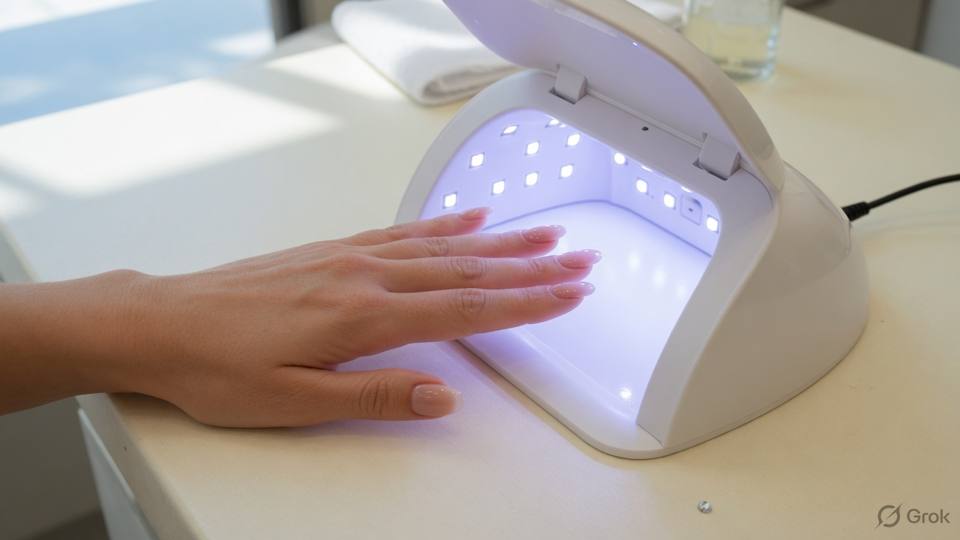
Curing is a chemical reaction, not a drying process, and it needs the full time stated for the product and the lamp. Read the label for the match between the gel and the lamp, and do not assume that every lamp cures every product. Place the hand flat, with the nails facing the light, and do not let the client pull the hand out early to look. If the thumb sits outside the lamp, cure it separately. Replace lamps or bulbs on the schedule the manufacturer gives, because an old lamp still glows while delivering less energy. A lamp that feels warm is not proof of a full cure, and a client who says it is fine is not a substitute for the timer.
Under-cured gel is soft in the middle, and the surface may look perfectly hard. It will wrinkle under pressure, peel at the edge, and sometimes cause a burning or itching sensation days later. If a client reports that the product feels soft or that the lamp stung, check the coat thickness, the lamp, and the cure time before you blame the product. A thick coat needs more energy than a thin one, which is another reason to keep the layers thin. Do not double the time to compensate for a thick coat; remove it and start again. A full cure is cheaper than a removal and a rebuild.
The client's comfort belongs in the curing step. Some clients feel a heat spike as the gel sets, especially on a thin or damaged plate, and some feel it more with a thick coat. Ask before you start whether they have felt this before, and tell them to say if it becomes sharp. If it does, have them lift the hand out, wait a moment, and put it back in, rather than enduring it in silence. That pause does not ruin the cure if the coat is thin and the full time is completed. Never tell a client that pain is normal. It is information about the coat, the plate, or the lamp, and it should change what you do next.
- 1. Read the product label for the lamp match and the stated cure time.
- 2. Place the hand flat so all five nails face the light.
- 3. Cure the base coat for the full time before any colour.
- 4. Cap the free edge thinly on the base, each colour, and the top coat.
- 5. Keep every coat thin, and cure each one for the full time.
- 6. Cure a thumb separately if it sits outside the lamp.
- 7. Replace lamps and bulbs on schedule, and keep a log of the change.
- 8. If the client feels a heat spike, pause, then finish the full cure.
Salon example
A client named Rohan books a gel manicure before a job interview and asks for a dark blue that will not chip. The technician applies a thin base, caps the edge, and cures it fully. She applies two thin colour coats, capping each one, and checks the timer each time rather than counting in her head. Rohan says the lamp feels hot on the second coat and asks her to take the hand out early. She explains that the heat comes from the gel setting and that pulling out early would leave the coat soft, so she has him lift the hand for a few seconds and then put it back for the rest of the time. She cures the top coat fully and checks the edge with her thumbnail. At the end she tells him to keep the nails dry for a few hours and to book a removal rather than peeling if an edge lifts. The set survives the interview and two weeks of typing, and the only wear is a small smooth spot at one tip. He also books the removal at three weeks, before the edge has a chance to lift.
Caution: An uncapped edge and a short cure are the two fastest routes to peeling.
Soak off, never pry
Removal starts with the top coat, not with a metal tool. File the surface of the top coat to break the seal, taking care to stay on the product and off the natural plate. Then soak a cotton pad in the remover named for that gel, place it on the nail, and wrap the finger in foil or a clip so the pad stays in contact. Wait the full soak time. The product should look dull, soft, and slightly lifted at the edges when it is ready. If it is still firm, wrap it again rather than reaching for a pusher. A second soak costs minutes; a pried nail costs weeks of thin, peeling plate.
When the product is soft, remove it with a gentle pusher or an orange stick, working from the edge inward and keeping the tool almost flat against the product. Do not dig under the product to lift it. Do not scrape the plate to get the last patch. If a small amount remains, re-wrap that nail and wait again. After removal, wipe the nail, look at the plate for white spots, bends, or separation, and oil the nail and the cuticle. If the plate looks thin or feels sensitive, do not apply a new set that day; offer a rest, a strengthener, or a plain polish, and book the next gel for a later date.
Prying is the most common cause of long-term nail damage in a salon. Gel bonds to the plate, and when it is levered off before it is soft, it takes layers of keratin with it. The plate becomes thin, bends under pressure, and peels in sheets. The client feels the damage for weeks after the gel is gone, and the next set lifts early because the surface is uneven and weak. The damage is not always visible in the chair. A plate can look normal and still be thin enough to flex, and flexing is what breaks the seal on the next application. This is why the rule is absolute: soak off, never pry.
Removal is also a chance to inspect. Look at every nail with the product gone, and compare the ten. Check for green staining, separation, a new dark line, or a crumbly edge. If you find something you would not cover, say so now, while the nail is bare and the client can see it. Explain that the nail needs a rest or a referral, and resist the request to put a fresh set on immediately to hide it. The removal appointment is the moment when the salon's honesty is most visible, because the client is looking at the same ten nails you are. Use it to teach, not to sell.
- 1. File the top coat to break the seal, staying off the natural plate.
- 2. Soak a pad in the correct remover and wrap it firmly on the nail.
- 3. Wait the full soak time, and check whether the product has softened.
- 4. Re-wrap a nail that is still firm instead of reaching for a tool.
- 5. Remove soft product with a pusher held almost flat, working inward.
- 6. Never lever, chip, bite, or scrape the product off the plate.
- 7. Inspect all ten nails after removal, and note anything you would not cover.
- 8. Oil the nails and cuticles, and book a rest day if the plate is thin.
Salon example
A client named Tanya comes in with a gel set that is five weeks old and two nails that have already been picked at home. The technician files the top coat, wraps all ten nails, and sets a timer. When the timer goes, eight nails are ready and two are still firm at the edge. She re-wraps those two and waits again. Tanya says she is in a hurry and asks the technician to just lift the last of it with the pusher. The technician refuses, explains that the product is still bonded, and shows her the white marks on the nails she picked at home, where layers of plate came away with the gel. She finishes the removal gently, oils the nails, and recommends a two week rest with a strengthener instead of a new set. Tanya is not pleased, but she books the rest appointment, and at the next visit the plate looks smoother. The technician writes the removal date and the rest advice on the card, and Tanya stops picking at her gel between appointments. Tanya leaves with a small bottle of oil and a removal booked for four weeks.
Caution: If you have to force it, it is not ready to come off.
This is a Nandu Nai textbook. It is a private brand book, not a government licence, and it does not give the right to give medical treatment.